

Mux App Installation Guide
Mux is a video infrastructure platform that provides APIs for encoding, streaming, hosting, and delivering on-demand and live video content at scale.
The Mux App integrates Mux's video infrastructure directly into Contentstack, allowing you to seamlessly upload, manage, and deliver videos, including configuration for public or signed playback, all from within your Contentstack entries.
Prerequisites
- Mux account
- Contentstack account
- Access to the Contentstack Organization/Stack as the Owner/Admin
Follow this step-by-step guide to install and configure Mux within your stack.
Steps for Execution
- Retrieve your credentials from Mux
- Install and configure the Mux app in Marketplace
- Use the Mux app within your stack
-
Retrieve your Credentials from Mux
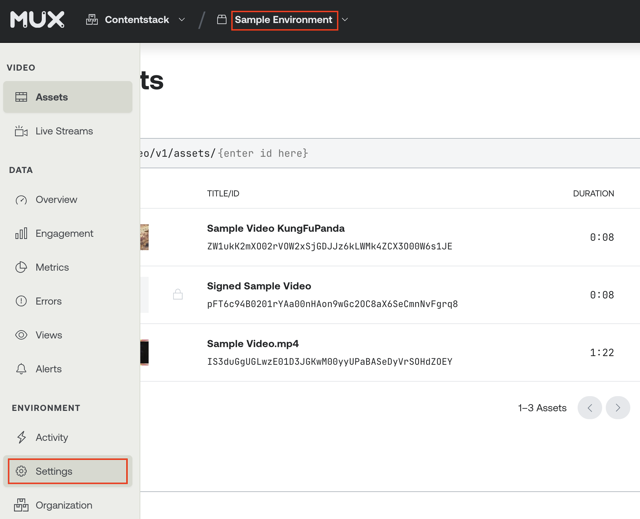
To get the credentials for Mux, log in to the Mux account. Create a new Environment or select an existing one in your organization, and click Settings from the left-navigation.
Then, follow the steps given below:
Get Access Token ID & Secret Key
- Navigate to Access Tokens from the left navigation, and click the Create token button.
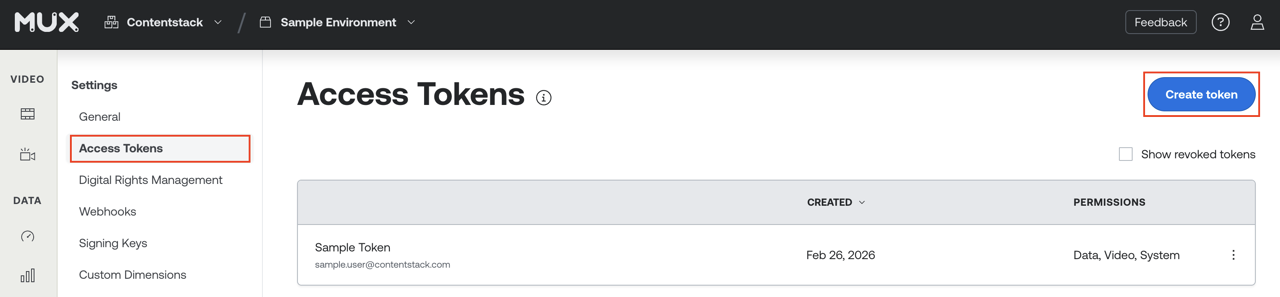
- In the Create access token modal, enter the Name, provide Permissions, and click Save.

Tip: Grant System > Write permission to easily access the signed (private) assets.
- Copy the Token ID and Secret Key from the Save token modal, and click Done.
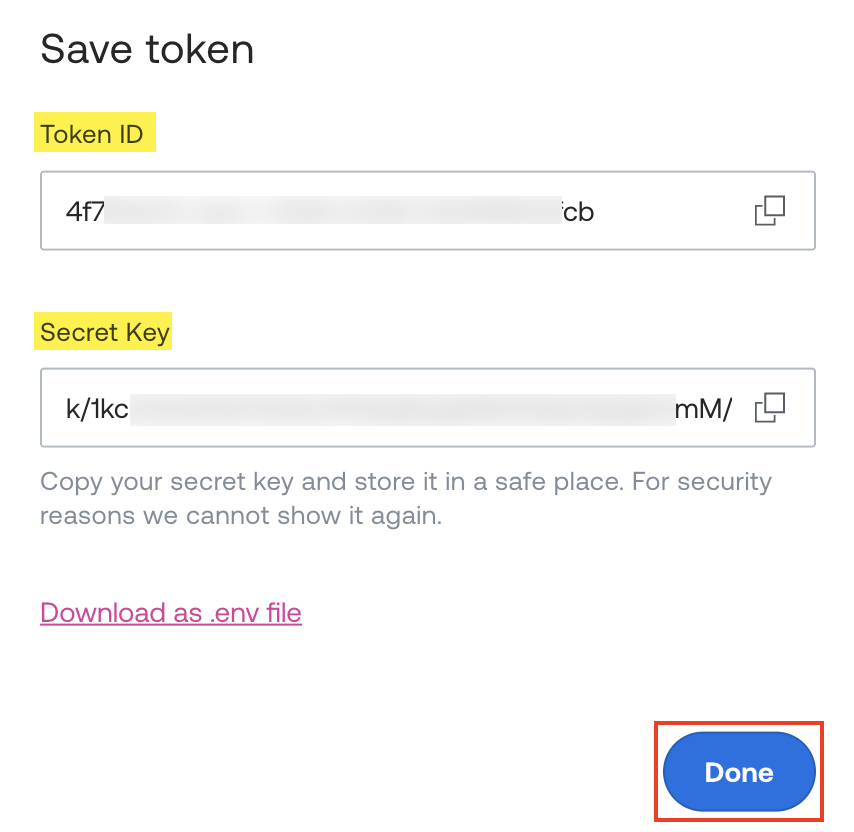
- You can fill the Token ID as Access Token ID and Secret Key as Mux Secret Key during app configuration in step 2.
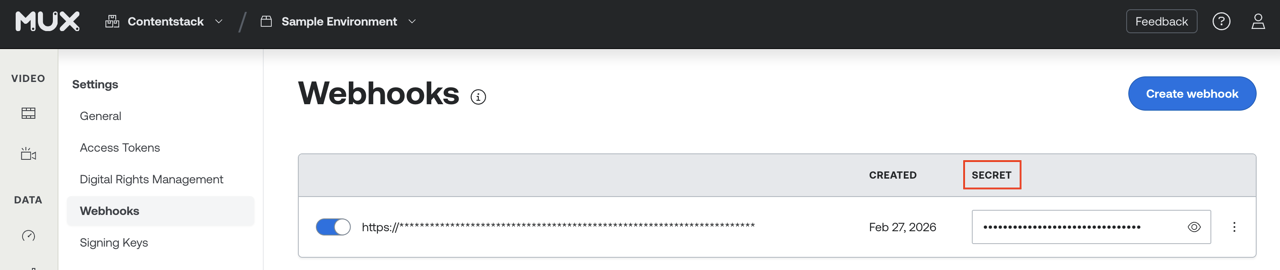
Get Webhook Signing Secret
- Navigate to Webhooks from the left navigation, and click the Create webhook button.
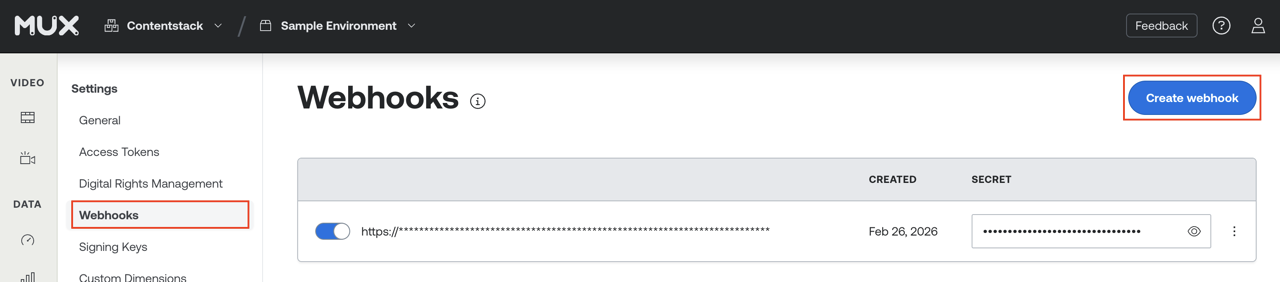
- In the Create webhook modal, provide the URL (Webhook URL), and click Save.
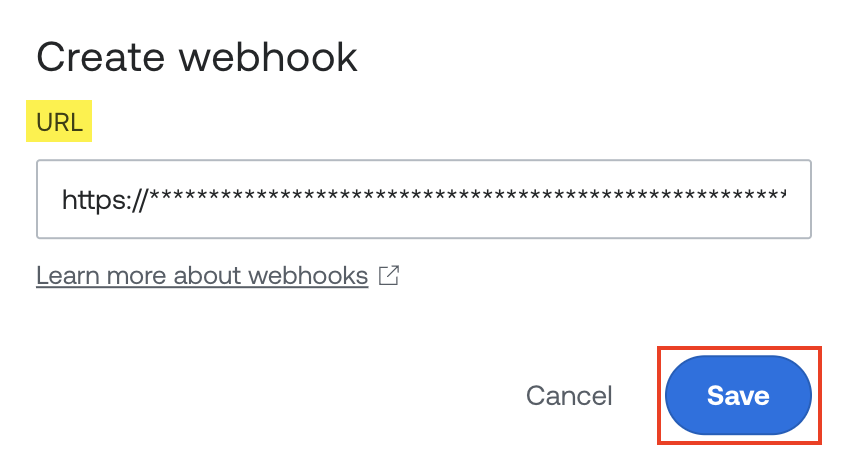
Note: You will get the system-generated Webhook URL in step 2 during app configuration.
- Copy the SECRET to use in the Webhook Signing Secret field in step 2 to verify the connection.
- Navigate to Access Tokens from the left navigation, and click the Create token button.
-
Install and Configure the Mux App in Marketplace
To install the app, log in to your Contentstack account and follow the steps below:
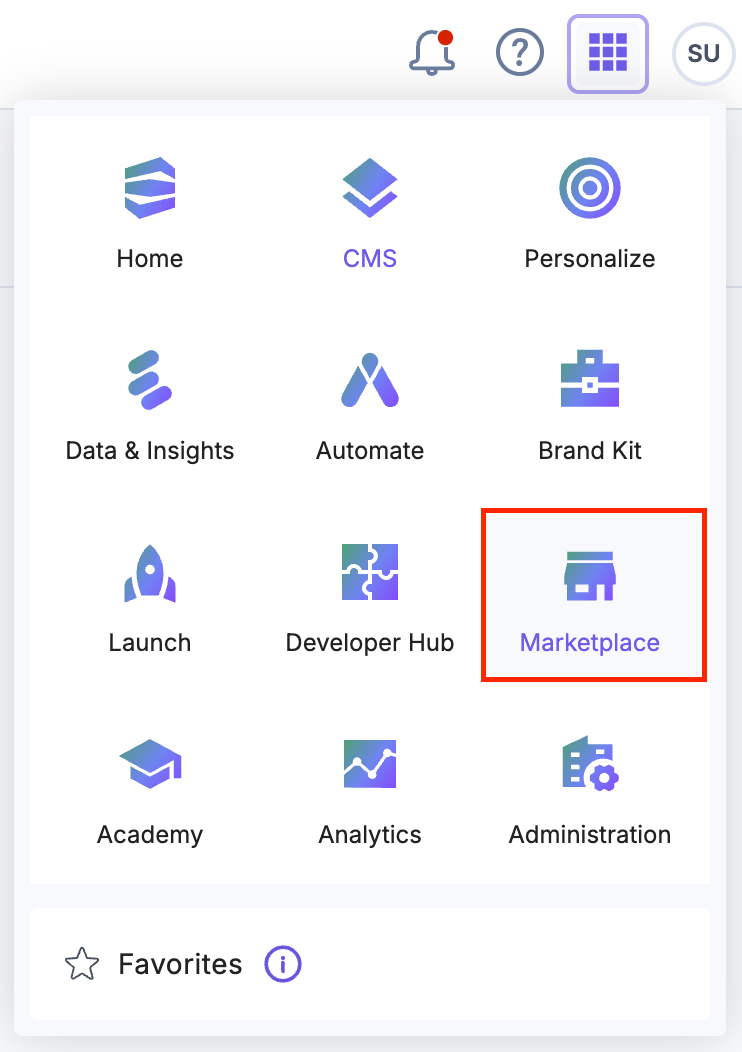
- Navigate to the “App Switcher” icon in the top-right corner and click Marketplace.
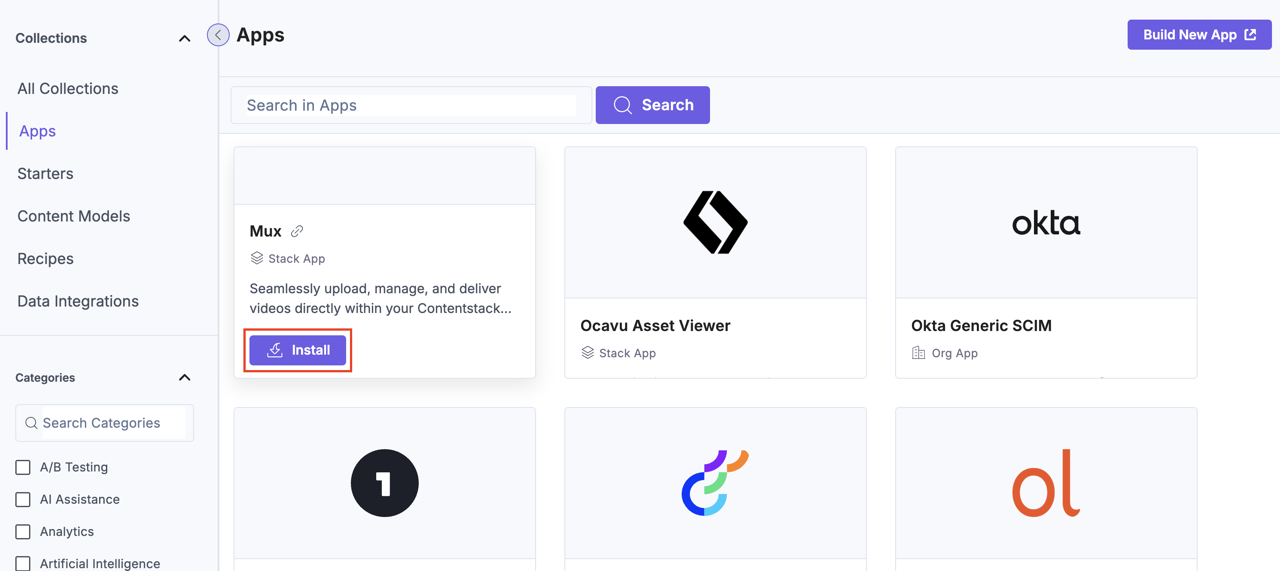
- Click Apps from the left panel.
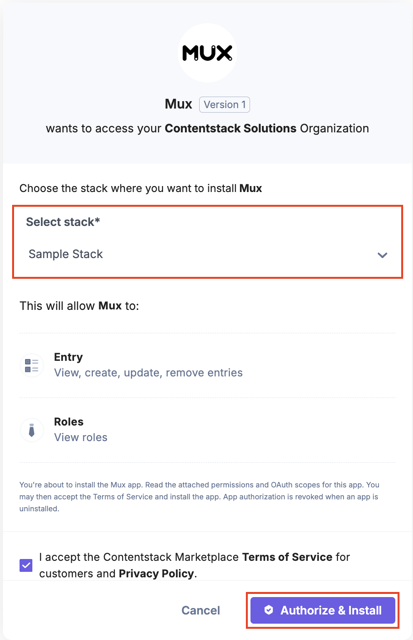
- Within the Marketplace, you can see the available apps. Hover over the Mux app and click Install.
- In the pop-up window, select the stack where you want to install the Mux app, accept the Terms of Service, and click the Authorize & Install button.
- On the Configuration screen, perform the following steps:
- To connect Contentstack with your Mux account, you need to authenticate first. Provide the Mux Access Token ID and Mux Secret Key retrieved in step 1. After entering the credentials, click Authenticate to verify and establish the connection.
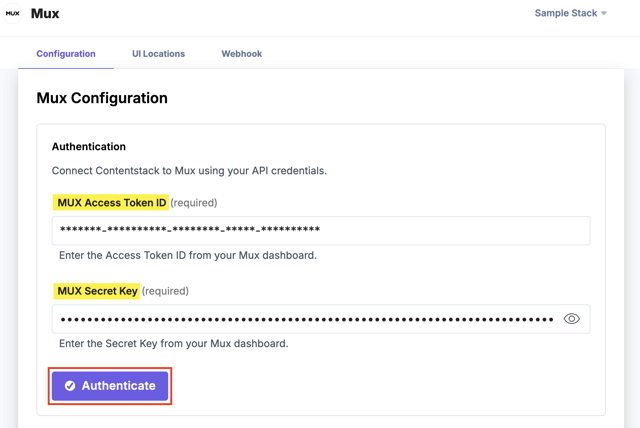
Warning: Enter valid credentials. If you enter an incorrect Access Token ID or Secret Key, the app fails authentication and does not function properly.
Once authenticated, you can configure upload settings, webhook details, and playback options for your videos.
- In the Uploads & Webhooks section, click the Enable Uploads toggle to allow users to upload videos directly from entries.

After enabling uploads:
- Set the Max Upload Limit from 1 to 200.
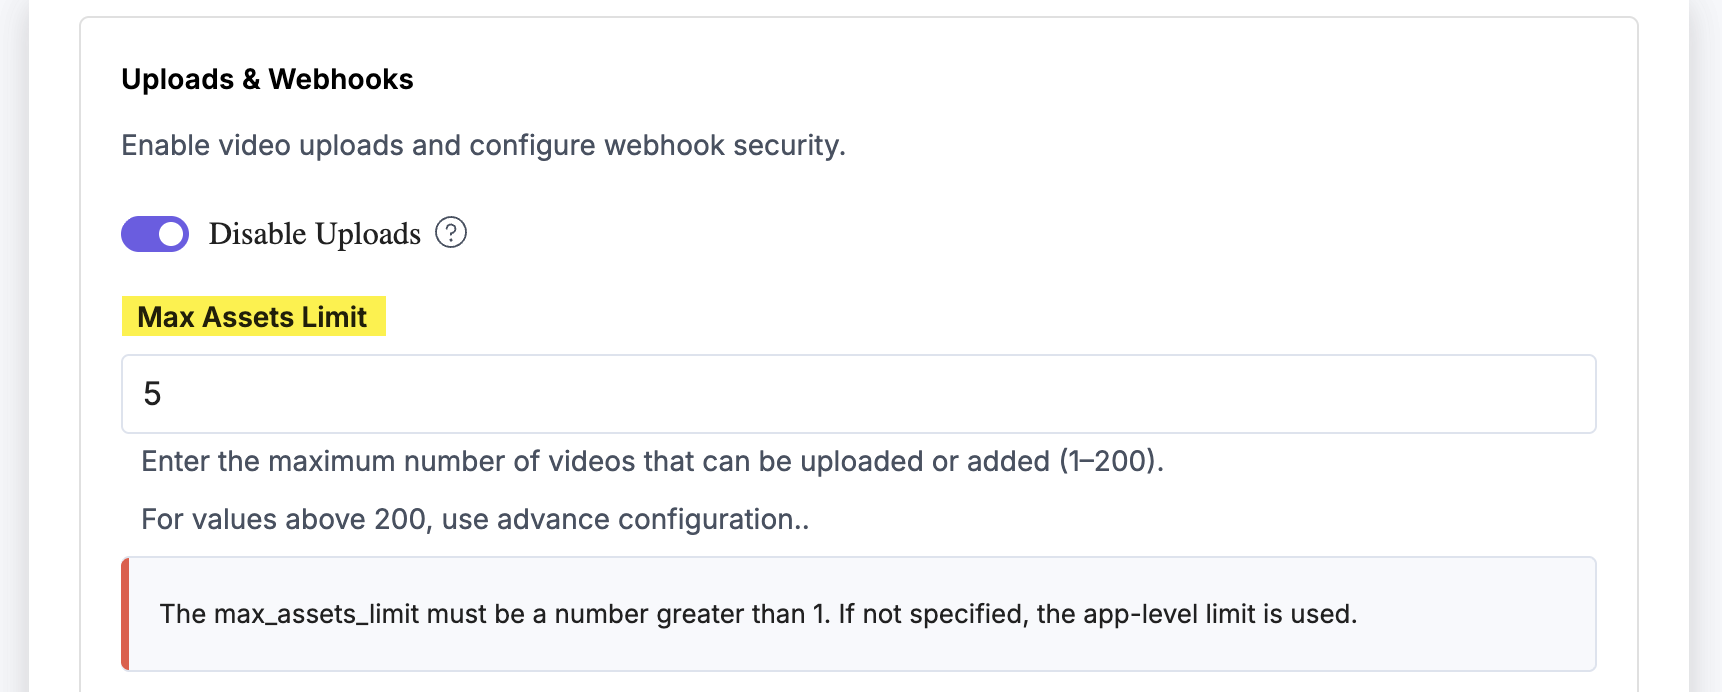
Note: To set the Max Upload Limit above 200, refer to the Set Advanced Config Object section.
- To configure the webhooks in your Mux app, copy the system-generated Webhook URL that receives Mux webhook events, and use it to fetch the Webhook Signing Secret.

Note: To retrieve the Webhook Signing Secret, refer to the Get Webhook Signing Secret section.
- Paste the Webhook Signing Secret to verify the connection. This configuration allows Mux to send asset events (such as asset creation and processing updates) back to Contentstack and update entry versions automatically.
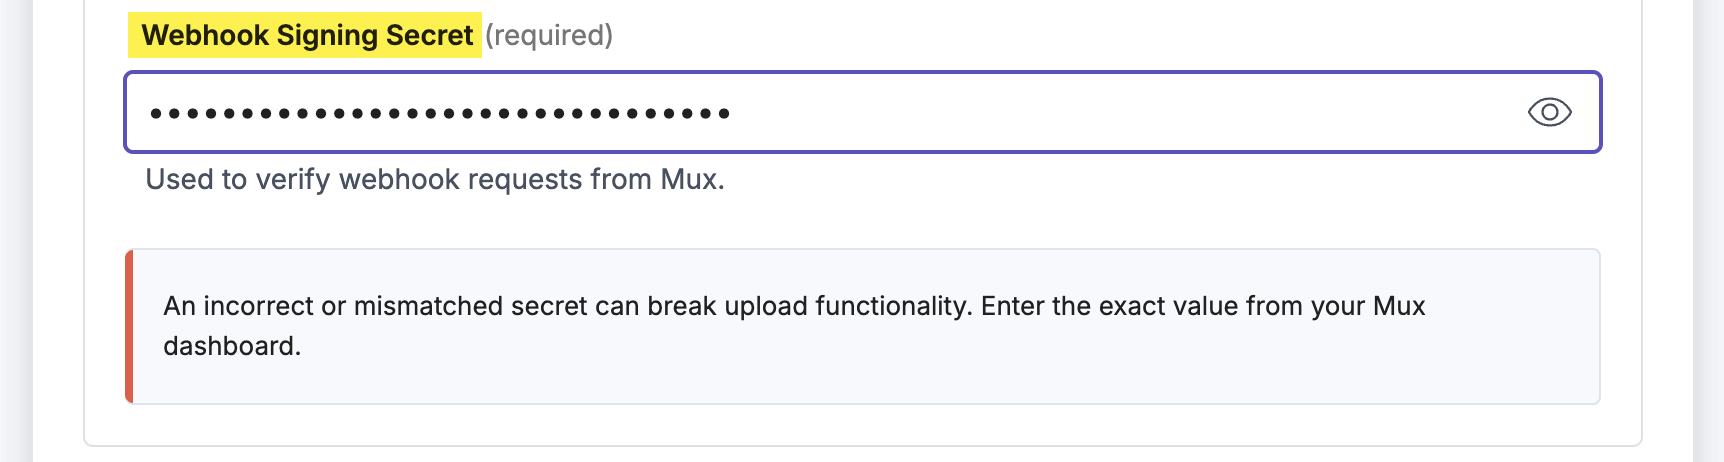
Warning: Upload functionality does not work unless you configure the webhook correctly in your Mux account.
- Set the Max Upload Limit from 1 to 200.
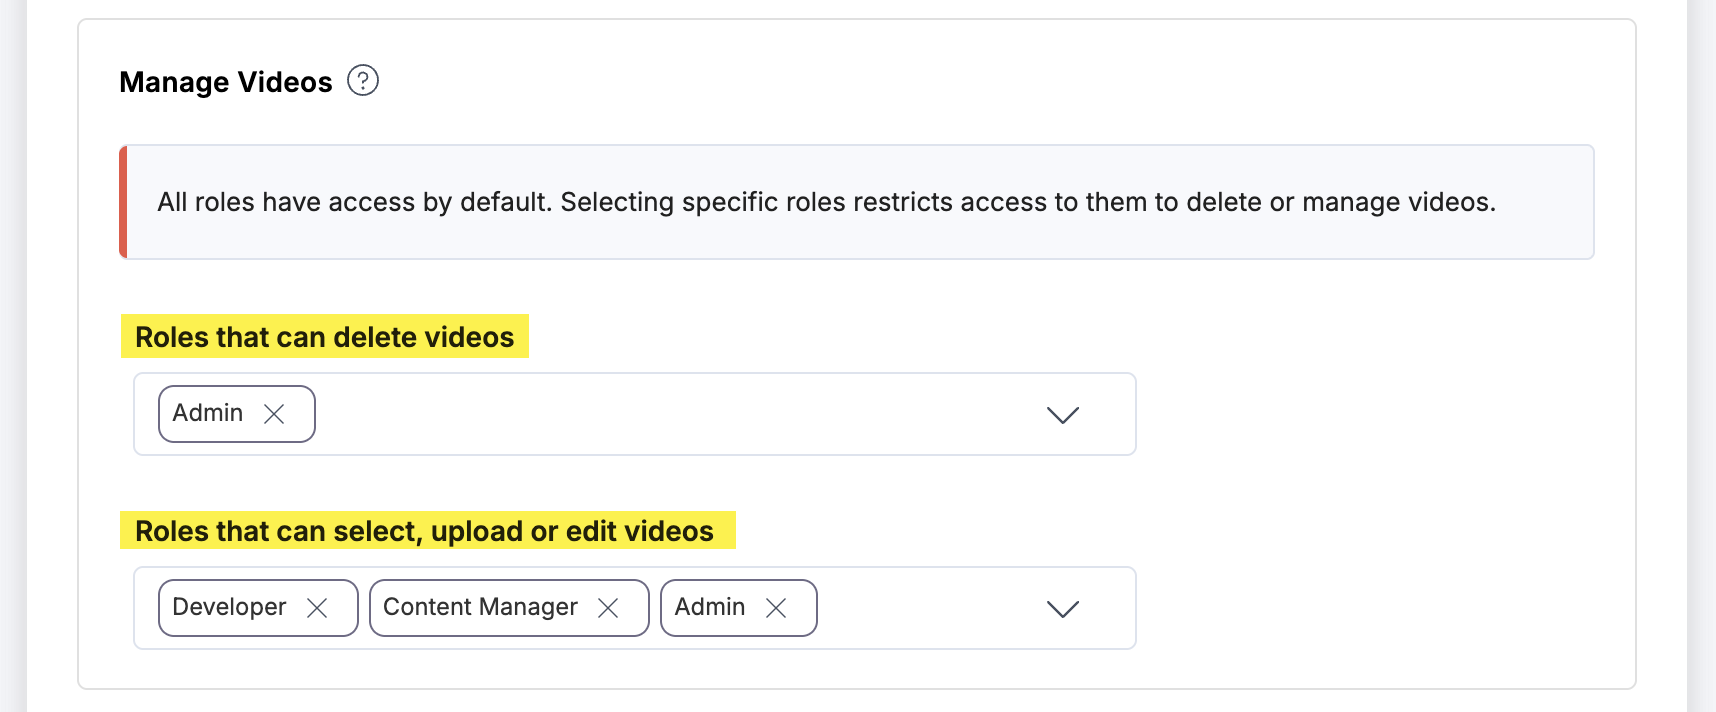
- In the Manage Videos section, select which specific roles (e.g., Admin, Developer, or Content Manager) are authorized to manage video assets.
- Roles that can delete videos: Allow users to remove existing videos.
- Roles that can select, upload, or edit videos: Allow users to add, select, modify, or update video assets.
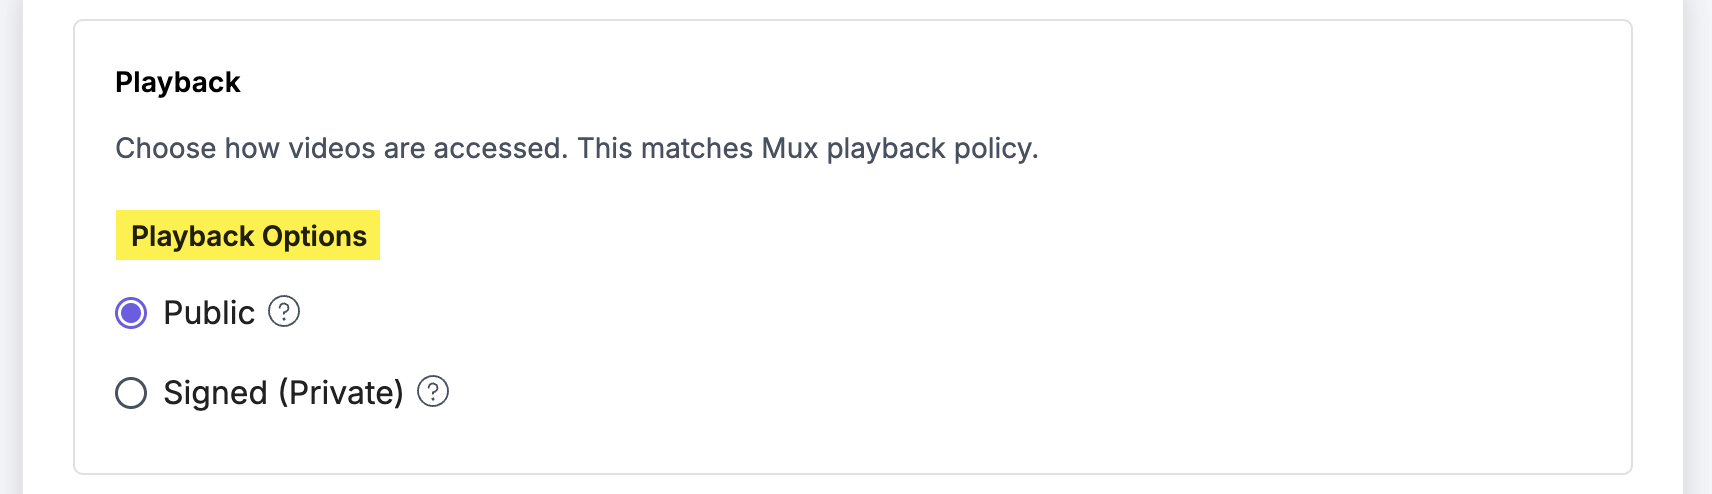
- In the Playback section, choose how videos are accessed:
- Public: Anyone with the playback URL can access the video.
- Signed (Private): The video requires a signed playback token and remains accessible for a limited duration.
Note:
- Select the playback option that matches your Mux playback policy. If you choose Signed (Private), the app generates and manages playback tokens automatically.
- If Mux Authentication credentials do not have System > Write permissions, the Signed (Private) asset option is disabled.
- Choose the Mux Keys to Save in Entry: Choose how to save the data fetched from the Mux account in Contentstack entries.
- If you select the All Fields option, you can select only a limited number of videos in the entry.
- For Custom Fields, you can search and add specific Mux videos you want to save in entries.
Note: When you change the settings from All Fields to Custom Fields, and vice versa, any existing and newly added assets in the entry will store the data according to the updated configuration settings.
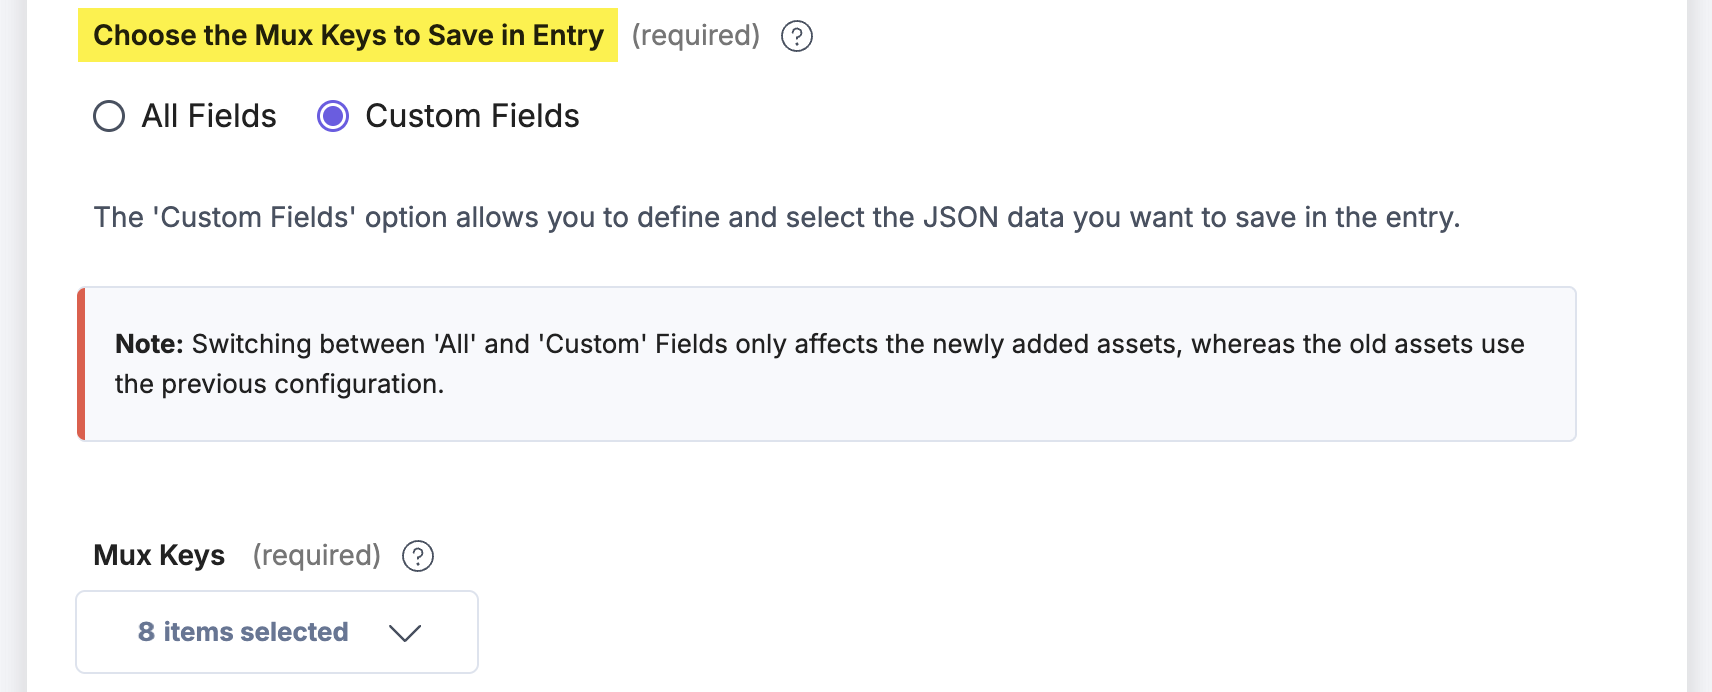
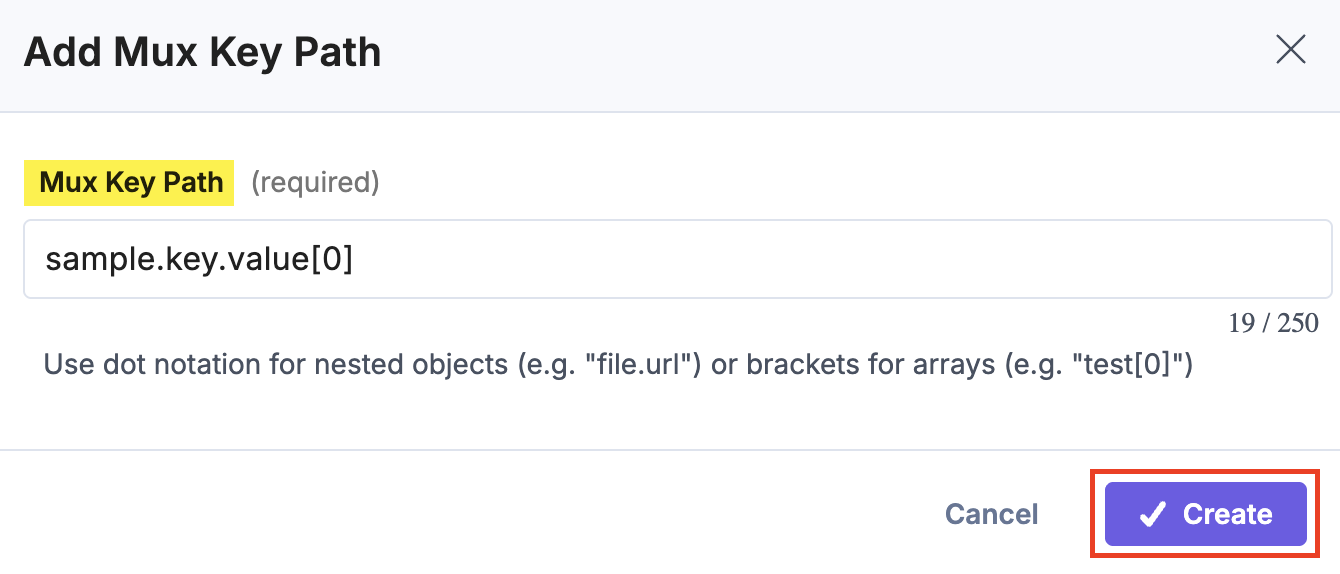
If you select Custom Fields then the Mux Keys drop-down appears. By default, id, tracks, status, playback_ids, duration, created_at, passthrough, and meta keys are already selected inside the dropdown. If you want to create a new key, click the + New Key Field option.
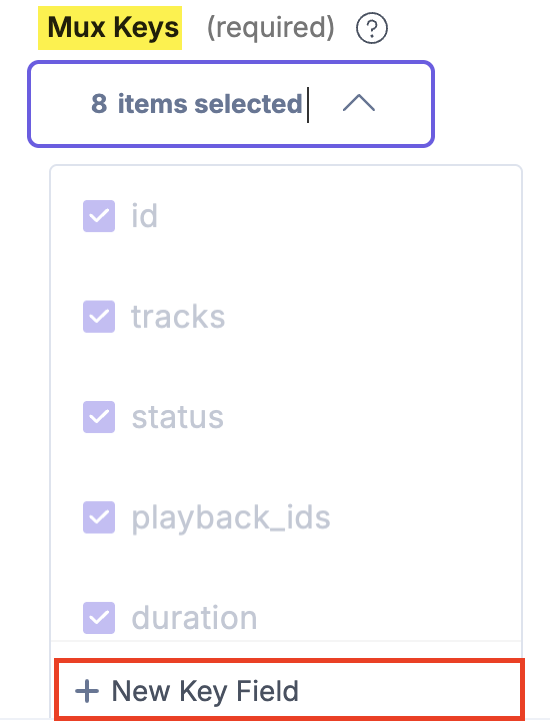
In the Add Mux Key Path modal, enter the Mux Key Path and click the Create button to create a new key.
- After adding the configuration details, click the Save button.
- On the UI Locations tab, you can see the predefined app location (Custom Field UI location). You can use the toggle button to enable or disable it based on your requirements.
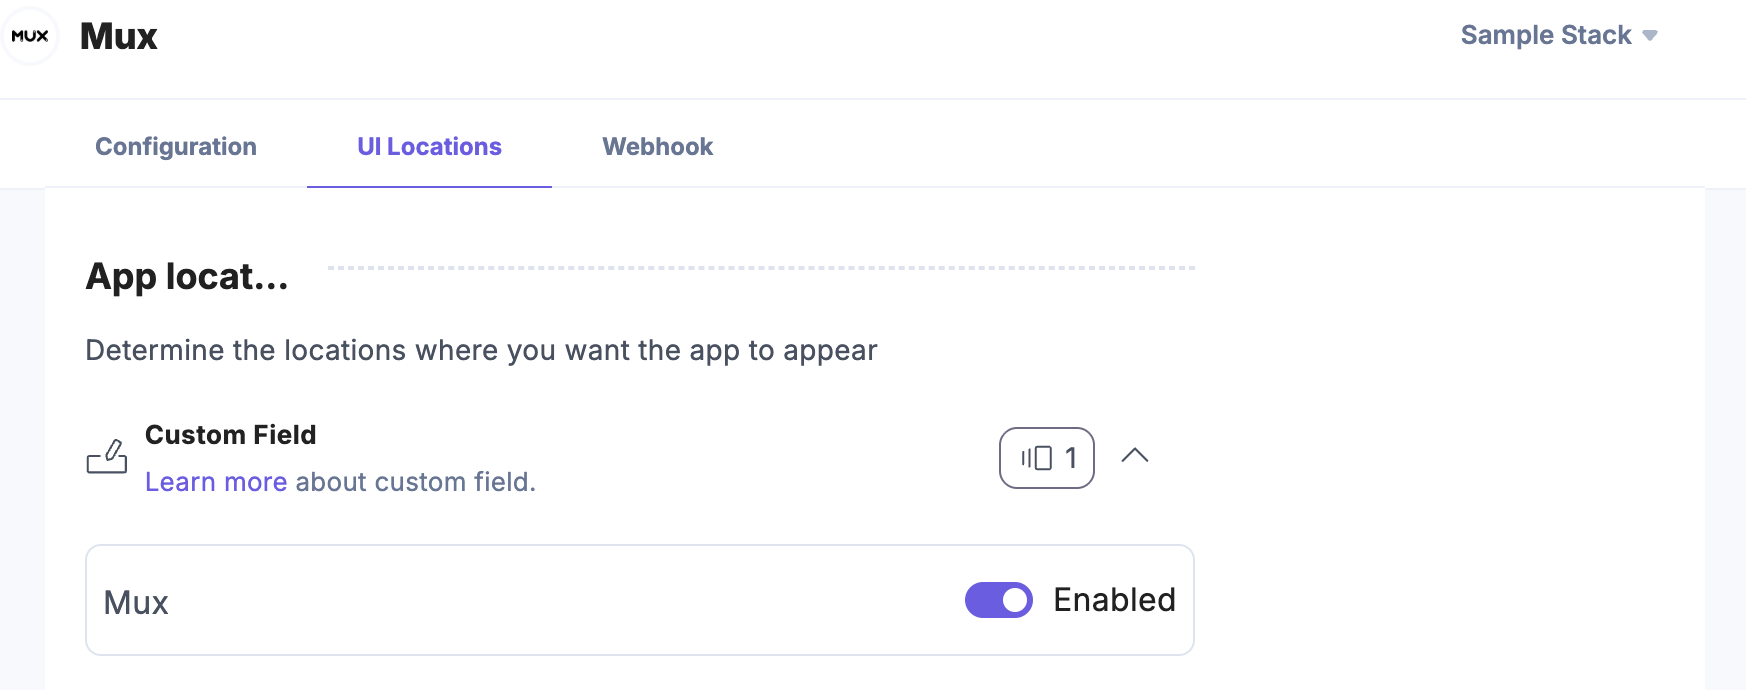
- If the webhook is enabled for your app, you can view the Webhook Logs under the Webhook tab.
Additional Resource: For more information on UI locations, please refer to the Installed Apps guide.
- Click Open Stack to start using the Mux app.
- To connect Contentstack with your Mux account, you need to authenticate first. Provide the Mux Access Token ID and Mux Secret Key retrieved in step 1. After entering the credentials, click Authenticate to verify and establish the connection.
- Navigate to the “App Switcher” icon in the top-right corner and click Marketplace.
-
Use the Mux App Within your Stack
To use the Mux app within an entry of your stack, follow the steps given below:
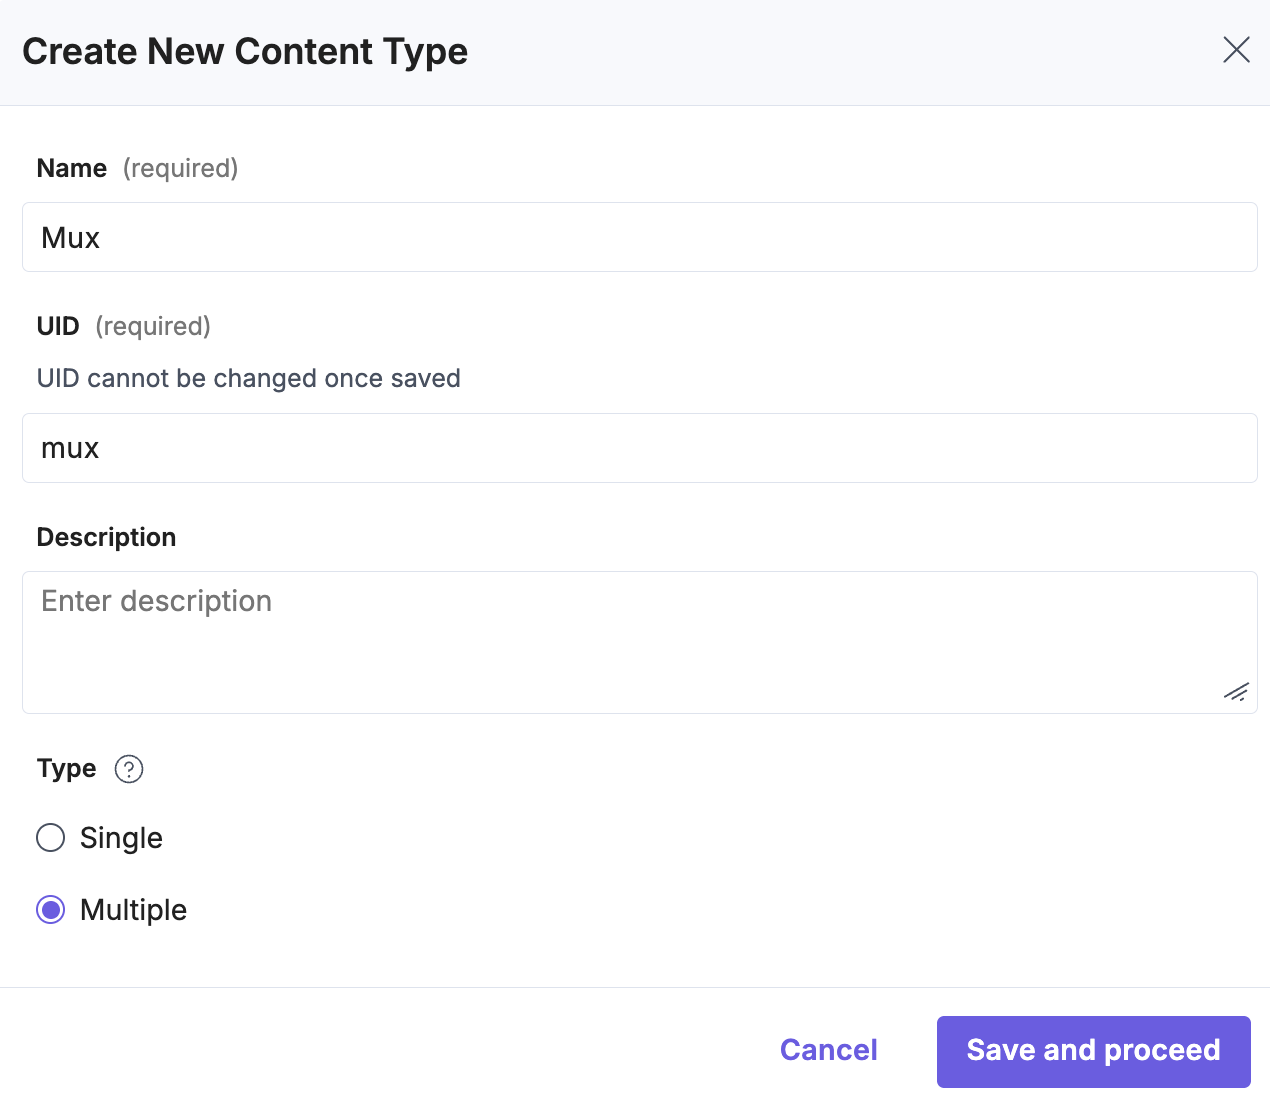
- Navigate to the stack dashboard, click Content Models in the header, then New Content Type. From the dropdown, select Create New.
- Create a content type by adding relevant details as displayed below:
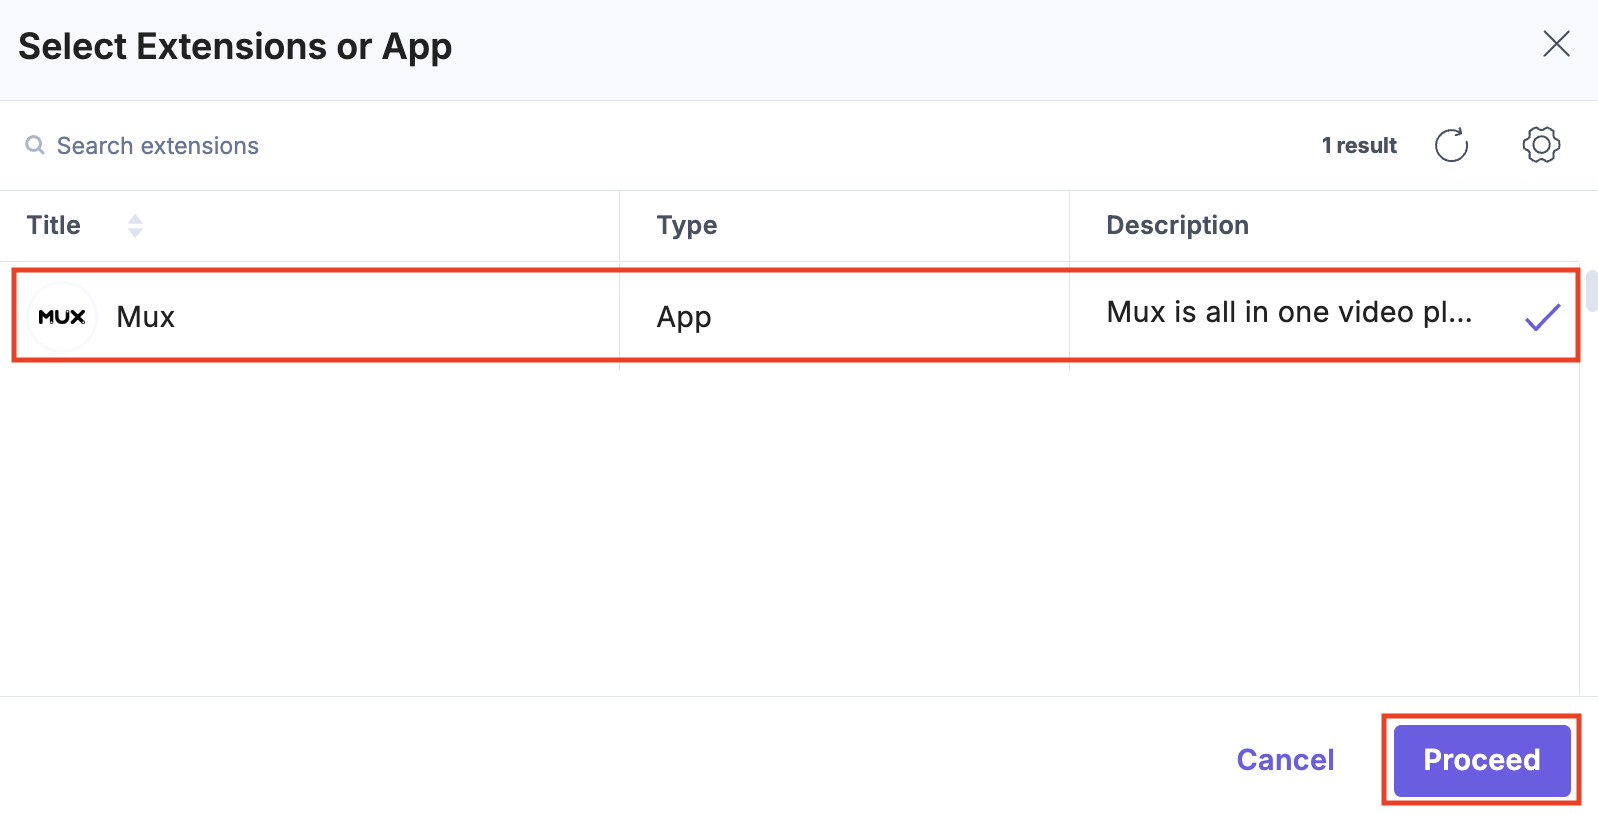
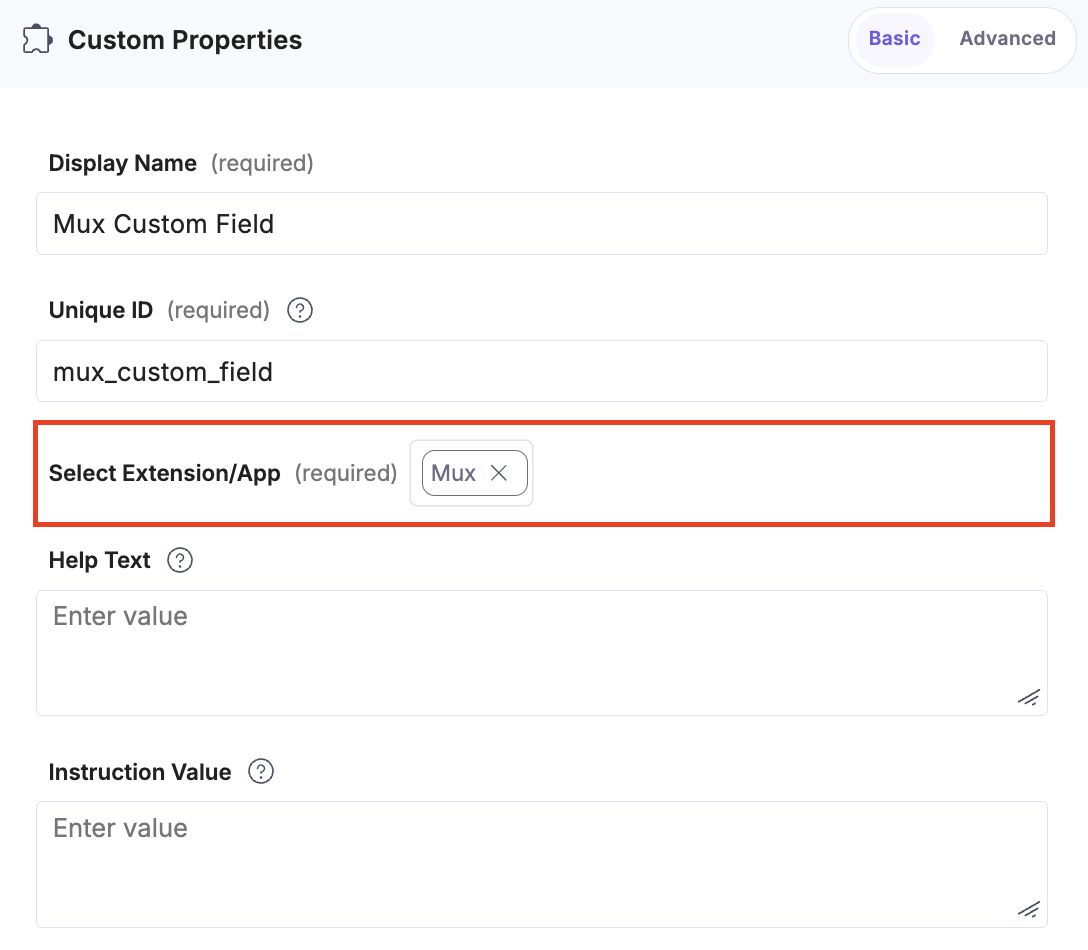
- In the Content Type Builder page, add a Custom field by clicking the Insert a field link represented by a + sign.
- Under Select Extension or App, select Mux and click the Proceed button.
Change the Display Name of the custom field to your choice, for example, Mux Custom Field. Optionally, you can add Help Text and Instruction Value as required. This adds Mux in the custom field.
Additional Resource: To set the maximum upload limit, refer to the Set Advanced Config Object section.
- After adding the app, click Save or Save and Close to save your changes.
- To use the Mux app, create an entry for this newly created content type. Navigate to Entries in the header, click + New Entry to create an entry within the same content type, and click Proceed.
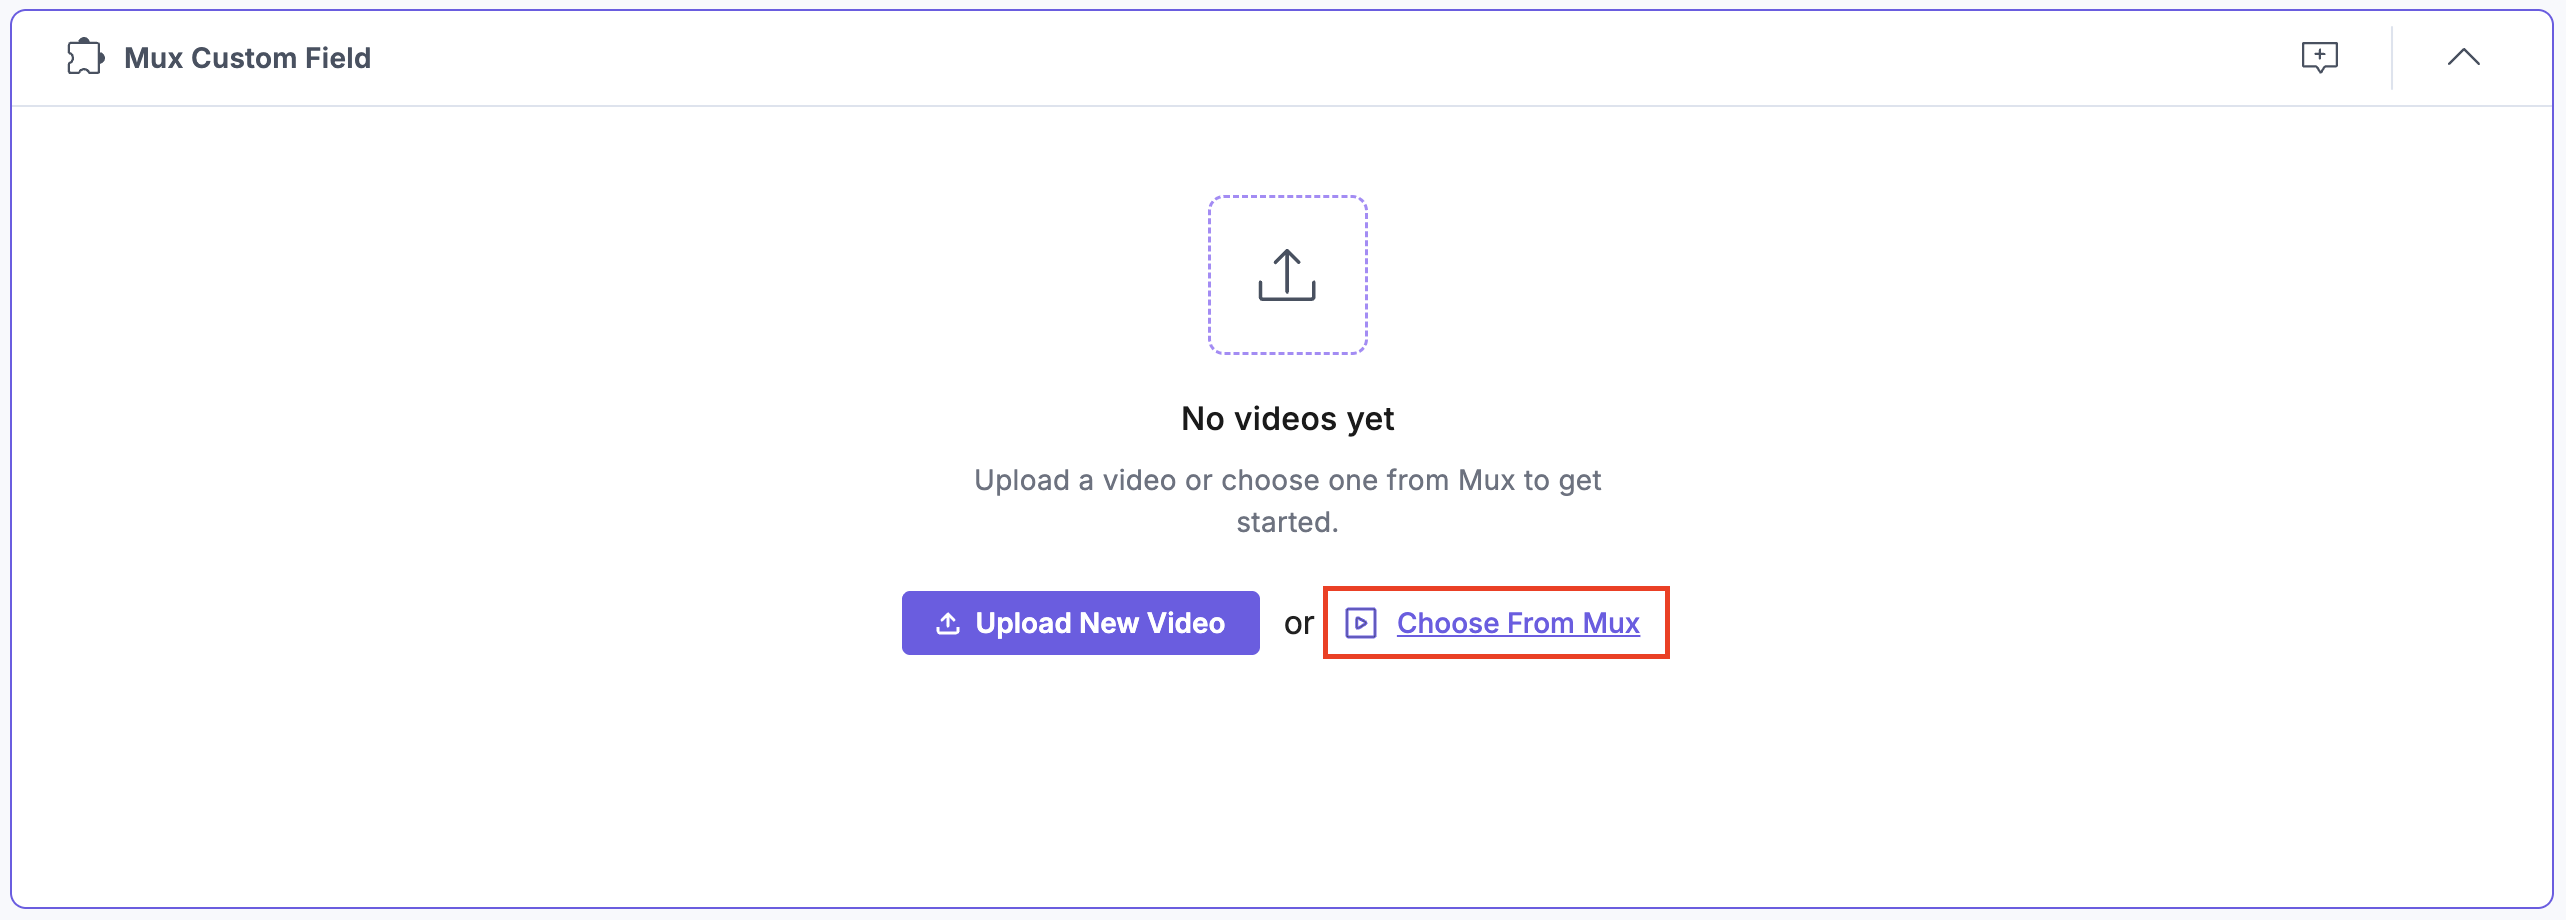
You can see the Mux app’s custom fields on your entry page. Provide the entry title and click Save to ensure the entry has at least one version.
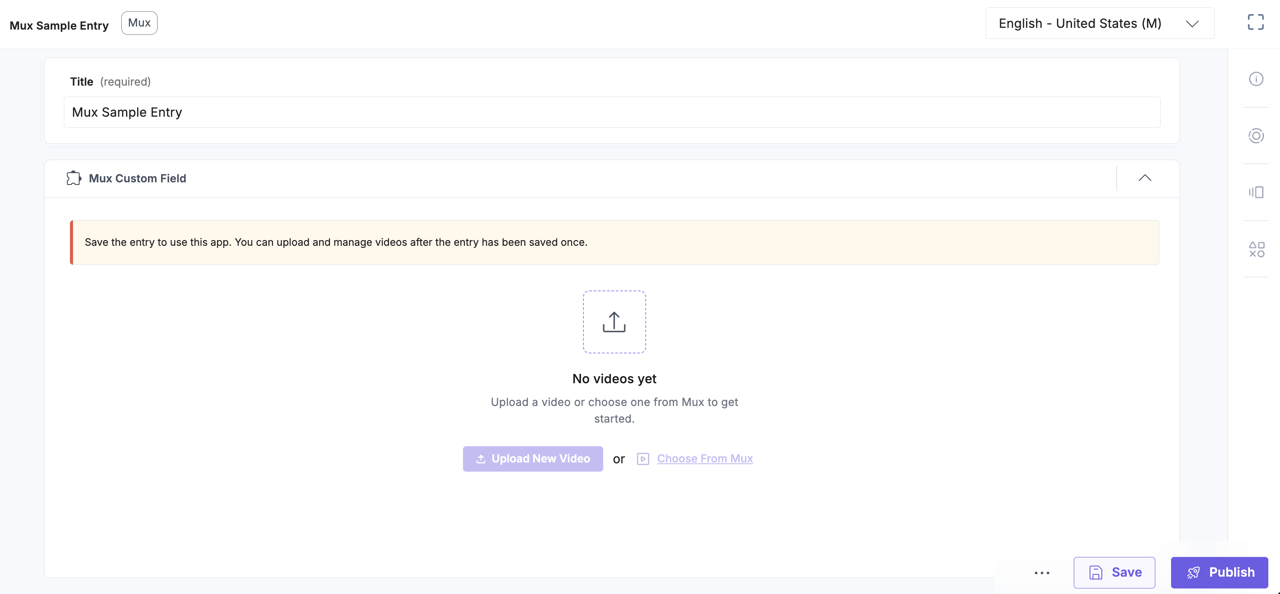
Warning: It is mandatory to save the entry before you upload a video or choose one from the Mux library, otherwise the action will fail.
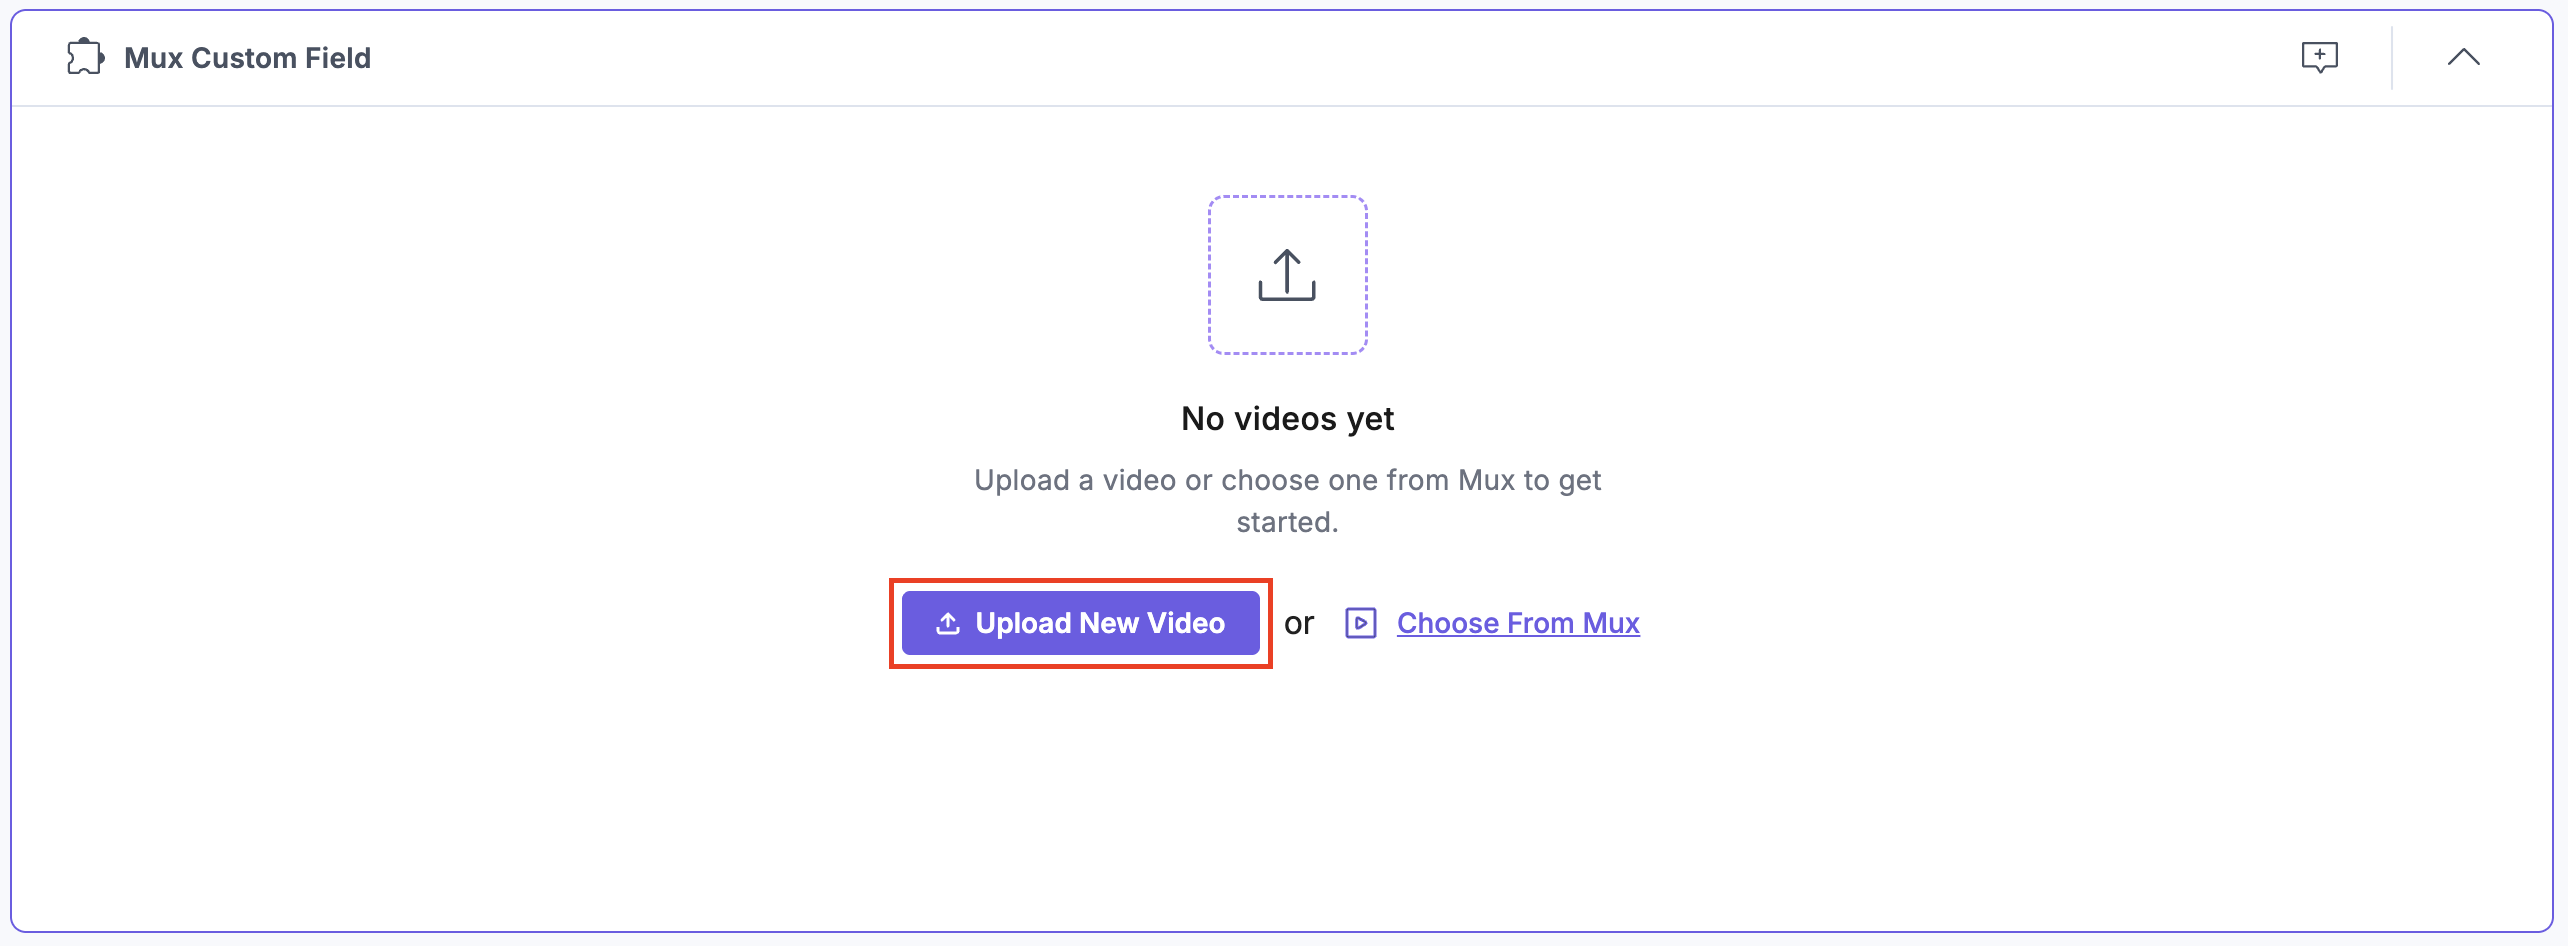
Upload New Videos
- To upload a video within the custom field, follow the steps:
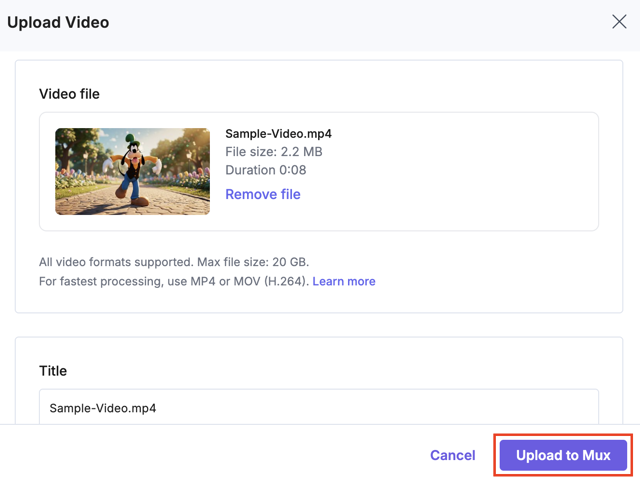
- Click the Upload New Video button and select the desired video.
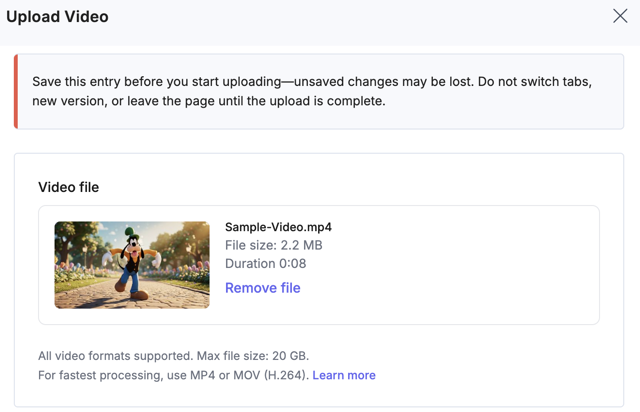
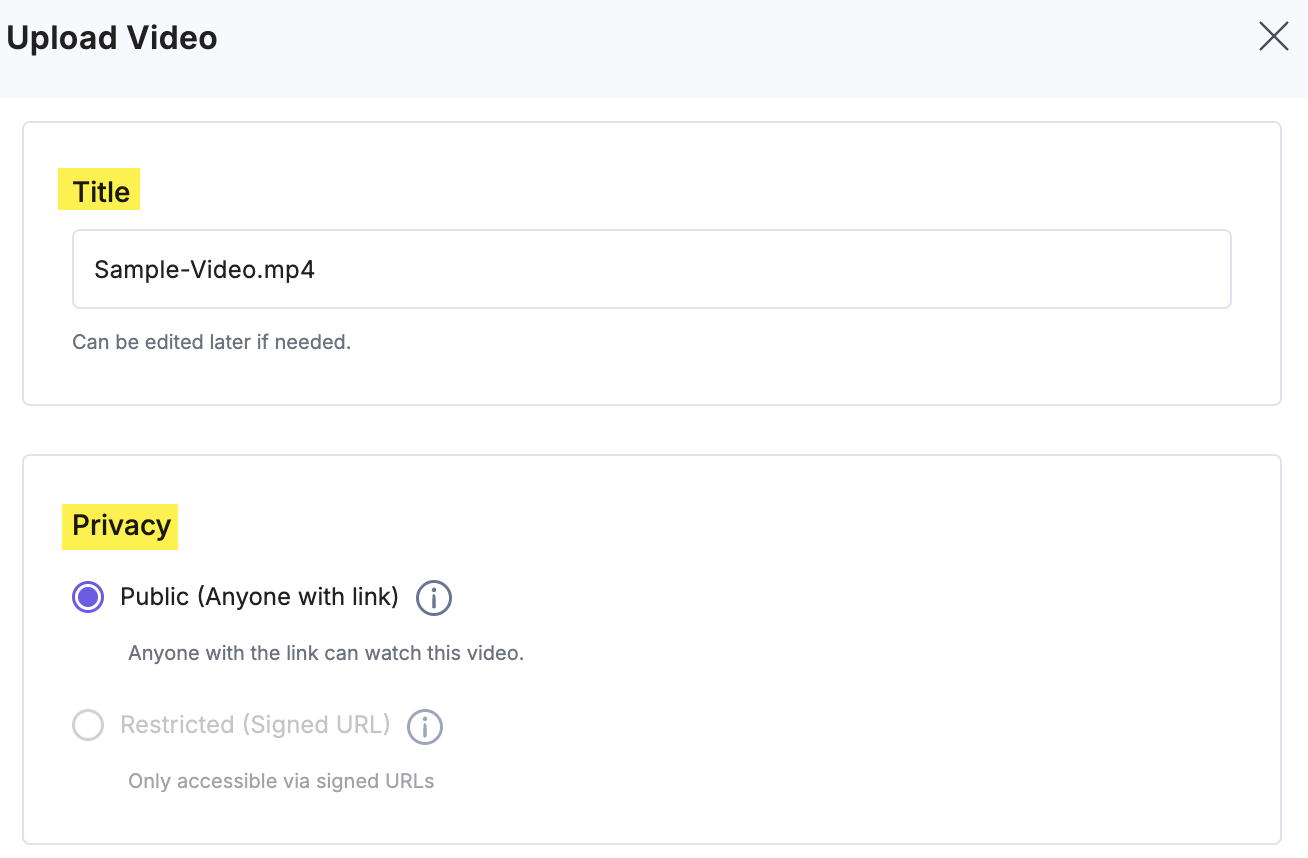
- In the Upload Video modal, you can preview the video details (such as File size and Duration), and also remove or replace the file by clicking Remove File.
- You can update the video Title and view the Privacy settings (Public or Restricted). The Privacy settings were configured in the Playback section during app configuration in step 2.
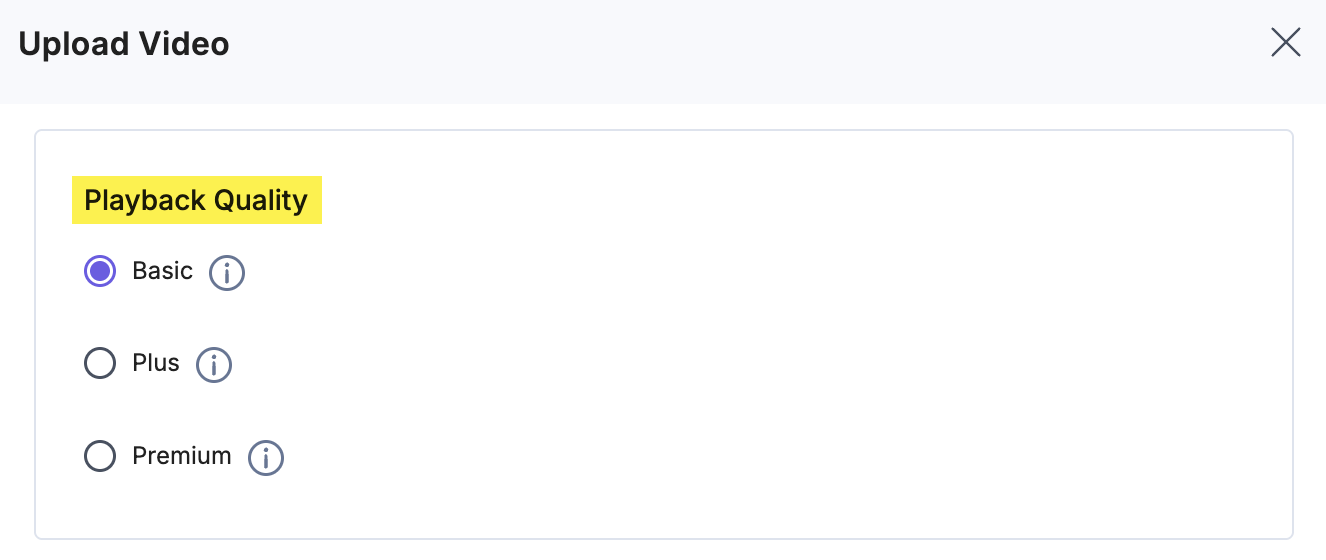
- Set the Playback Quality by choosing from Basic, Plus, or Premium options. These settings correspond to different bitrates and resolutions, such as 360p, 480p, or 1080p.
- You can select auto-generated Captions. You can select the preferred language or Auto-detect to get the video language.
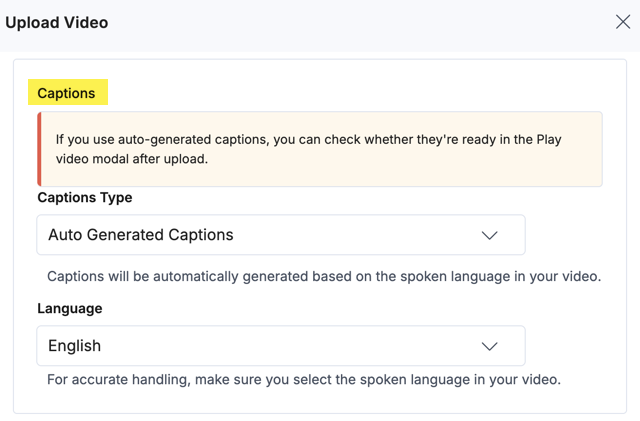
Note: Languages marked as Beta may not support translation.
- To support legacy devices, social media sharing, offline viewing, or transcription services, you can generate static MP4 renditions of your video, by selecting the Standard (Highest Resolution) and Audio Only options in the MP4 Generation settings.
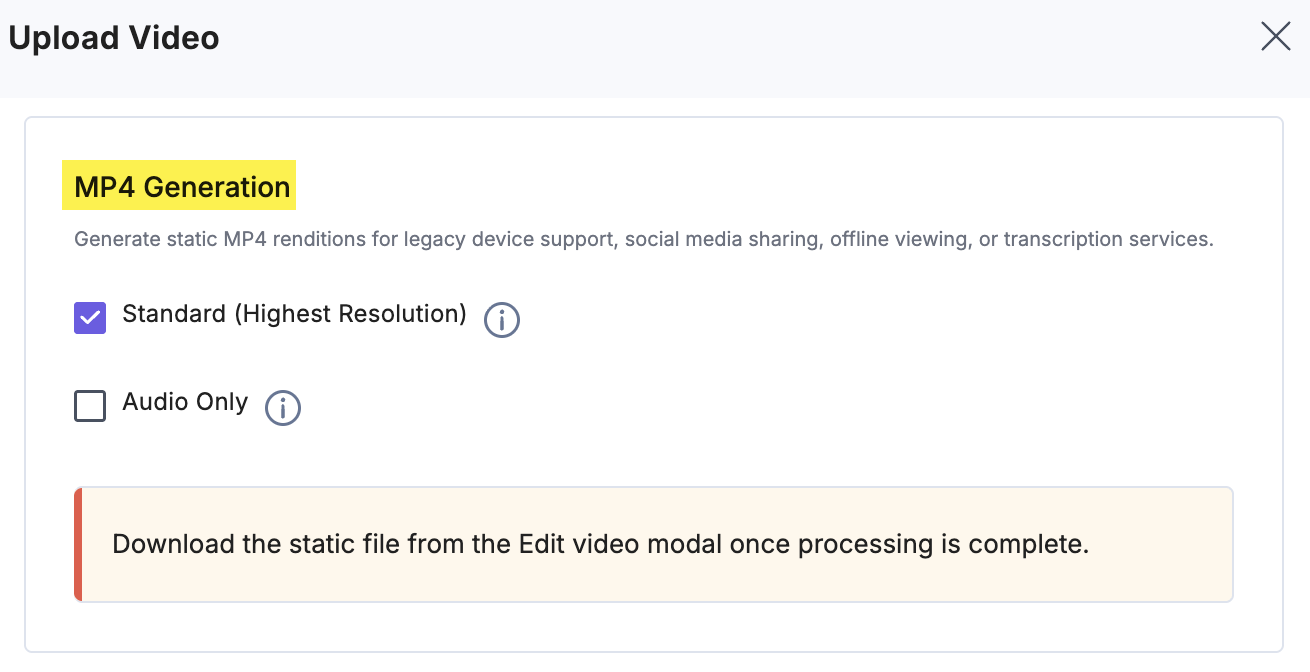
Note: The app supports all video formats, with a maximum file size of 20 GB. For faster processing, use MP4 or MOV files encoded with H.264. To learn more, refer to the Minimize processing time documentation.
- Click Upload to Mux to add video to the Mux account. During the upload process, you can cancel the uploading process by clicking Cancel Upload.
Note: You can upload 200 assets within the custom field. To increase the Max Upload Limit above 200, refer to the Set Advanced Config Object section.
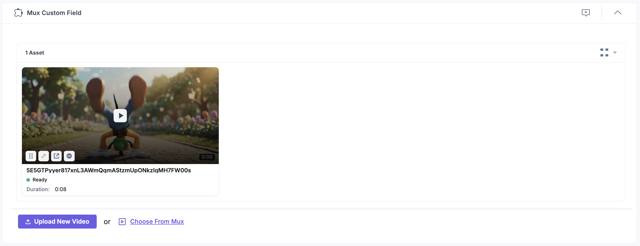
- After the upload is complete, MUX processes the video (typically taking 5, 10, 15, and more minutes depending on file size). The app uses webhooks to send Asset created events back to Contentstack to update the entry.
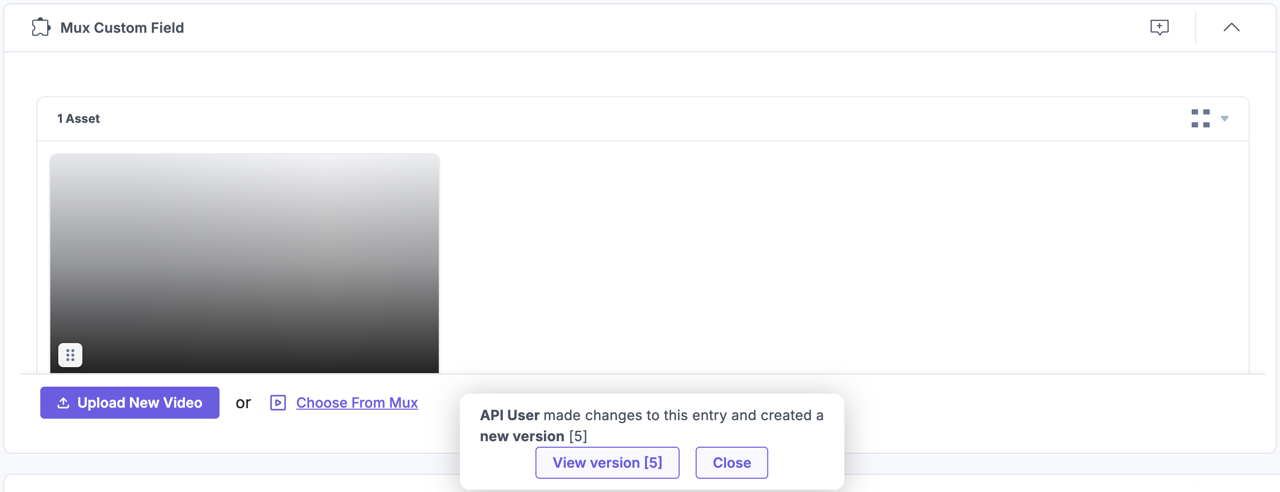
Note: At every event, the entry version is updated. You must navigate to the latest entry version to see the processed video data.
- Click the Upload New Video button and select the desired video.
-
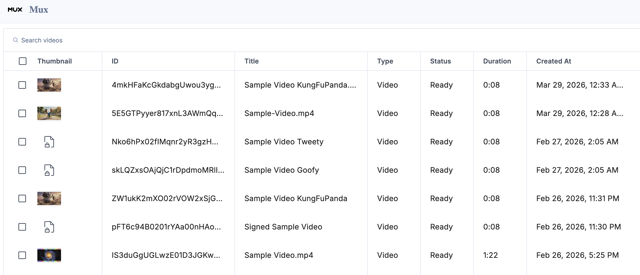
Choose Videos From Mux Account
To choose videos from Mux account, follow the steps:- Click the + Choose from Mux button to select video assets from your Mux account.
- You can select the Public assets (shown with a standard thumbnail), Restricted or Signed (Private) assets (marked with a lock icon), and Audio-only assets from the selector page.
Note:
- To view the signed assets in the custom field, you need to select the playback option as Signed (Private) during app configuration in step 2.
- The app generates a playback token to display the signed asset.
- If a signed asset token expires, the app displays a warning message. Refresh the page to generate a new token.
- Hover over the video on the Mux selector page, and you can see the View in Mux option to go directly to the Mux dashboard.
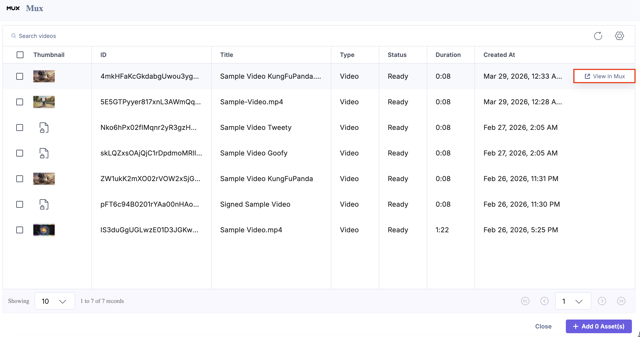
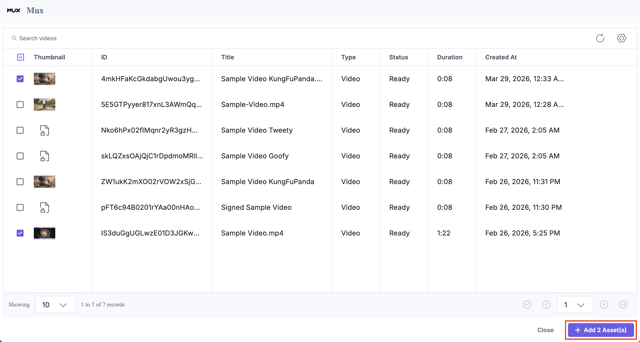
- Select the desired assets from your Mux selector page and click + Add Asset(s) to add them to your entry.
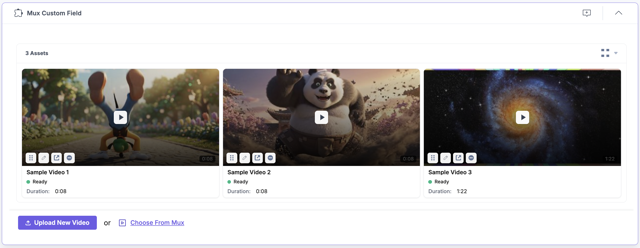
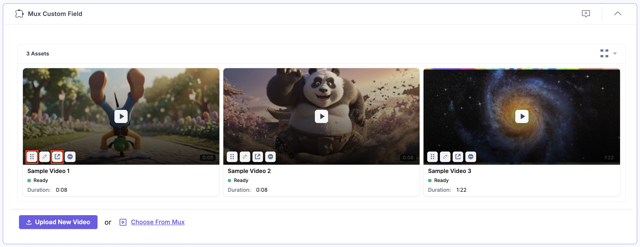
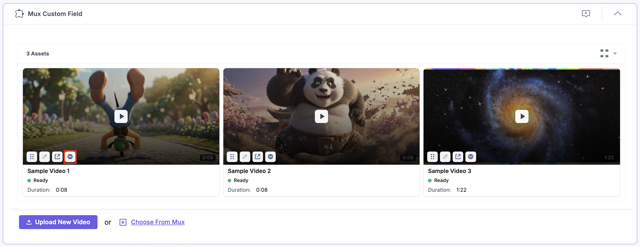
- The assets you selected are referenced within your entry in the thumbnail view, by default.
- To view the assets in the list view, select List from the drop-down menu.
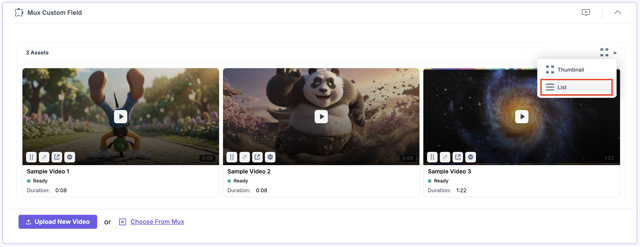
- The assets you insert get referenced within your entry in the list view.

- Click the Save button to save your entry.
- You can drag and rearrange videos by clicking the “Reorder” icon on the selected video.
- Also, you can view the videos in Mux by clicking the “Open In Mux” icon on the selected video.
Edit Video Settings
- Click the + Choose from Mux button to select video assets from your Mux account.
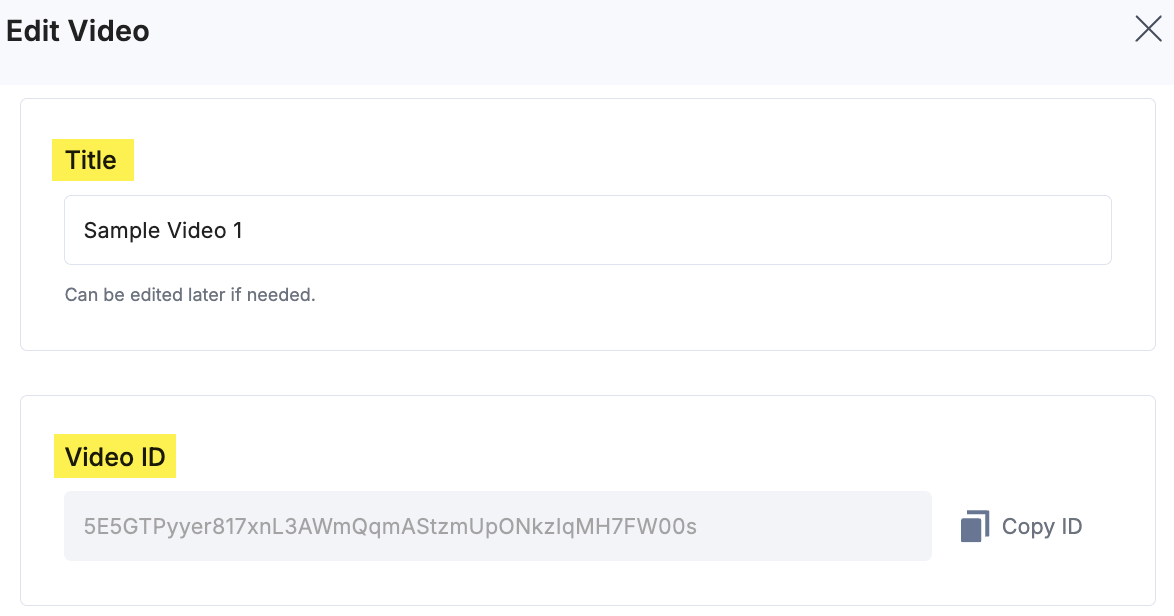
- To edit a video within the custom field, click the “Edit” icon on the selected video.

- In the Edit Video modal, you can perform update the following settings:
- You can rename the Title and copy the Video ID generated by Mux.
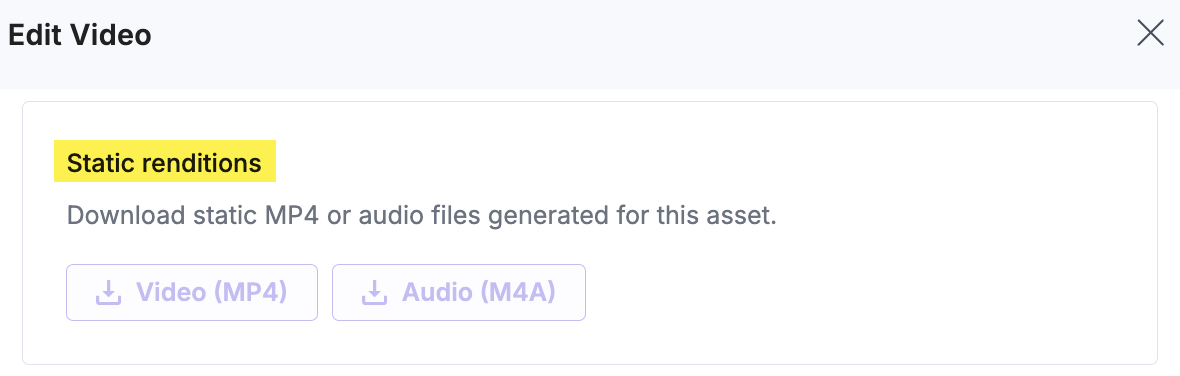
- Under Static renditions, download the generated Video (MP4) or Audio (M4A) files.
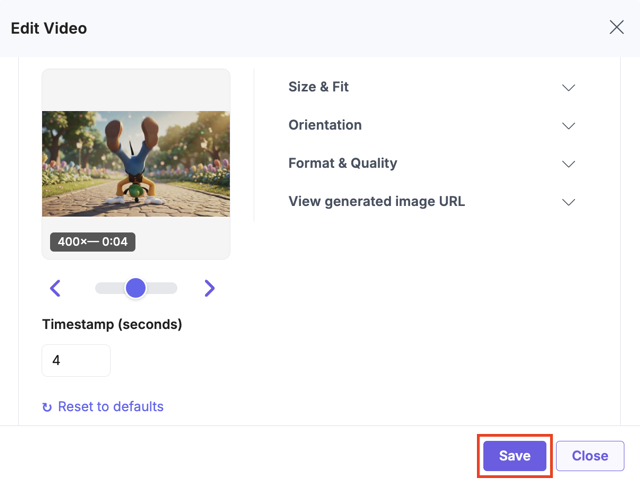
- In the Thumbnail section, choose the thumbnail type: Static Image or Animated Preview (GIF). You can use the timeline slider to select the preferred frame for the thumbnail preview.
Note: Custom thumbnails do not appear in the Mux dashboard. They appear only in your Contentstack entry and video players.
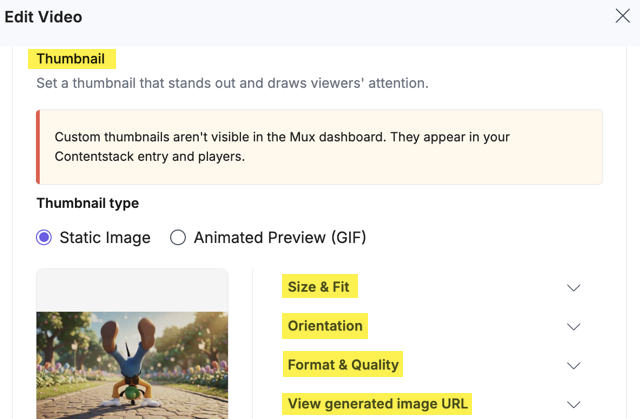
- Expand Size & Fit to set: Width (1–4096 px), Optional Height (0–4096 px), or leave it empty for auto-scaling, and Fit mode (for example, preserve aspect ratio).
- Expand Orientation to flip the image horizontally or vertically.
- Expand Format & Quality to select the image format (for example, JPEG).
- Expand View generated image URL to preview and copy the thumbnail URL.
- Click Save to apply the changes.
Delete Videos
- You can rename the Title and copy the Video ID generated by Mux.
- To remove a video from the custom field, click the “Remove” icon on the selected video.
- In the Remove Video modal, you can perform delete in two ways:
- Remove from entry (Soft Delete): Click the Remove from entry button to remove the video from the Contentstack entry but keep it in the MUX dashboard.
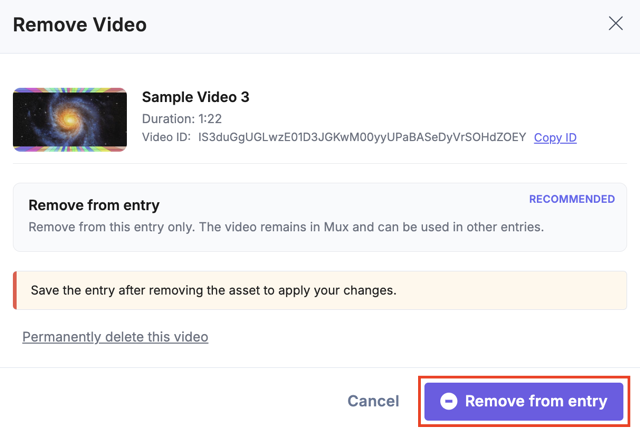
- Permanently delete this video (Hard Delete): Click the Permanently delete this video link and then click the Permanently delete video button to remove the video from both Contentstack and the MUX dashboard.
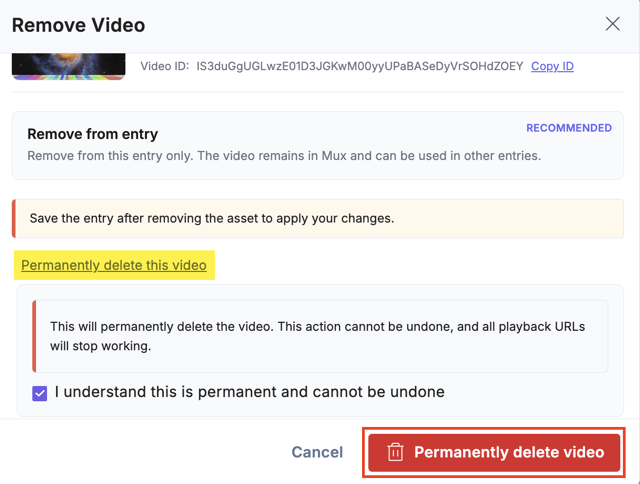
Note:: This option is role-specific, configured in the Uploads & Webhooks > Manage Videos section during app configuration in step 2.
- Remove from entry (Soft Delete): Click the Remove from entry button to remove the video from the Contentstack entry but keep it in the MUX dashboard.
- After adding, editing, and omitting the assets, Save and Publish your entry.
Set Advanced Config Object (Optional)
While adding the Mux app in the custom field in step 3, you can set the custom settings to override the configured settings in app installation in step 2.
Under Advanced properties, you can set the Config Parameter for all entries of a particular content type. The key:value passed in the configuration object overrides the default app configuration settings.
You can set the Playback Access as Signed and Max Assets Limit to upload videos that can be added in the Mux account and Custom field.
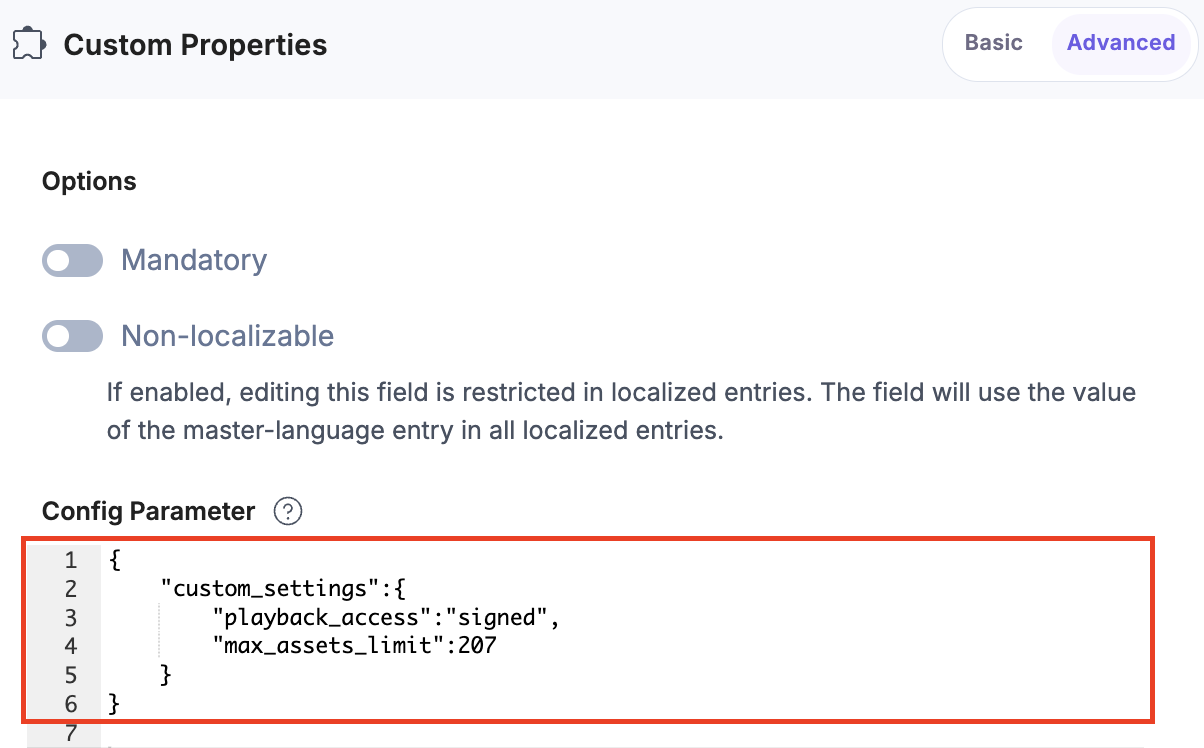
In our example, the max asset limit for uploads is 207.
{
  "custom_settings":{
    "playback_access":"signed",
    "max_assets_limit":207
  }
}
By following the steps, you can ensure your Mux app is fully optimized with the latest permission controls and authentication standards. Once these configurations are saved, you will have a seamless, secure workflow for managing video assets directly within Contentstack.
More articles in "Video"
