

Edge URL Redirects
Redirects are used in most websites to achieve use cases such as redirecting users to the updated URLs or domains, temporary redirects during site maintenance or downtime, providing short vanity URLs, etc. With the Edge URL redirects, Contentstack Launch allows you to manage high-performance, edge-based redirects in your source code.
While, in most cases, redirects can be managed in the framework-specific code, you may come across use cases where a few redirects are required to be set up for high performance. For example, you may want to add a trailing slash (/) to all URL paths if it is not specified. This is where Launch Edge redirects will be useful. The redirects are executed at the nearest edge point-of-presence for the visitor, ensuring that they see the least amount of latency.
You can specify both static and pattern-based URLs for redirects. Add your redirects to the launch.json file and then check-in the file to your Git repository.
This step-by-step guide will help you create a project in Launch that configures the Edge URL redirects.
Prerequisites
- Contentstack account
- Access to Launch for your organization
Steps for Execution
Create the launch.json File
Follow the steps to create the launch.json file for URL redirects:
- Open your source code folder.
- Create a JSON file named launch.json inside the folder, and paste the following code into it:
{ "redirects": [ { "source": "/source", "destination": "/destination", "statusCode": 308, "response": { "headers": { "x-powered-by": "launch" } } } ] } - Replace /source in the code with your source route.
- Replace /destination in the code with your destination route.
Note: The source and destination URLs must not exceed 512 characters each.
- Based on the type of redirection you require, add one of the following status codes in the statusCode field:
- For permanent redirection: 301 or 308.
- For temporary redirection: 302 or 307.
Note: By default, the statusCode value is set to 308 if you do not specify the statusCode field.
You can use the headers field in the response object to set custom headers for the redirect response. The response field is optional; you can skip it if setting custom headers is not required.
- Save the launch.json file.
Note: The file size must be limited to 5MB. To optimize performance and minimize latency during processing, use regular expressions to keep the configuration compact and efficient.
Examples for the uses of Edge URL Redirects
- Using path variables allows you to capture dynamic segments of the source URL and re-use them to construct the destination URL.
Example:{ "redirects": [ { "source": "/blog/:slug", "destination": "/news/:slug", "statusCode": 308 } ] }The above example uses a path variable slug to redirect requests to any path (including subdirectories) under /blog/ to a corresponding path under /news/. The redirection is done with a 308 status code.
- Path variables can also be captured with a regular expression. A regular expression allows you to pattern match on any given text, including URLs. The resulting path variable captures a part of the URL that matches the regular expression, and can then be re-used to construct the destination URL.
Example:{ "redirects": [ { "source": "/blogs/:category(product-updates|announcements)/:postId(.*)", "destination": "/product-updates/:postId", "statusCode": 301 } ] }In the above example, we have redirected all blogs that fall under the “product-updates” or “announcements” categories to a separate /product-updates section in the website. Note how we're defining two different regular expressions for capturing path variables, category and postId. In the destination, we're using only the postId path variable to construct the final URL. Given a URL like /blogs/product-updates/march-updates, the destination URL will be /product-updates/march-updates.
- Using an absolute path, you can redirect your sites to external links.
Example:{ "redirects": [ { "source": "/blog/post", "destination": "https://example.com/news/page", "statusCode": 308 } ] }In the above example, the requests to the path /blog/post from the root of your website are redirected to the absolute path of an external site https://example.com/news/page.
- You can also capture specific query parameters in URLs and use those parameters in the destination.
Example:{ "redirects": [ { "source": "/blogs/:category((?!product-updates|announcements).+)\\?(.*)postId=:postId(.+)", "destination": "/blogs/:category/:postId", "statusCode": 301 } ] }With this configuration, requests like /blogs/insights?postId=321 redirects to /blogs/insights/321. The query parameter postId is captured with the given regular expression and used as a path parameter in the destination URL. We also see here the usage of the negative lookahead regular expression, which allows you to exclude categories such as "product-updates" and "announcements" from being matched.
Deploy your Project in Launch
Deploy your project in Launch by importing the source code from GitHub or by uploading the source code folder.
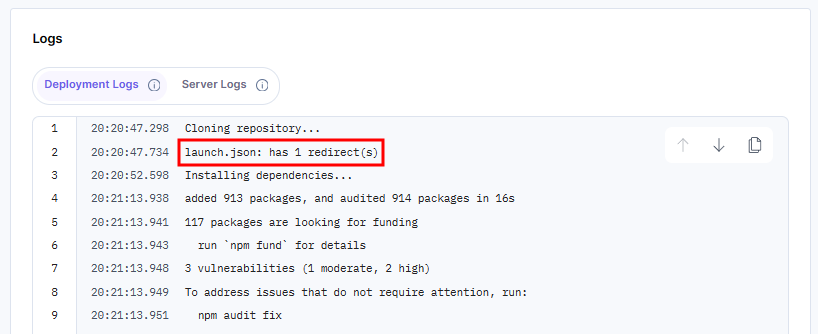
After successful deployment, the Logs section displays the count of redirects as follows:
Limitations
- Adding a launch.json file to an app within a monorepo is currently not supported.
- Launch does not support complete URLs in the source. However, you can use Launch Edge Functions to redirect traffic based on the hostname when multiple domains point to the same environment.
More articles in "Launch Features"
