

Hosting a Static Website on Azure Blob Storage
Note: This page is no longer maintained, and the underlying code may be outdated or unsupported. It may be removed in a future release.
We recommend using Contentstack Launch, a front-end hosting and deployment platform designed for websites built on the Contentstack CMS. Launch streamlines development by enabling you to start a new project and easily connect it to your GitHub repository. To learn how to host and deploy websites using Contentstack Launch, refer to the Launch documentation.
Binary Large Objects, or simply BLOB, is a storage service offered as part of Microsoft Azure to store files. It is used to store and retrieve BLOBs, commonly known as files.
It simplifies the process of uploading, sharing, and managing online documents (files) along with off-loading static content from your webserver to reduce the load. You can use Blob for hosting or deploying static websites.
In this guide, we will learn how we can deploy a static Gatsby site on Azure Blob using the VS Code editor and GitHub Actions methods.
Prerequisites
- Contentstack Account
- Working knowledge of Azure
- An account in Microsoft Azure Blob Storage
- A Gatsby website up and running on localhost
- VS Code Editor
- A GitHub account
Quickstart
Deploying a website on Azure Blob involves completing the following steps:
- Create a Microsoft Azure account
- Create Storage account
- Create a production build of the website
- Install Azure storage extension
- Deploy the website on Azure Blob
Note: Before we start, it is assumed that you already have a website running on the localhost with Gatsby as the front-end and Contentstack as the back-end. If you have not created the website yet, we suggest you follow the steps mentioned in the Build a Sample Website Using Gatsby and Contentstack and get your website ready before hosting it on Azure Blob.
Create a Microsoft Azure Account
Before creating the Azure function, we need to create an Azure account. Follow the steps given below to create one:
- Go to the Microsoft Azure page and click on the Start free button.
For this exercise, we’ll be using a free plan. However, you can choose to purchase the paid plans by clicking on the Or buy now button. - On the next screen, you’ll get a “Sign in” modal. If you already have an account, just log in with your credentials. Else, click on the Create one! link.
- Once you click on the Create one! link, you’ll be asked to create a username. You can also create your account by providing your phone number or an email address.
Note: It will not accept a work-related email address. Only your personal email address such as Gmail, Outlook, or Hotmail will be accepted.
You will then receive an email with a verification code. Once your account is created, it will ask you to provide further information to safeguard the account. Follow the onscreen instruction and complete the account setup.
- Go to the Microsoft Azure page and click on the Start free button.
Create Storage account
On the Azure Portal page, create a storage account by performing the following steps:
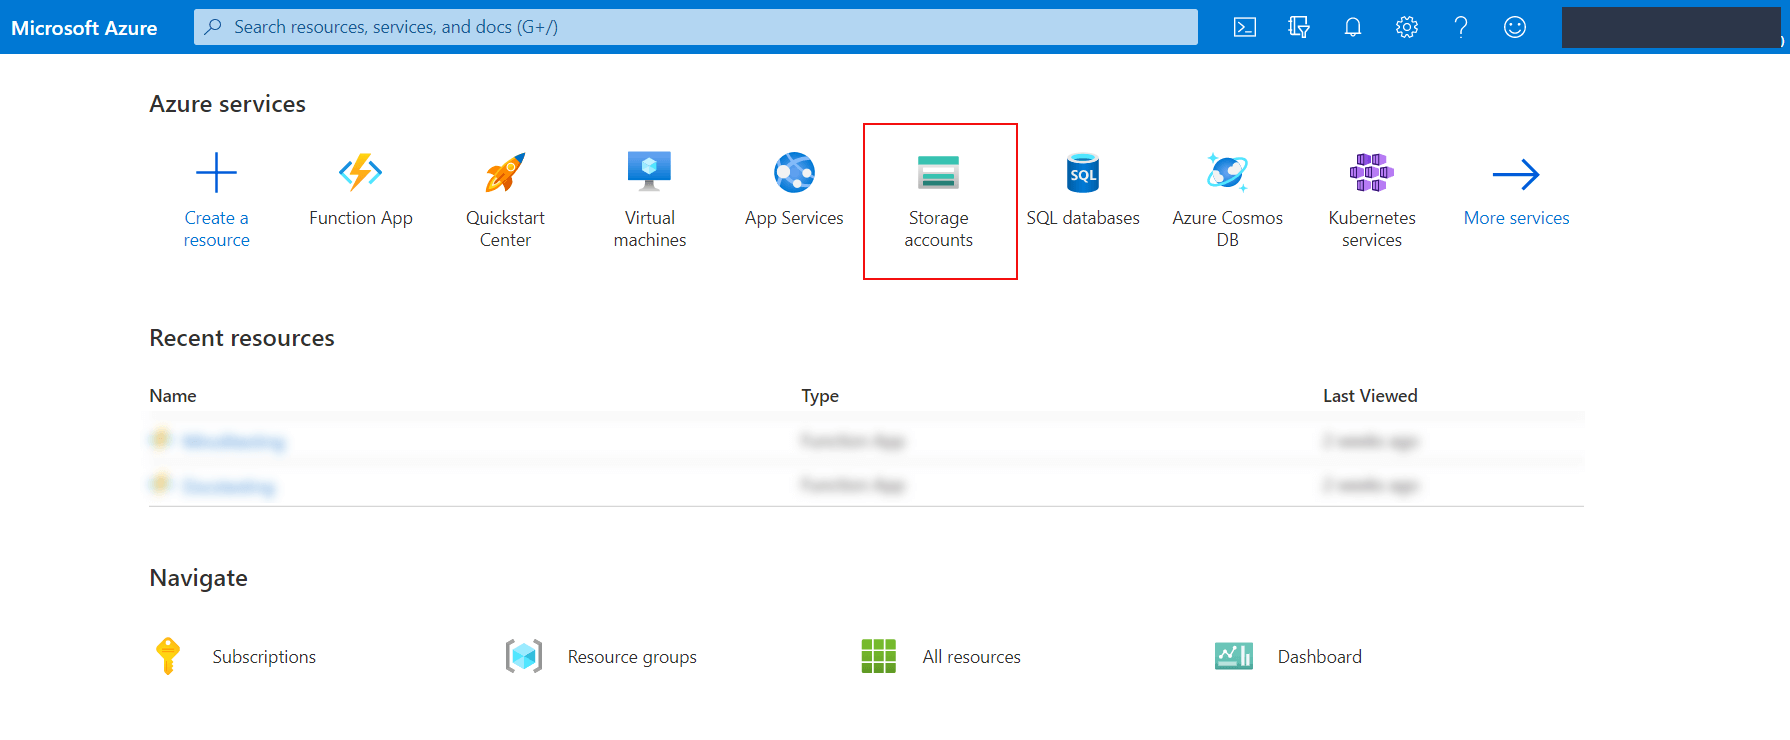
- Click on Storage accounts in the Azure services section:
- On the Storage accounts page, click on + Create.
- Provide the following details on the Create a storage account page:
- Resource group: Select any available group of your choice. Else, create a new one by clicking Create new.
- Storage account name: Enter a unique name for your storage account
- Region: Choose any appropriate region. In our case, it’s “East US.”
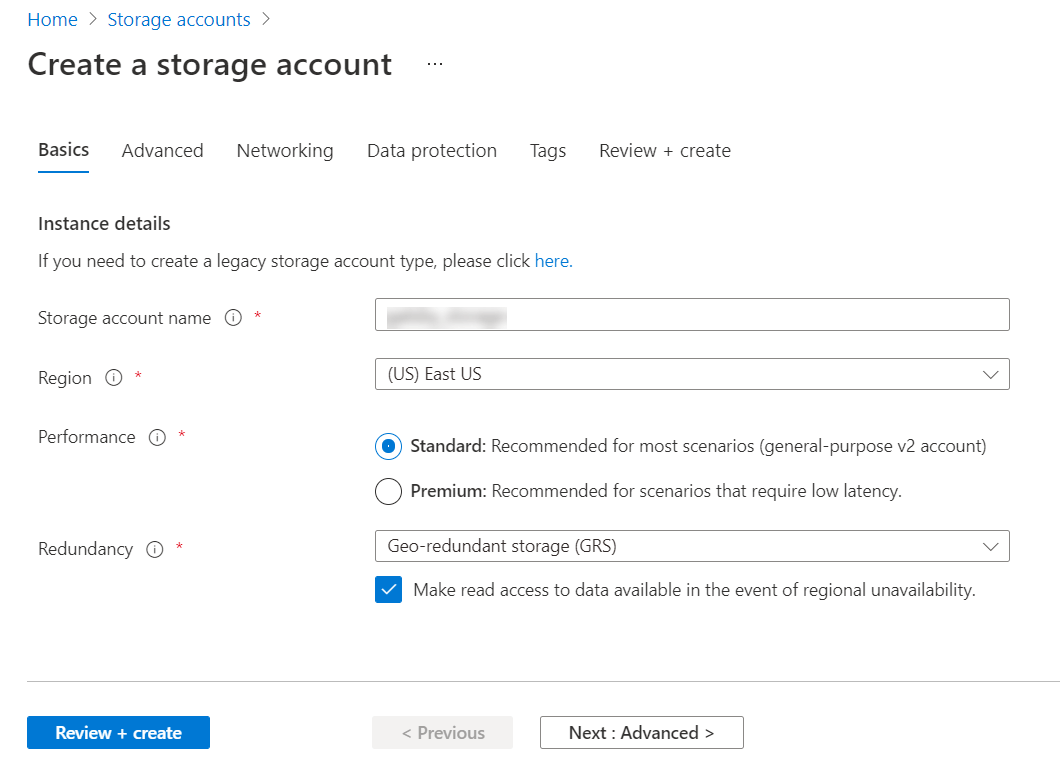
- Click on Review + create. This will initiate the validation process.
- If the function passes the validation, you’ll see the Create button at the bottom of the page. Click on it.
It will then start and complete its deployment process and you will see the following image: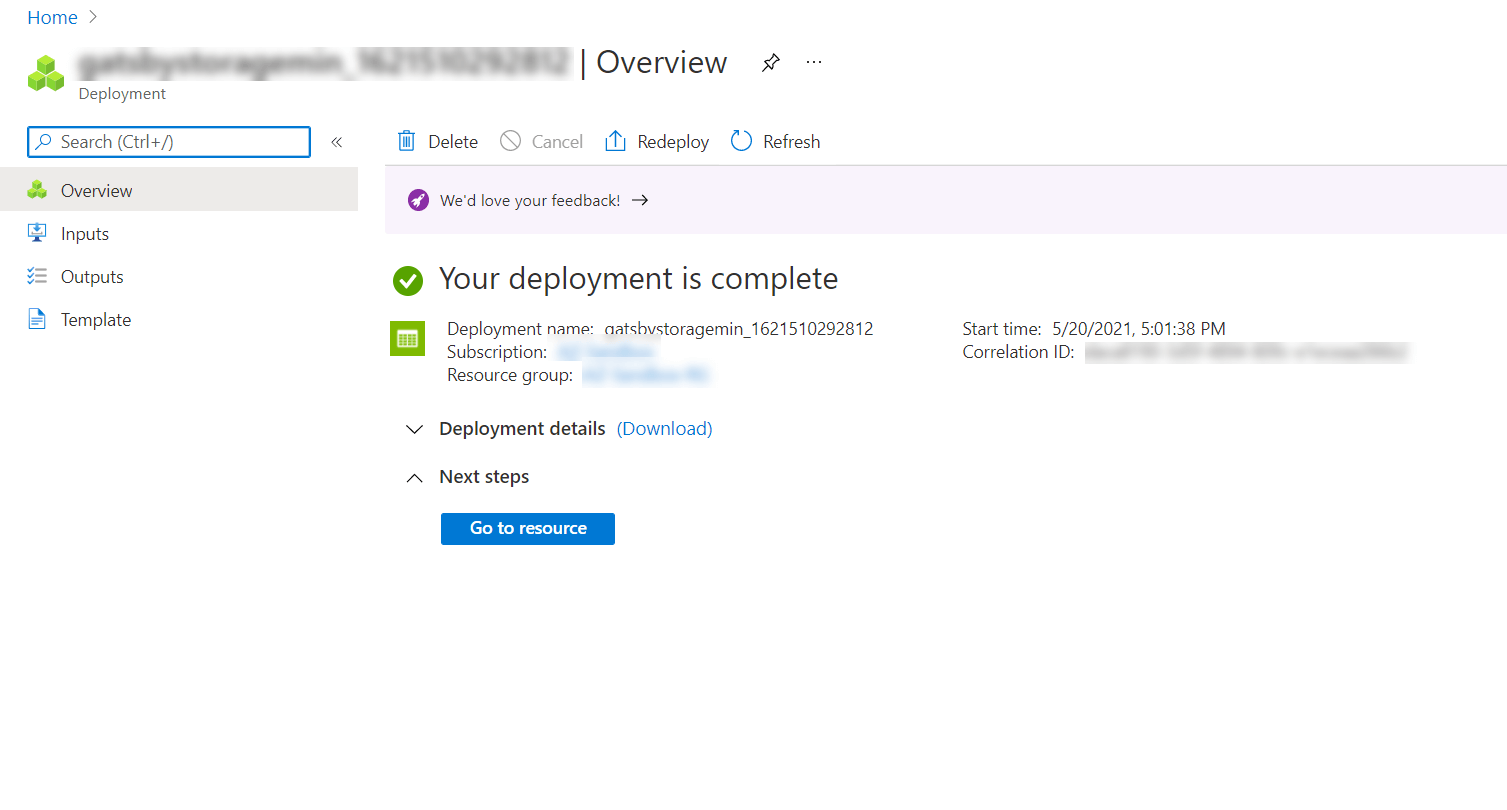
- Next, click on the Go to resource button to visit the recently-created function’s page.
- From the left navigation panel, click on Static website under the Data management section.
- By default, the Static website option is disabled.
Enable this option, enter index.html as the Index document name and 404.html as the Error document path, and click on Save, as shown below: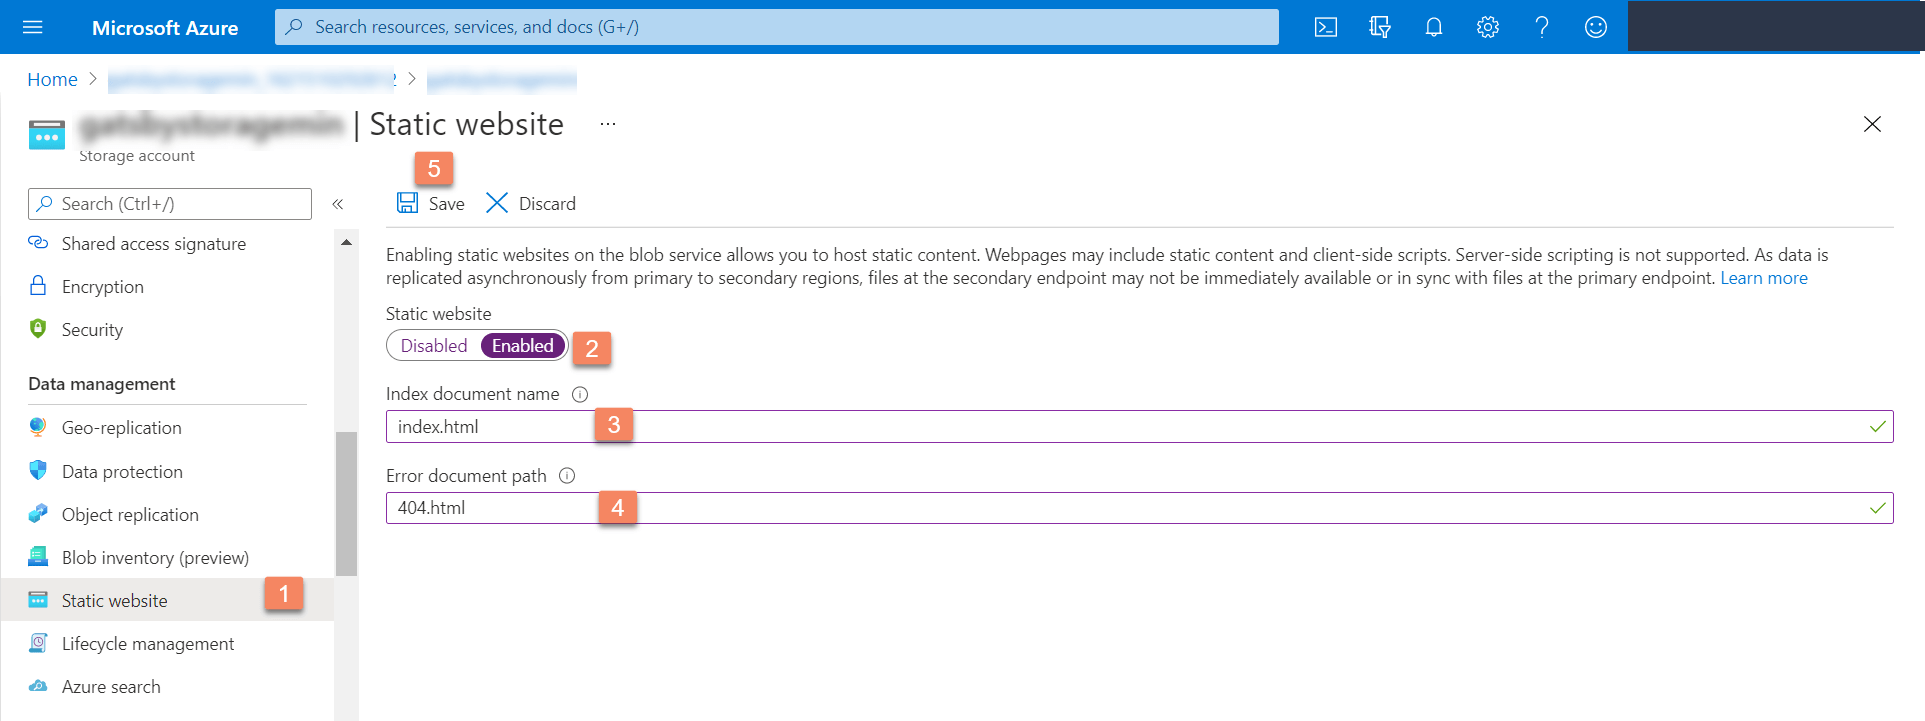
- Upon saving, you’ll get two links: Primary endpoint and Secondary endpoint.
Note down the Primary endpoint as we’ll be hosting the website on this endpoint.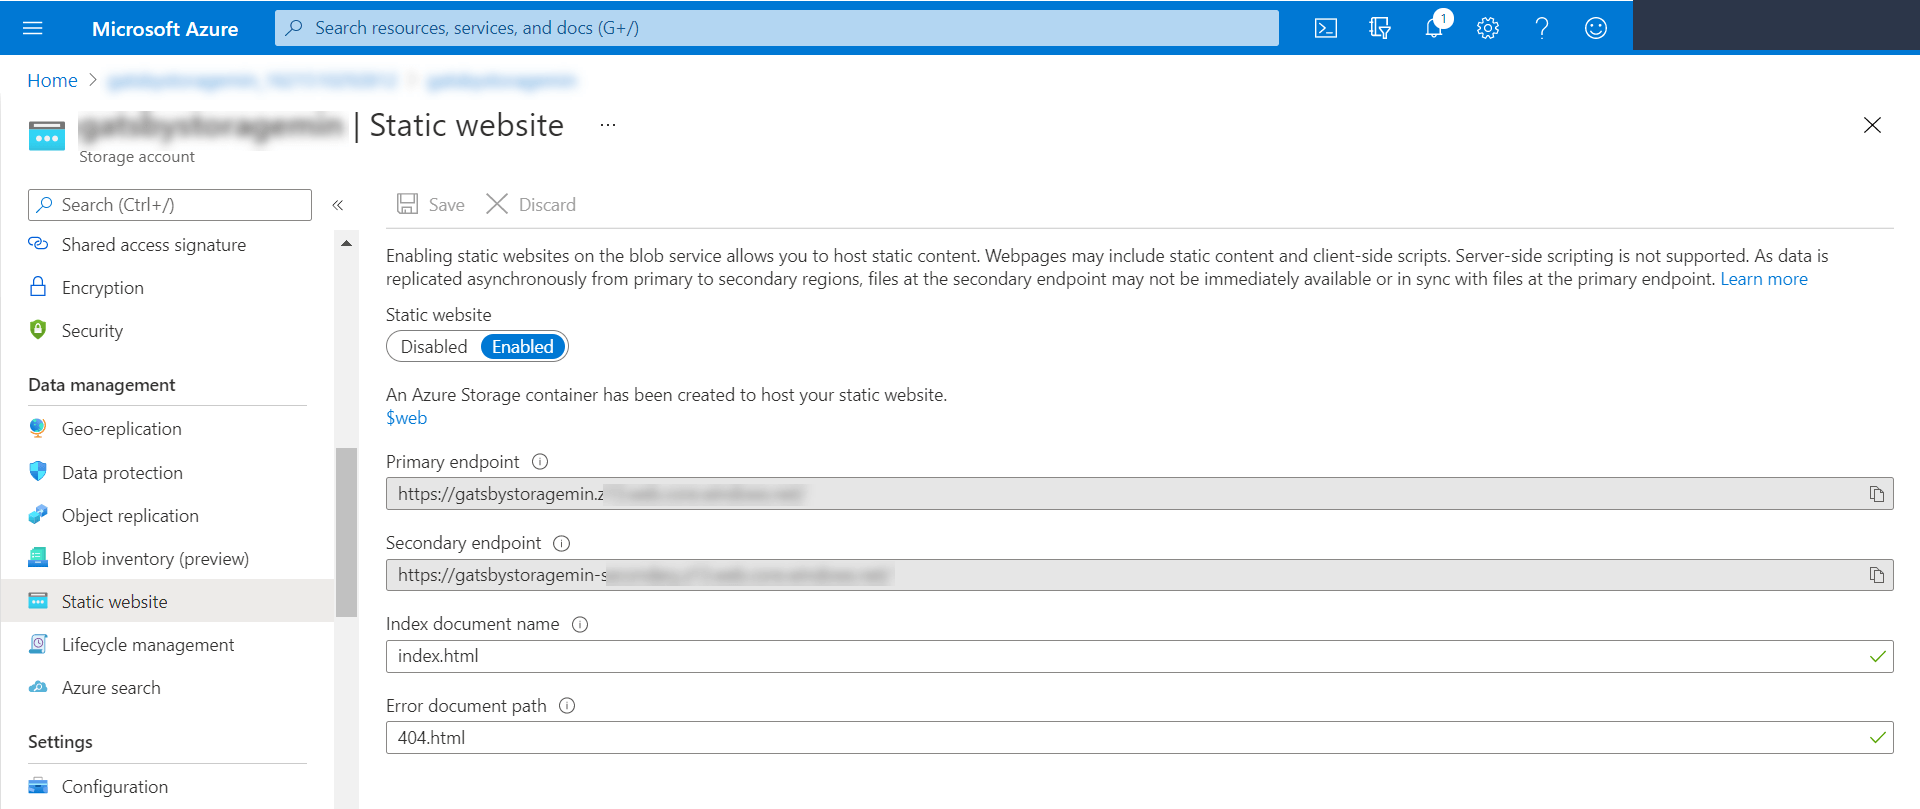
With these steps, we have configured the storage account in Azure Blob and have generated the link to host our static website. Let's move ahead to creating a build in Gatsby.
- Click on Storage accounts in the Azure services section:
Create a Production Build of the Website
Assuming that you’ve set up the Gatsby sample website, follow these steps to create a production build of the website:
- Open the project in VS Code editor.
- Create an env.production file and add the following code snippet by specifying your stack API key, delivery token, and environment name:Note that by default, our setup uses the North American region. If you want to use the Europe region, you need to set it as shown below:
CONTENTSTACK_API_KEY = <api_key_of_your_stack> CONTENTSTACK_DELIVERY_TOKEN = <delivery_token_of_the_environment> CONTENTSTACK_ENVIRONMENT = <environment_name>CONTENTSTACK_CDN = https://eu-cdn.contentstack.com/v3For Azure North America, set it as:
CONTENTSTACK_CDN = https://azure-na-cdn.contentstack.com/v3For Azure Europe, set it as:
CONTENTSTACK_CDN = https://azure-eu-cdn.contentstack.com/v3 Open your terminal and move inside the project’s root directory, and run the following command:
gatsby build
The above command will create a production build of your website into the public folder of the project.
The production build is now created. Now let’s proceed to connect this website with Azure Storage.- Open the project in VS Code editor.
Install Azure Storage Extension
Let's now install the Azure Storage extension in VS Code. This extension simplifies the management of Azure Storage. By using this extension for VS Code, we will be able to access our Blob containers.
In the VS Code editor, click on the “Extensions” icon from the left navigation panel.
Search for the Azure Storage extension and install it.
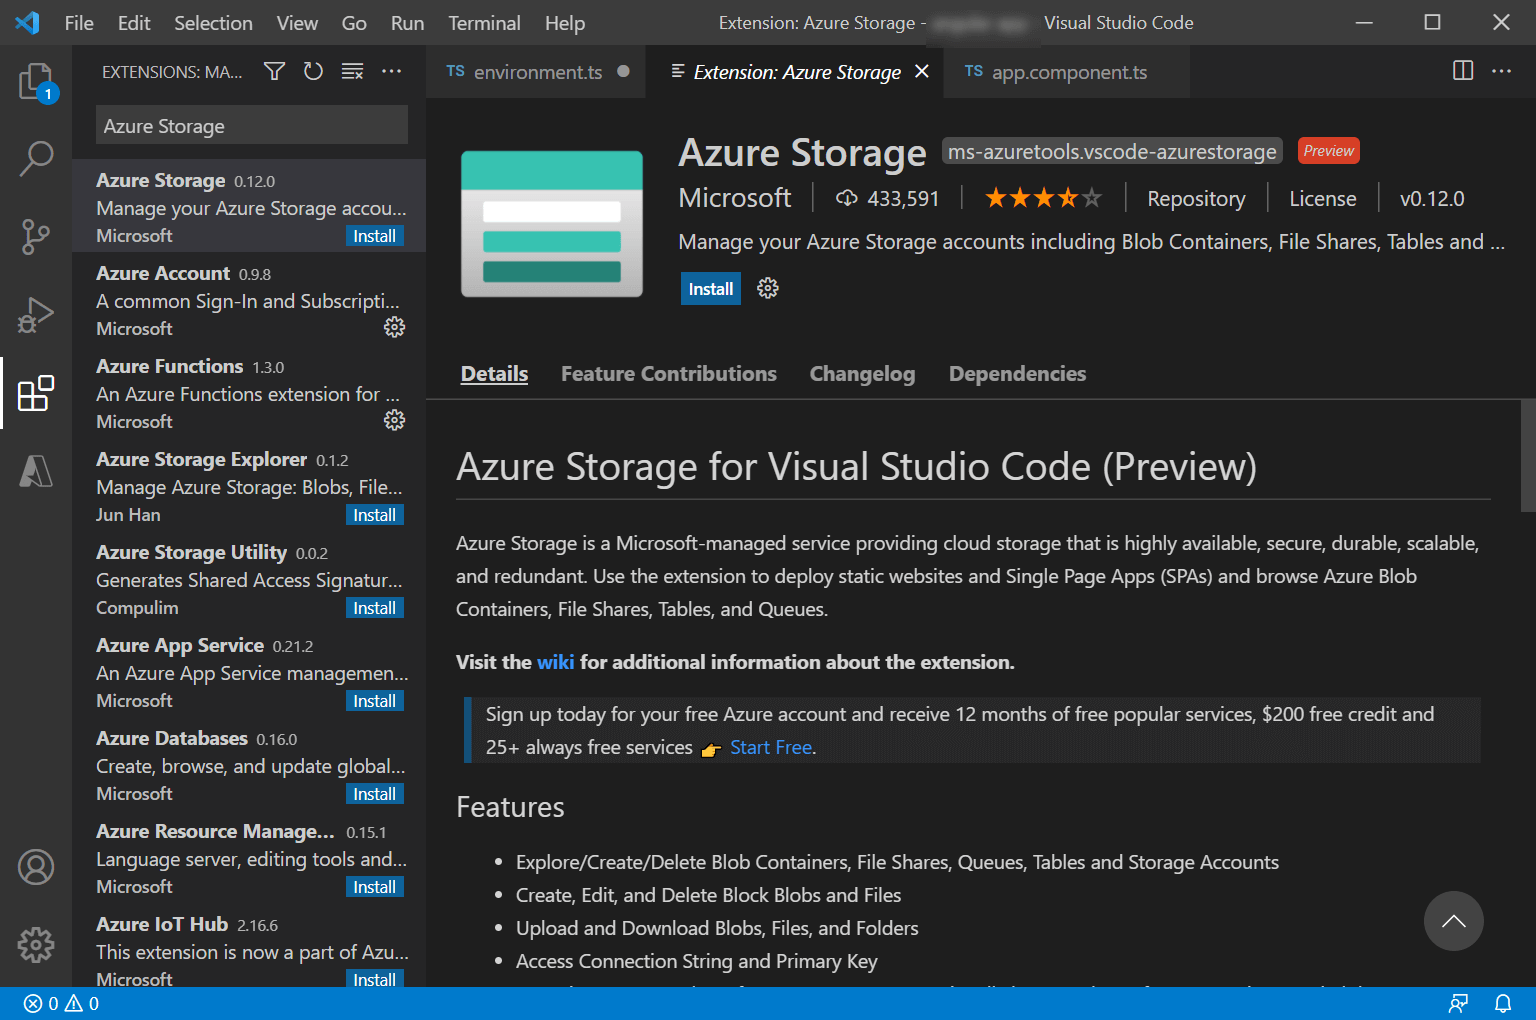
Alternatively, you can install the extension from the Azure Marketplace. But for that, you first need to install the VS Code editor on your machine. Download it, if you haven’t installed it.
Deploy the Website on Azure Blob
For deploying the website on Azure Blob, there are two methods available:
Let’s discuss how to deploy a website using these methods in detail.
Deploy the Website Using the VS Code Extension
Perform the following steps to start the deployment process:
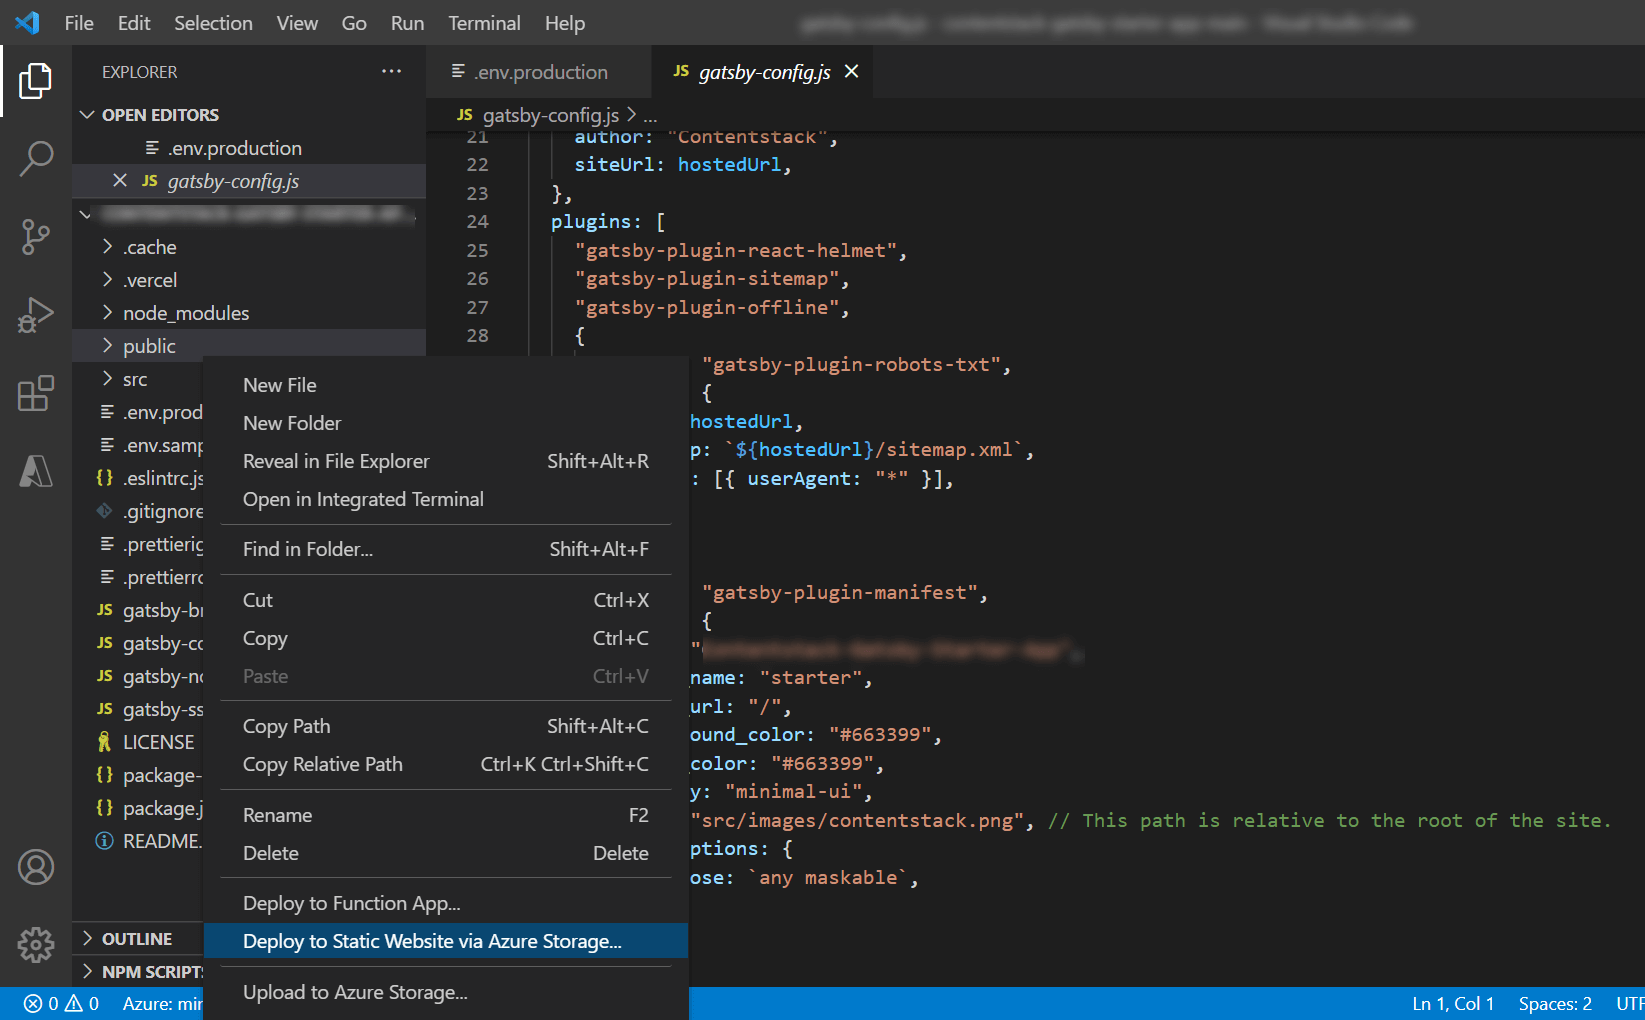
- Staying inside your project directory in VS Code editor, right-click the public folder, and click on Deploy to Static Website via Azure Storage as shown below:
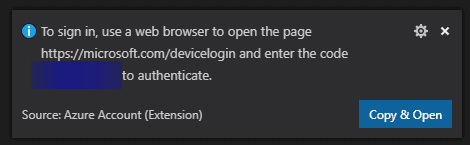
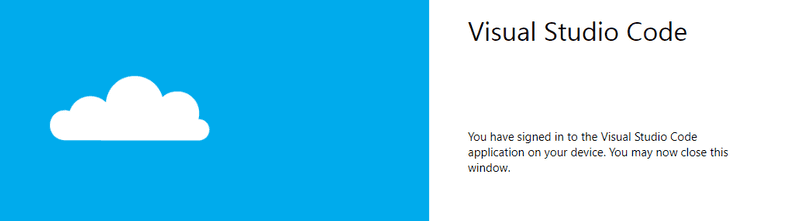
- If you are not logged into Azure already, it will promptSign in to Azure as shown below:

- You will see a dialog at the bottom right, asking you to load a web page and enter a device code. Click on Copy & Open and enter the code.
- The web page will show that you are trying to link your Azure device to VS Code. Click on Continue and log in to Azure if you are not logged in already. If everything works correctly, you should see a page confirming that you have signed in:
- Now return to the VS Code, select your subscription, and then your storage account.
- Selecting the storage account will begin the deployment. If you have previously deployed, you will see a dialog asking if you want to delete your files and redeploy them.
In a few seconds, you will see a message at the bottom right of the VS Code confirming that your website has been deployed!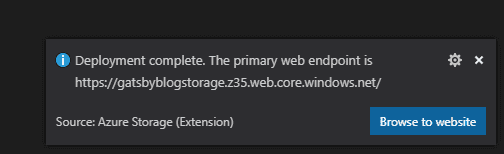
With these steps, we have completed the deployment of your static site using the VS Extension. Let's now see the alternate way of deploying your website using GitHub Actions.
Deploy the Website Using GitHub Actions
Note: Before using this method ensure you have Git installed on your machine. Also, you’ll need to have a GitHub repository. If not, refer to this GitHub repository creation guide to learn about the process.
Assuming that you’ve created the production build of the Gatsby sample app, perform the following steps to deploy the website on Azure Blob using GitHub Actions:
- Open the terminal, move inside the project root directory, and run the following command:
- git init
- git add
- git commit -m "first commit"
- git remote add origin <ORIGIN_URL>
Note: ORIGIN_URL is the remote URL of the repository. For example, https://github.com/username/gatsby-starter-website.git
- git push -u origin master
Note: If running the git remote add origin command results in the "Fatal: remote origin already exists" error, then try the git remote set-url origin <YOUR_ORIGIN_URL> command, where you need to provide the name of the origin URL in <YOUR_ORIGIN_URL>.
- After running the above commands, your code will be deployed on the GitHub repository that you have created.
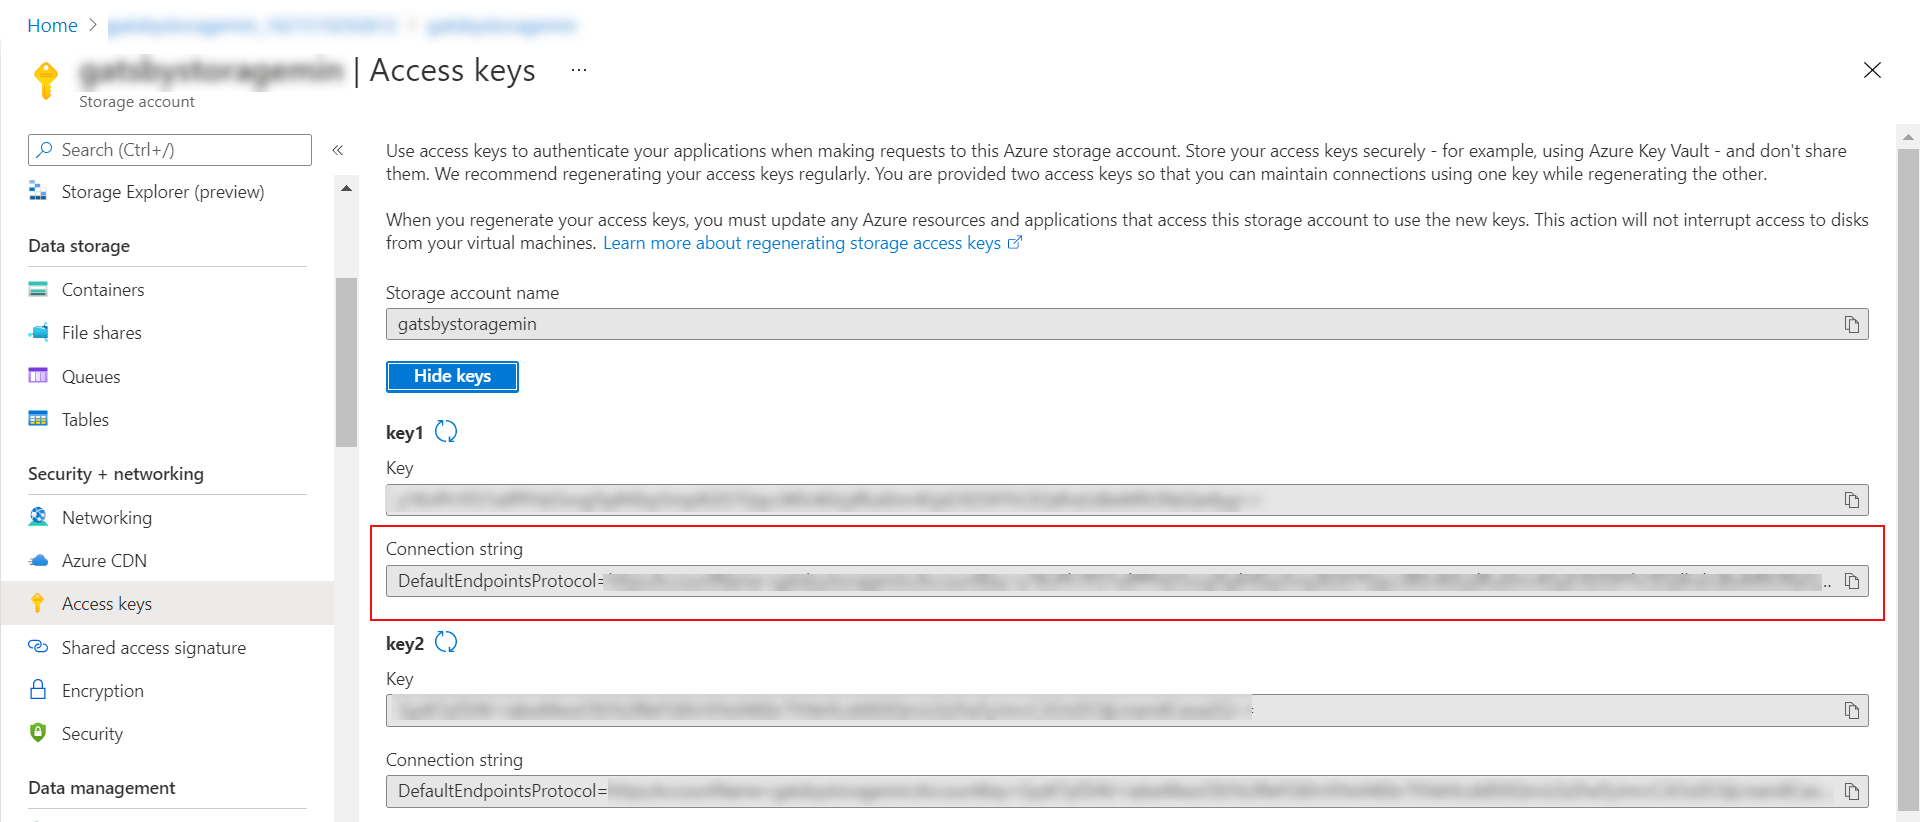
Now we have our Azure Storage Account setup and our Gatsby site pushed to our GitHub repository. - Go to your Azure portal, then to your storage account, and click on Access keys from the left navigation panel.
- Click on Show keys and copy the first Connection string as shown below:
- Go to your GitHub repository where this sample code is uploaded, click on Settings, and then on Environments.
- On the Environments page, click the New environment button.
- Enter an appropriate name for your environment and click the Configure environment button.
- On the next screen, scroll down to the Environment secrets section, and click + Add Secret.
- In the Add secret modal, set BLOB_STORAGE_CONNECTION_STRING as Name, paste the “connection string” in the Value textbox, and click Add secret.
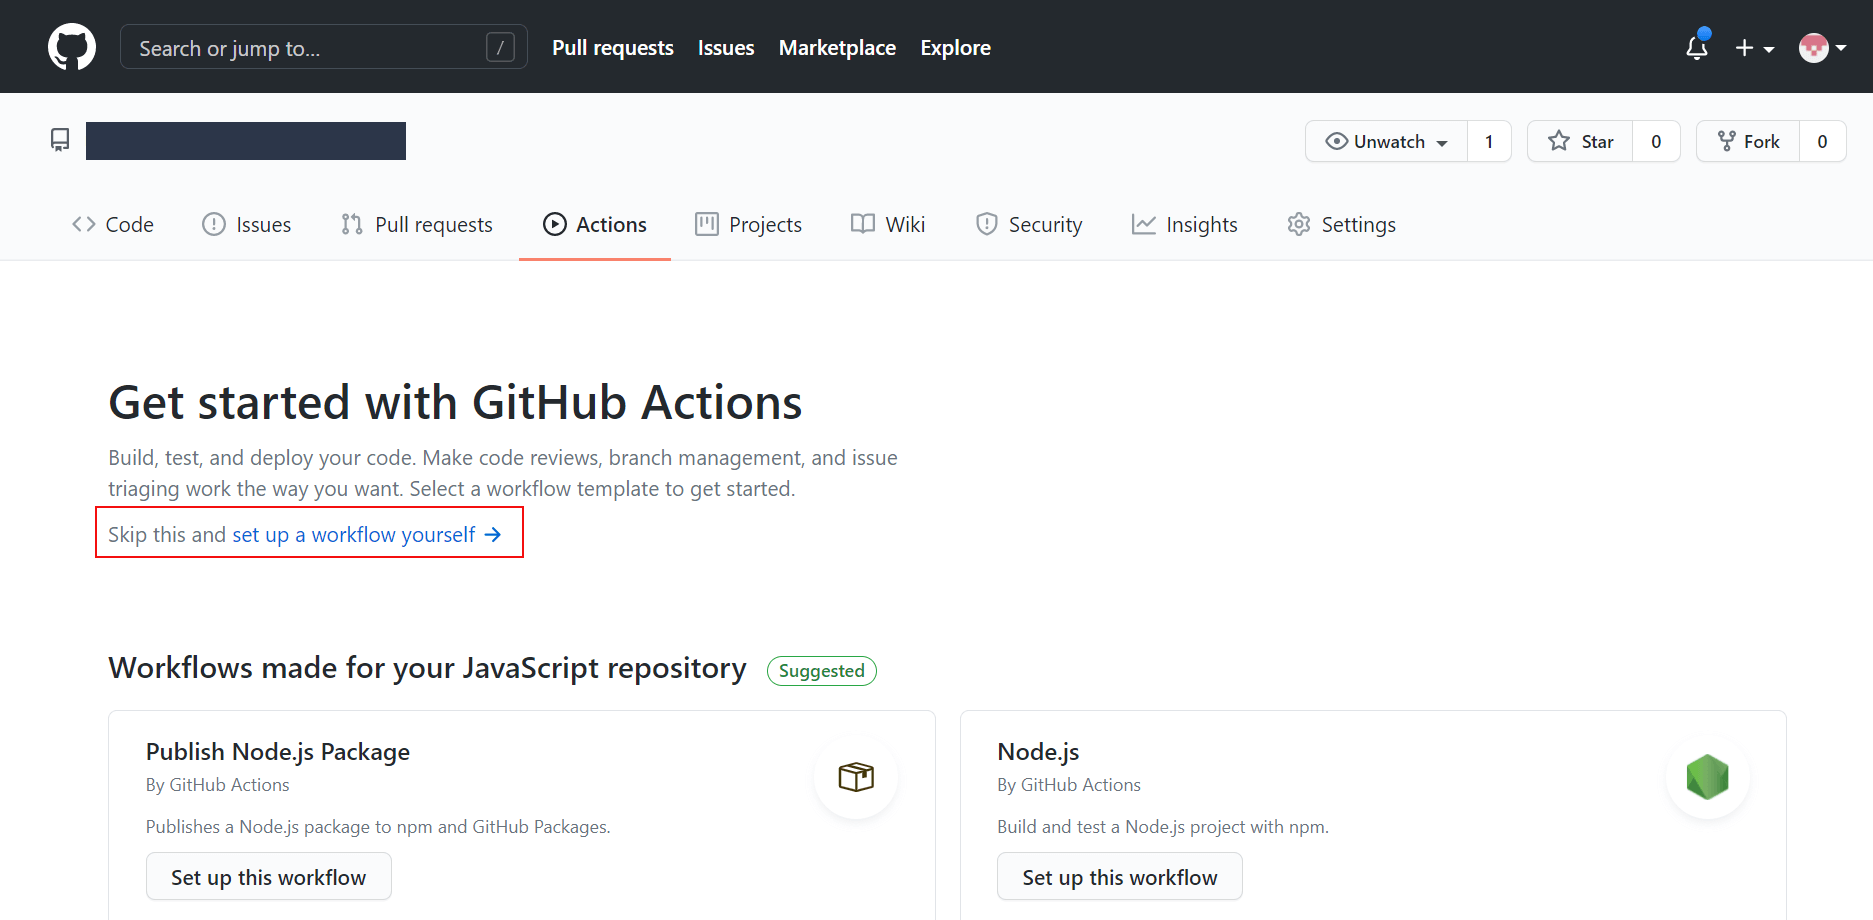
This step will make the “connection string” available for us to use as an environment variable in our GitHub Actions workflow. - Now click on the Actions at the top and then the set up a workflow yourself link:
This will add the .github/workflows/main.yml file to your repository. - On the next screen, you’ll see the .github/workflows/main.yml file with a few lines of default code.
Replace the default code with the following code:name: Build and deploy Gatsby site to Azure Blob Storage on: push: branches: - master #trigger the workflow on push request event for the master branch # A workflow run is made up of one or more jobs that can run sequentially or in parallel jobs: build-and-deploy: runs-on: ubuntu-latest steps: - uses: actions/checkout@master - name: Set up Node.js version uses: actions/setup-node@v1 with: node-version: '12.x' - name: npm install and build run: | npm install npm run build - name: Upload to Azure Blob Storage uses: bacongobbler/azure-blob-storage-upload@v1.0.0 with: source_dir: public #gatsby build generates this file after build container_name: $web connection_string: ${{ secrets.BLOB_STORAGE_CONNECTION_STRING }} - Next, click the Start commit button at the top-right corner of the page.
- In the Commit new file window, provide the necessary details and click on the Commit new file button.
- Now by clicking on the Actions tab in GitHub, you should see your workflow running and successfully deployed to Azure Blob Storage.
- If you visit the static website's primary endpoint that we created in Azure earlier, you should see your Gatsby site running.
More Resources
More articles
