

Marketplace Ecommerce App Boilerplate
A boilerplate is a fitting template to describe distinct repetitive segments of a project to help build projects quickly and efficiently.
They can define project-level elements or standard methods for one or more projects.
The following guide shows how to build an ecommerce marketplace app using our Marketplace Ecommerce App Boilerplate. For more information about the Marketplace Ecommerce App Boilerplate, you can check the GitHub repository here.
Why should you use the Marketplace Ecommerce App Boilerplate?
- The ecommerce app boilerplate provides a standard code structure for all the required UI locations of the app. You can quickly start developing the app by changing the root_config files as needed for the third-party ecommerce system.
- Creating any application is prompt since you only need to use the required routes and corresponding components.
- We have built a boilerplate that incorporates all the best practices you can use while building your application in Contentstack.
- With this template, you can save a considerable amount of development time.
- The boilerplate also provides the Venus Components Library to make your application correspond with our Contentstack user interface.
Structure of the Marketplace Ecommerce App Boilerplate
The boilerplate folder structure consists of relative files and references, making it easy to acclimate within your project. This structure also allows the boilerplate to be thoroughly portable between different stacks in Contentstack.
Below is the folder structure of the boilerplate:
marketplace-ecomm-boilerplate-app
|-- api
    |-- constants
    |   |-- index.js
    |-- handler
    |   |-- index.js
    |-- root_config
    |   |-- index.js
    |-- .eslintrc.js
    |-- index.js
    |-- package-lock.json
    |-- package.json
|-- example
    |-- sapcc
    |  |-- api
    |  |  |-- root_config
    |  |   |-- index.js
    |  |-- ui
    |  | |-- root_config
    |  |   |-- index.js
    |-- bigcommerce
    |  |-- api
    |  | |-- root_config
    |  |   |-- index.js
    |  |-- ui
    |  | |-- root_config
    |  |   |-- index.js
|-- ui
    |-- public
    |   |-- favicon.ico
    |   |-- index.html
    |-- .env
    |-- src
    |   |-- assets
    |   |    |-- Logo.svg
    |   |-- common
    |   |    |-- constants
    |   |        |-- index.ts
    |   |    |-- contexts
    |   |        |-- appConfigurationExtensionContext.ts
    |   |        |-- categoryCustomFieldExtensionContext.ts
    |   |        |-- customFieldExtensionContext.ts
    |   |        |-- entrySidebarExtensionContext.ts
    |   |        |-- marketplaceContext.ts
    |   |        |-- productCustomFieldExtensionContext.ts
    |   |        |-- selectorExtensionContext.ts
    |   |   |-- hooks
    |   |       |-- useAppConfig.ts
    |   |       |-- useAppLocation.ts
    |   |       |-- useAppSdk.tsx
    |   |       |-- useCategoryCustomField.tsx
    |   |       |-- useCustomField.tsx
    |   |       |-- uuseFrame.ts
    |   |       |-- useInstallationData.tsx
    |   |       |-- useProductCustomField.tsx
    |   |       |-- useSdkDataByPath.ts
    |   |    |-- locale
    |   |        |-- index.ts
    |   |   |-- providers
    |   |        |-- AppConfigurationExtensionProvider.tsx
    |   |        |-- CategoryCustomFieldExtensionProvider.tsx
    |   |        |-- CustomFieldExtensionProvider.tsx
    |   |        |-- EntrySidebarExtensionProvider.tsx
    |   |        |-- MarketplaceAppProvider.tsx
    |   |        |-- ProductCustomFieldExtensionProvider.tsx
    |   |        |-- SelectorExtensionProvider.tsx
    |   |   |-- types
    |   |       |-- index.ts
    |   |   |-- utils
    |   |   |   |-- index.tsx
    |   |-- components
    |   |   |-- ErrorBoundary
    |   |       |-- index.tsx
    |   |   |-- WarningMessage
    |   |       |-- index.tsx
    |   |       |-- styles.scss
    |   |-- containers
    |   |   |-- App
    |   |   |   |-- index.tsx
    |   |   |   |-- styles.scss
    |   |   |-- CategoryField
    |   |   |   |-- index.tsx
    |   |   |-- ConfigScreen
    |   |   |   |-- index.spec.tsx
    |   |   |   |-- index.tsx
    |   |   |   |-- styles.scss
    |   |   |-- CustomField
    |   |   |   |-- Category.tsx
    |   |   |   |-- DeleteModal.tsx
    |   |   |   |-- DraggableGrid.tsx
    |   |   |   |-- DraggableListItem.tsx
        |   |   |-- DraggableListItemCategory.tsx
    |   |   |   |-- index.spec.tsx
    |   |   |   |-- index.tsx
    |   |   |   |-- ListItem.tsx
    |   |   |   |-- Product.tsx
    |   |   |   |-- RenderList.tsx
    |   |   |   |-- styles.scss
    |   |   |-- ProductsField
    |   |   |   |-- index.tsx
    |   |   |-- SelectorPage
    |   |   |   |-- index.tsx
    |   |   |   |-- styles.scss
    |   |   |-- SidebarWidget
    |   |   |   |-- index.tsx
    |   |   |   |-- ProductDescription.tsx
    |   |   |   |-- styles.scss
    |   |-- root_config
    |   |    |-- index.ts
    |   |-- services
    |   |    |-- index.ts
    |   |-- types
    |   |   |-- index.d.ts
    |   |-- index.css
    |   |-- index.tsx
    |   |-- react-app-env.d.ts
    |   |-- reportWebVitals.ts
    |   |-- .babelrc
    |-- .eslintrc
    |-- config.overides.js
    |-- jest.config.js
    |-- jest.CSStub.js
    |-- jest.setup.js
    |-- package-lock.json
    |-- package.json
    |-- tsconfig.json
    |-- update-app-info.json
└─ .gitignore
└─ LICENSE
└─ README.md
└─ SECURITY.md
└─ build.sh
└─ package.lock.json
└─ package. json
Below are the app routes for each location in App.tsx:
function App() {
  return (
    <ErrorBoundary>
      <MarketplaceAppProvider>
        <Routes>
          <Route path="/" element={<HomeRedirectHandler />} />
          <Route
            path="/custom-field"
            element={
              <Suspense>
                <CustomFieldExtensionProvider>
                  <CustomFieldExtension />
                 </CustomFieldExtensionProvider>
              </Suspense>
            }
          />
          <Route
            path="/entry-sidebar"
            element={
              <Suspense>
                <EntrySidebarExtensionProvider>
                  <EntrySidebarExtension />
                </EntrySidebarExtensionProvider>
              </Suspense>
            }
          />
          <Route
            path="/config"
            element={
              <Suspense>
                <AppConfigurationExtensionProvider>
                  <AppConfigurationExtension />
                </AppConfigurationExtensionProvider>
              </Suspense>
            }
          />
          <Route
            path="/product-field"
            element={
              <Suspense>
                <ProductCustomFieldExtensionProvider>
        <ProductExtension />
       </ProductCustomFieldExtensionProvider>
             </Suspense>
            }
          />
          <Route
            path="/category-field"
            element={
              <Suspense>
                 <CategoryCustomFieldExtensionProvider>
         <CategoryExtension />
     </CategoryCustomFieldExtensionProvider>
              </Suspense>
            }
           <Route
            path="/selector-page"
            element={
              <Suspense>
                <SelectorExtensionProvider>
<SelectorExtension />
            </SelectorExtensionProvider>
              </Suspense>
            }
         </Routes>
      </MarketplaceAppProvider>
    </ErrorBoundary>
  );
}
Using Marketplace Ecommerce App Boilerplate to Develop Custom Applications
To get started with building applications using the boilerplate, follow the steps given below:
Prerequisites
- Contentstack account
- Contentstack App Framework and knowledge of app development
- Reference to App SDK
Create a .env file and provide the URLs to configure the app.
For example:
- REACT_APP_API_URL: http://localhost:8080/
- REACT_APP_UI_URL: http://localhost:4000/
Install Dependencies
- Navigate to the root directory of the downloaded zip file.
- Run the following command to install the necessary packages:
In the terminal, go to the APP_DIRECTORY and install the necessary dependencies.
cd <APP_DIRECTORY>npm i
For UI
- To install the necessary packages for the UI, navigate to the UI folder.
cd <APP_DIRECTORY>/uinpm i
- After you install the packages, run the following command in the UI folder to get started.
npm run start
- For Windows operating system, use the following command:
npm run startWin
For API
- To install the necessary packages for the API, navigate to the API folder.
cd <APP_DIRECTORY>/apinpm i
- After you install the packages, run the following command in the API folder to get started.
npm run dev
- All the backend APIs are handled in a handler file inside the api/handler/index.js and all the UI API calls are handled inside the ui/src/services/index.tsx file.
Creating a Project Using The Boilerplate
To use your application, you need to upload it to Contentstack. To do so, perform the steps given below:
- Log in to your Contentstack account.
- In the left-hand-side primary navigation, you will find a new icon for Developer Hub (as shown below). Click the icon to go to the Developer Hub.
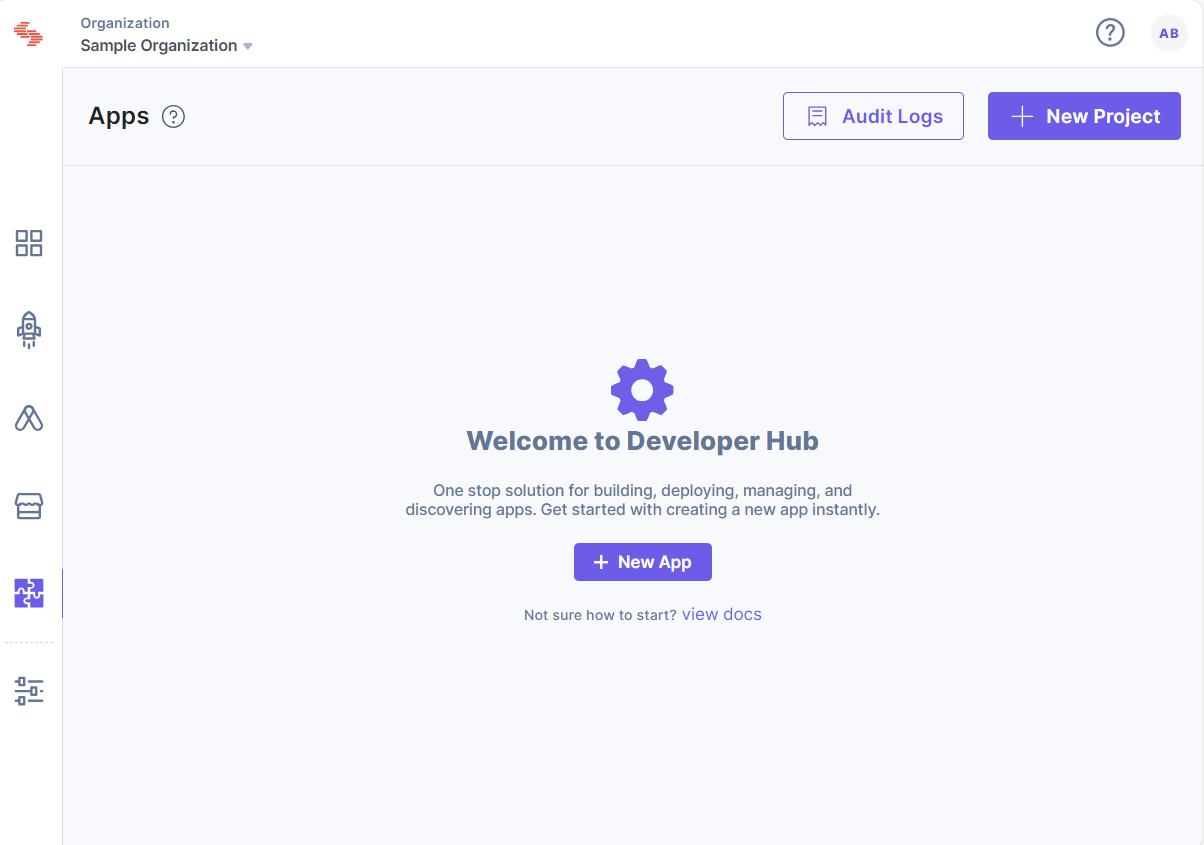
- Click the + New App button.
- In the New App modal, select Stack App as the Type of App. Enter a suitable Name for your app and an optional Description, and then click the Create button. By default, the Status of the created app will be Private.
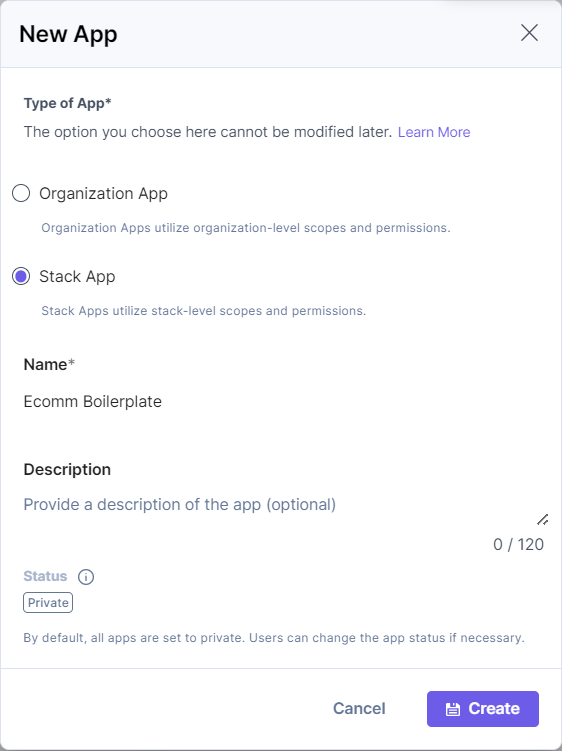
Warning: While selecting the Type of App in the above step, ensure you select Stack App, as this boilerplate supports stack apps only.
- Click Create.
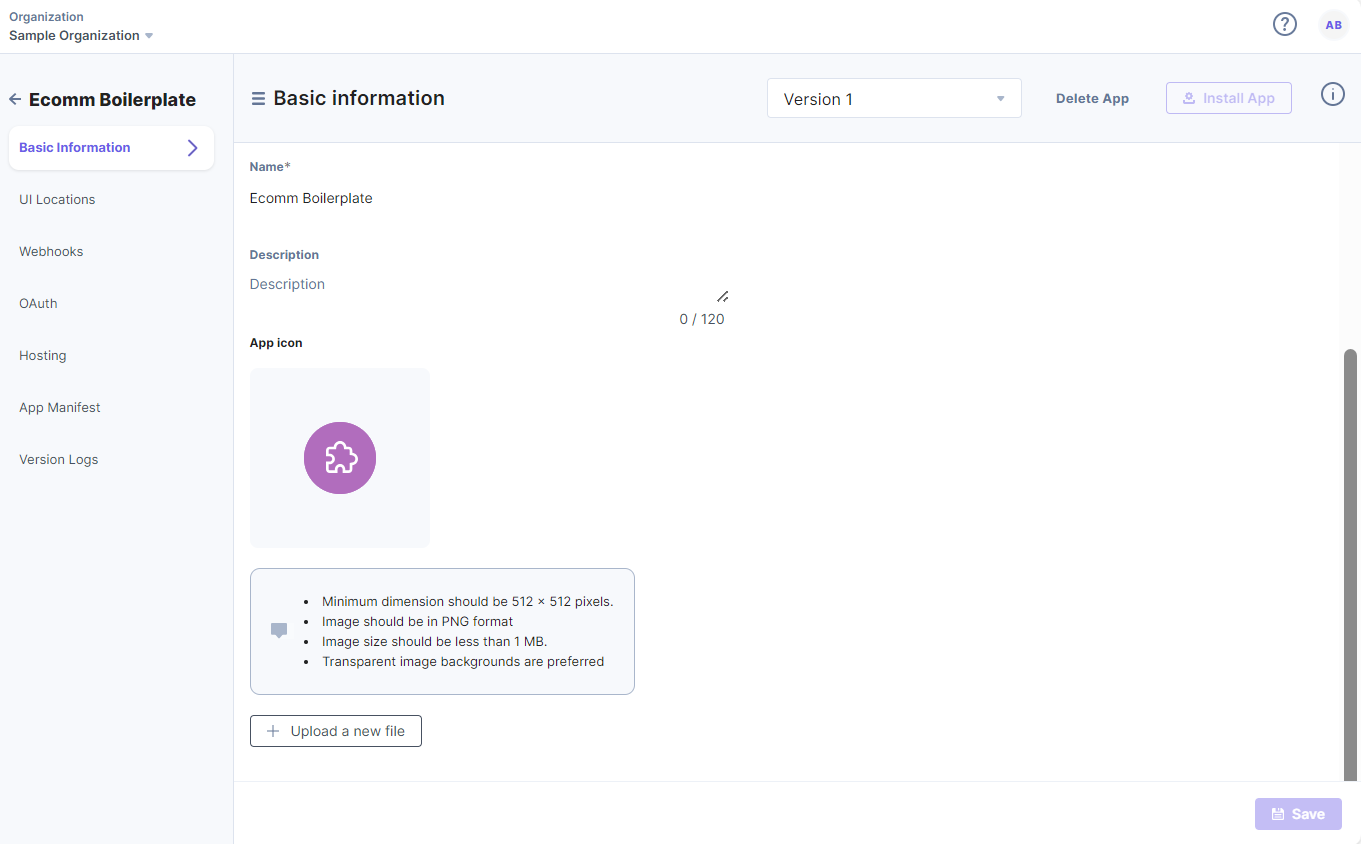
- On the resulting Basic Information page, upload your app’s icon and Save the changes.
- Click the UI Locations tab. To set the App URL, click the View Hosting Settings link. You will be redirected to the Hosting tab.
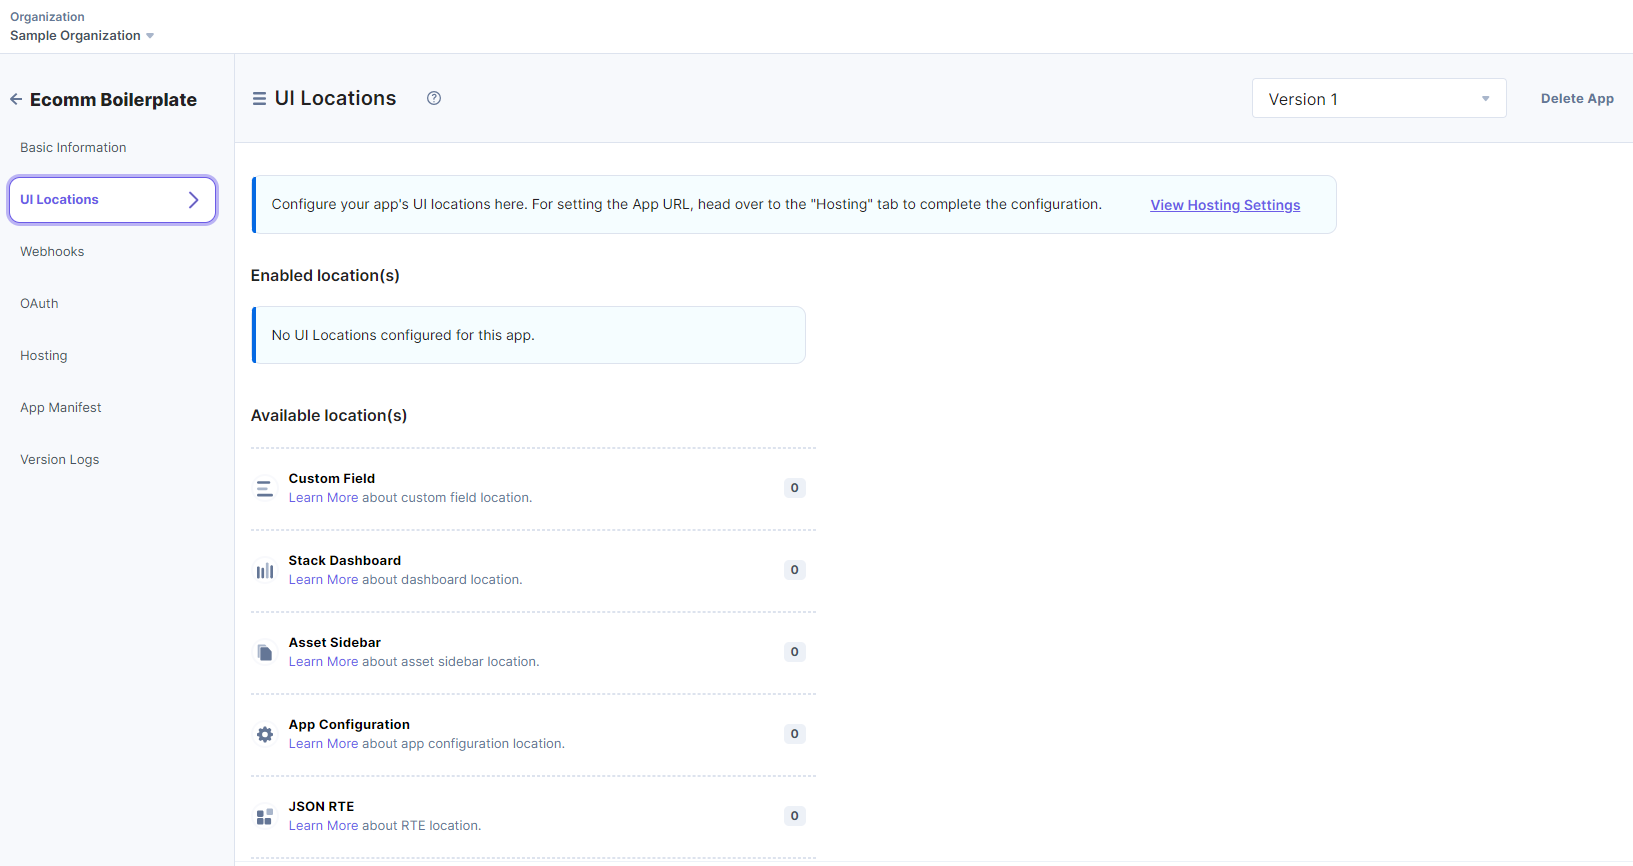
- Add the UI Locations as per your requirement.
- Add the below routes for each UI Location to get the desired results.
Note: The name for each UI Location is optional, and can be used to override the default app name.
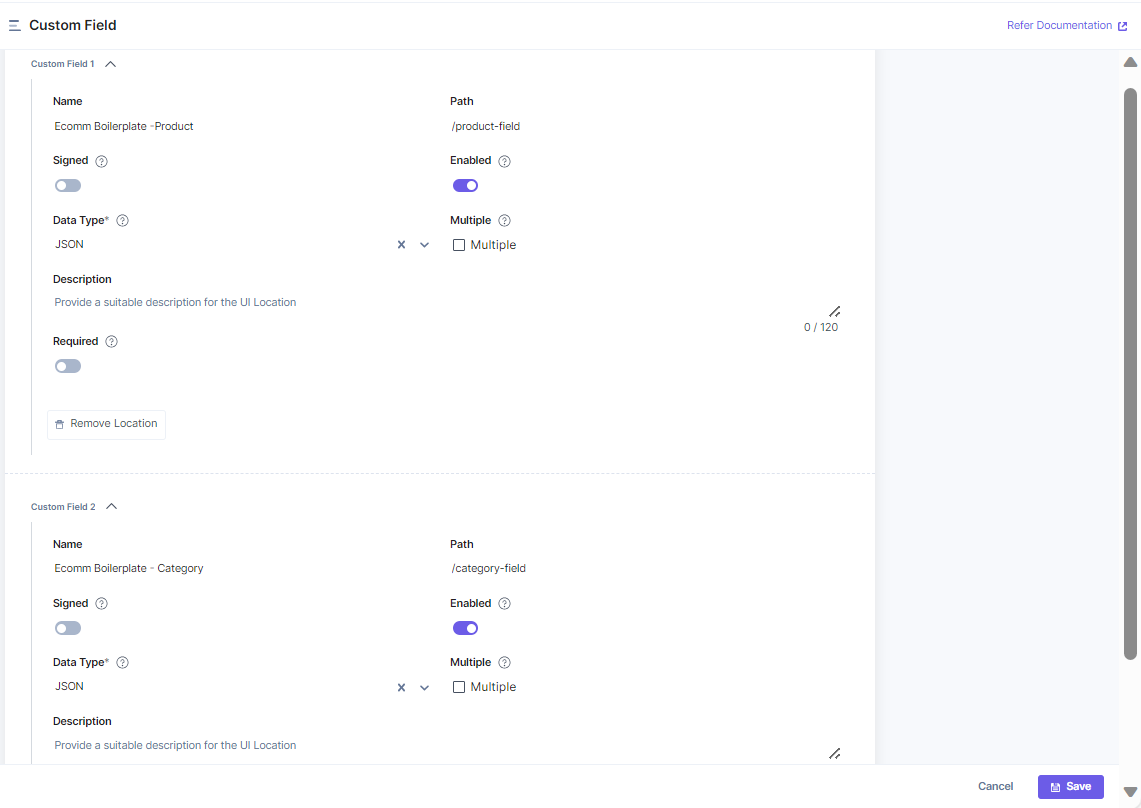
- Custom Field
You must add two custom locations to view the Product and Category for the products in your Contentstack entry. In the Custom Field 1, use <your_ app_name="">- Product for Name and /product-field for Path. In the Custom Field 2, user <your_app_name> - Category for Name and /category-field for Path. Select the Data Type as JSON to fetch JSON data in your entry.
- Entry Sidebar
For the Entry Sidebar UI Location, use /sidebar-widget for Path.
- App Configuration
For the App Configuration UI Location, use /config for Path.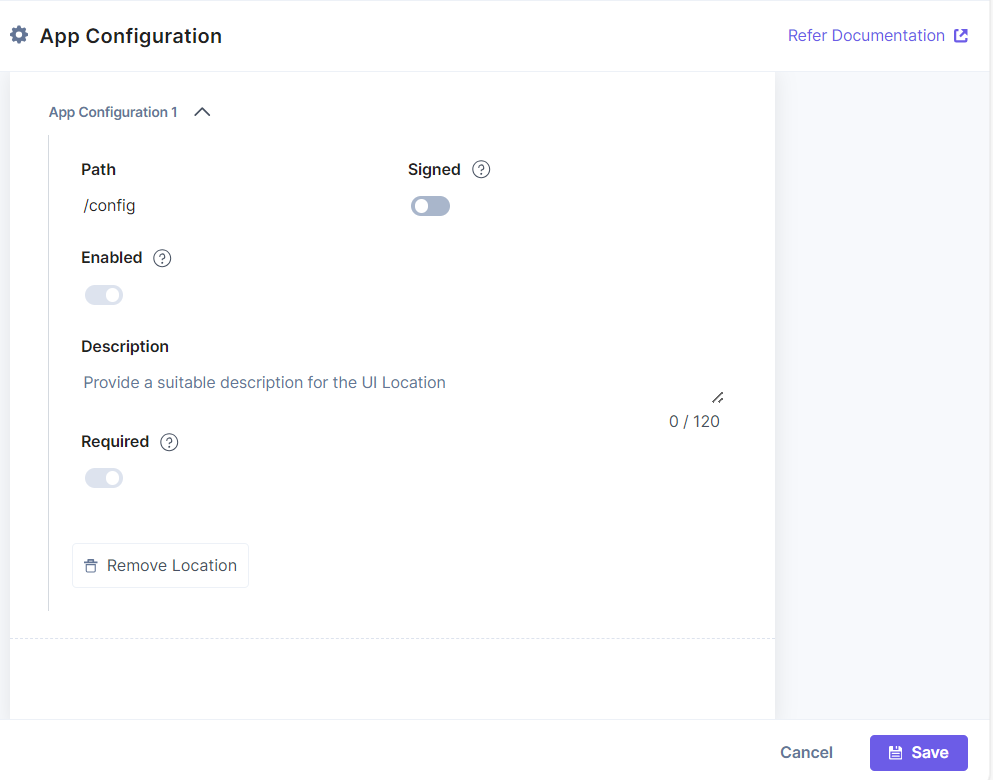
Note: After adding each route save and install the app in any stack.
- Custom Field
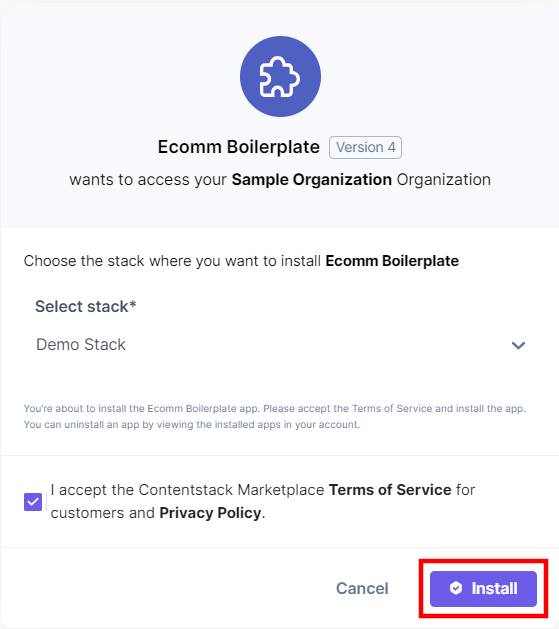
- Select the stack where you want to install the app and click the Install button.
- You will be redirected to the configuration page of the app.
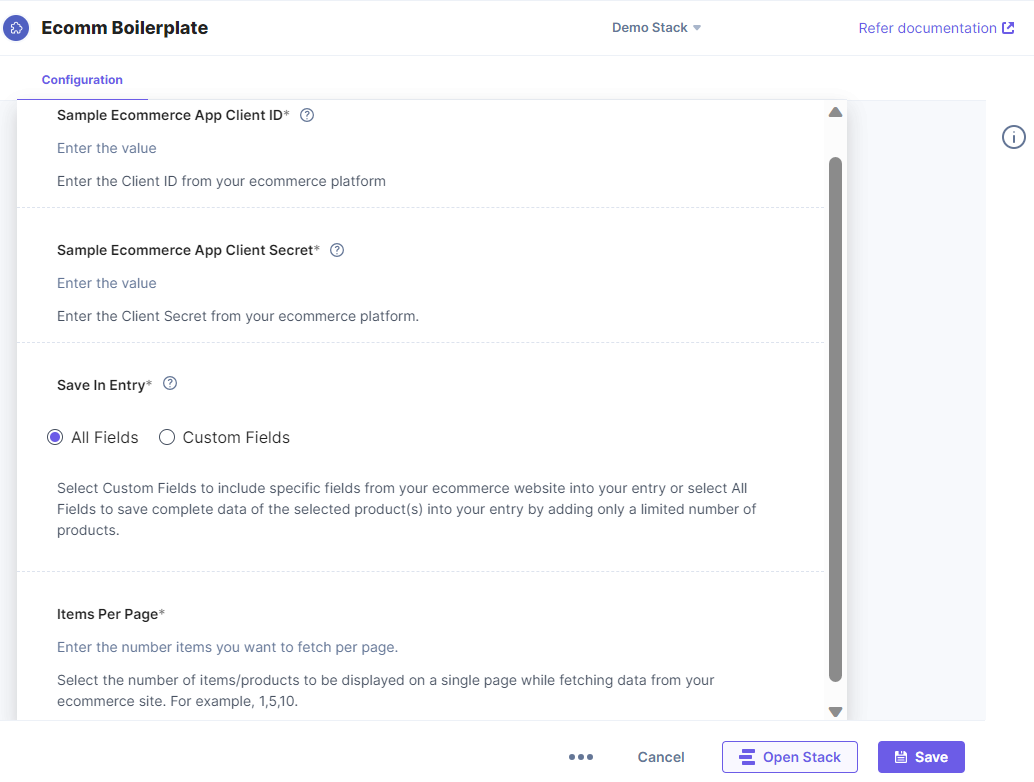
- On the Configuration page, enter the values for Sample Ecommerce App Client ID and Sample Ecommerce App Client Secret.
Let’s understand the configuration fields:
- Sample Ecommerce App Client ID
You can enter the Client ID fetched from the third-party ecommerce website and save the data. You can also use any other app configuration as per your ecommerce website.Note: This configuration is a template for the user to understand how they can add/update/remove the config fields and add customized fields based on their requirement.
- Sample Ecommerce App Client Secret:
You can use this field to enter Client Secret fetched from third-party ecommerce websites. You can also customize the app configuration with your dedicated fields.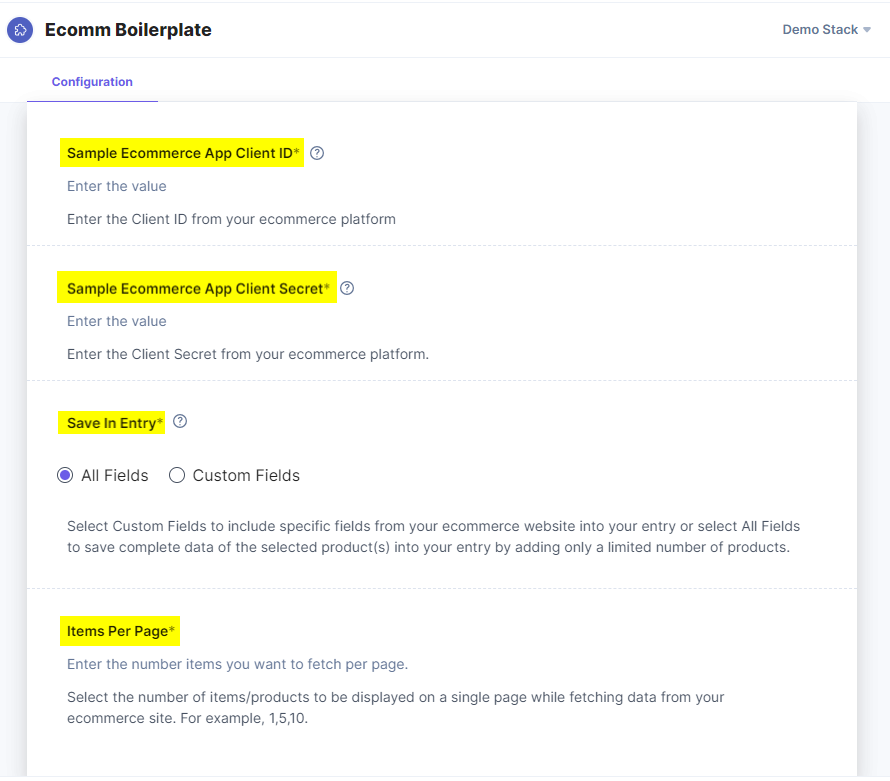
Note: With Save in Entry field, If you select the ''Custom Fields'' option, you can select the structure of the data you want to save in the entry. If the 'All Fields' option is selected, you might be able to add limited products in the custom field depending on the size of the data (Refer to the Custom Fields Location documentation, for more details). To increase this limit, Items Per Page defines the number of products to be displayed on the selector screen.
Additional Resource: To learn more, refer to the App Configuration document.
Having the basic ecommerce app setup ready, you can now update root_config files in the UI and API directories. You can go through the Template.MD file in our code repository documentation for complete details on root_config and update it as per the ecommerce platform that you are trying to integrate.
Note: In the root_config file, you can add the name of your app, the selector page information, etc. You can add details about the configuration screen as well.
You can check examples of some ecommerce websites, such as BigCommerce and SAP Commerce Cloud in the GitHub code you downloaded to get started. To do so, follow the steps below:
For API
- Navigate to the example -> app_name/index.tsx file.
- Copy the code present in index.tsx file.
- Navigate to the root_config and paste the code inside index.tsx file.
For UI
- Navigate to the example -> app_name -> index.tsx file.
- Copy the code present in index.tsx file.
- Navigate to the src -> root_config folder and paste the code inside index.tsx file.
Restart both the servers for UI and API using the npm command as shown above.
- Sample Ecommerce App Client ID
- Click Save and click Open Stack to start using the application.
- Navigate to the stack where your application is installed and view your application in the configured UI location.
Note: You must open the app in the configured UI location to view it.
Use the Ecommerce application within your Stack
To use the Ecommerce application within an entry of your stack, follow the steps given below:
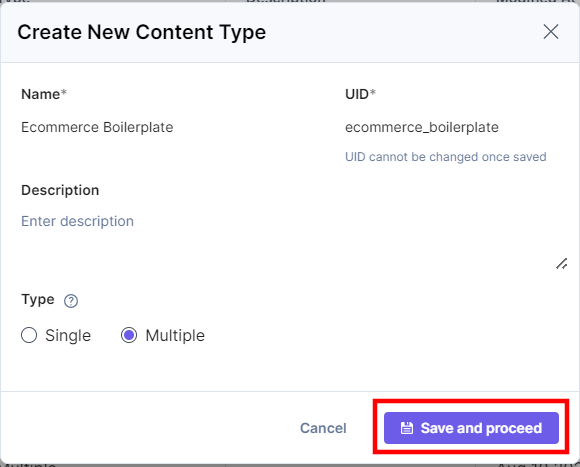
- Go to your stack and click the “Content Models” icon on the left navigation panel, and click the + New Content Type button.
- Create a content type by adding relevant details as displayed below:
- In the Content Type Builder page, add a Custom field in your content type by clicking on the “Insert a field” link represented by a + sign.
- Under Select Extension/App, select names defined for the Custom Field UI locations and click Proceed.
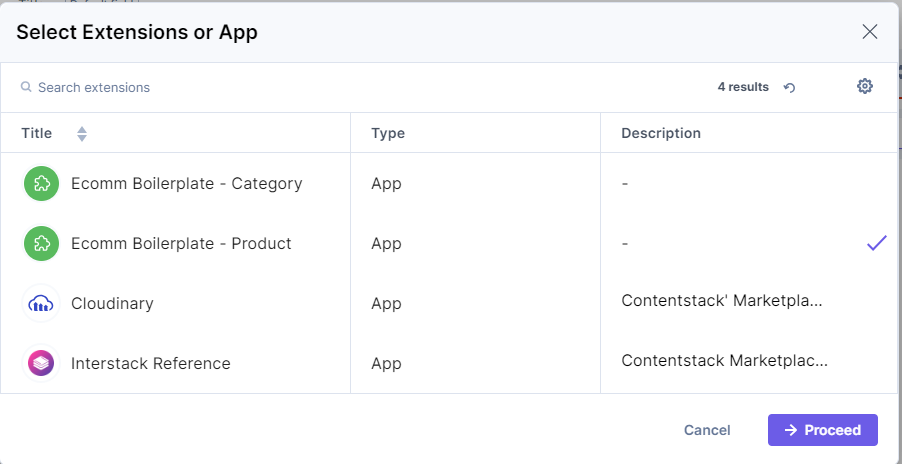
- After adding the app, click either Save or Save and Close to save your changes.
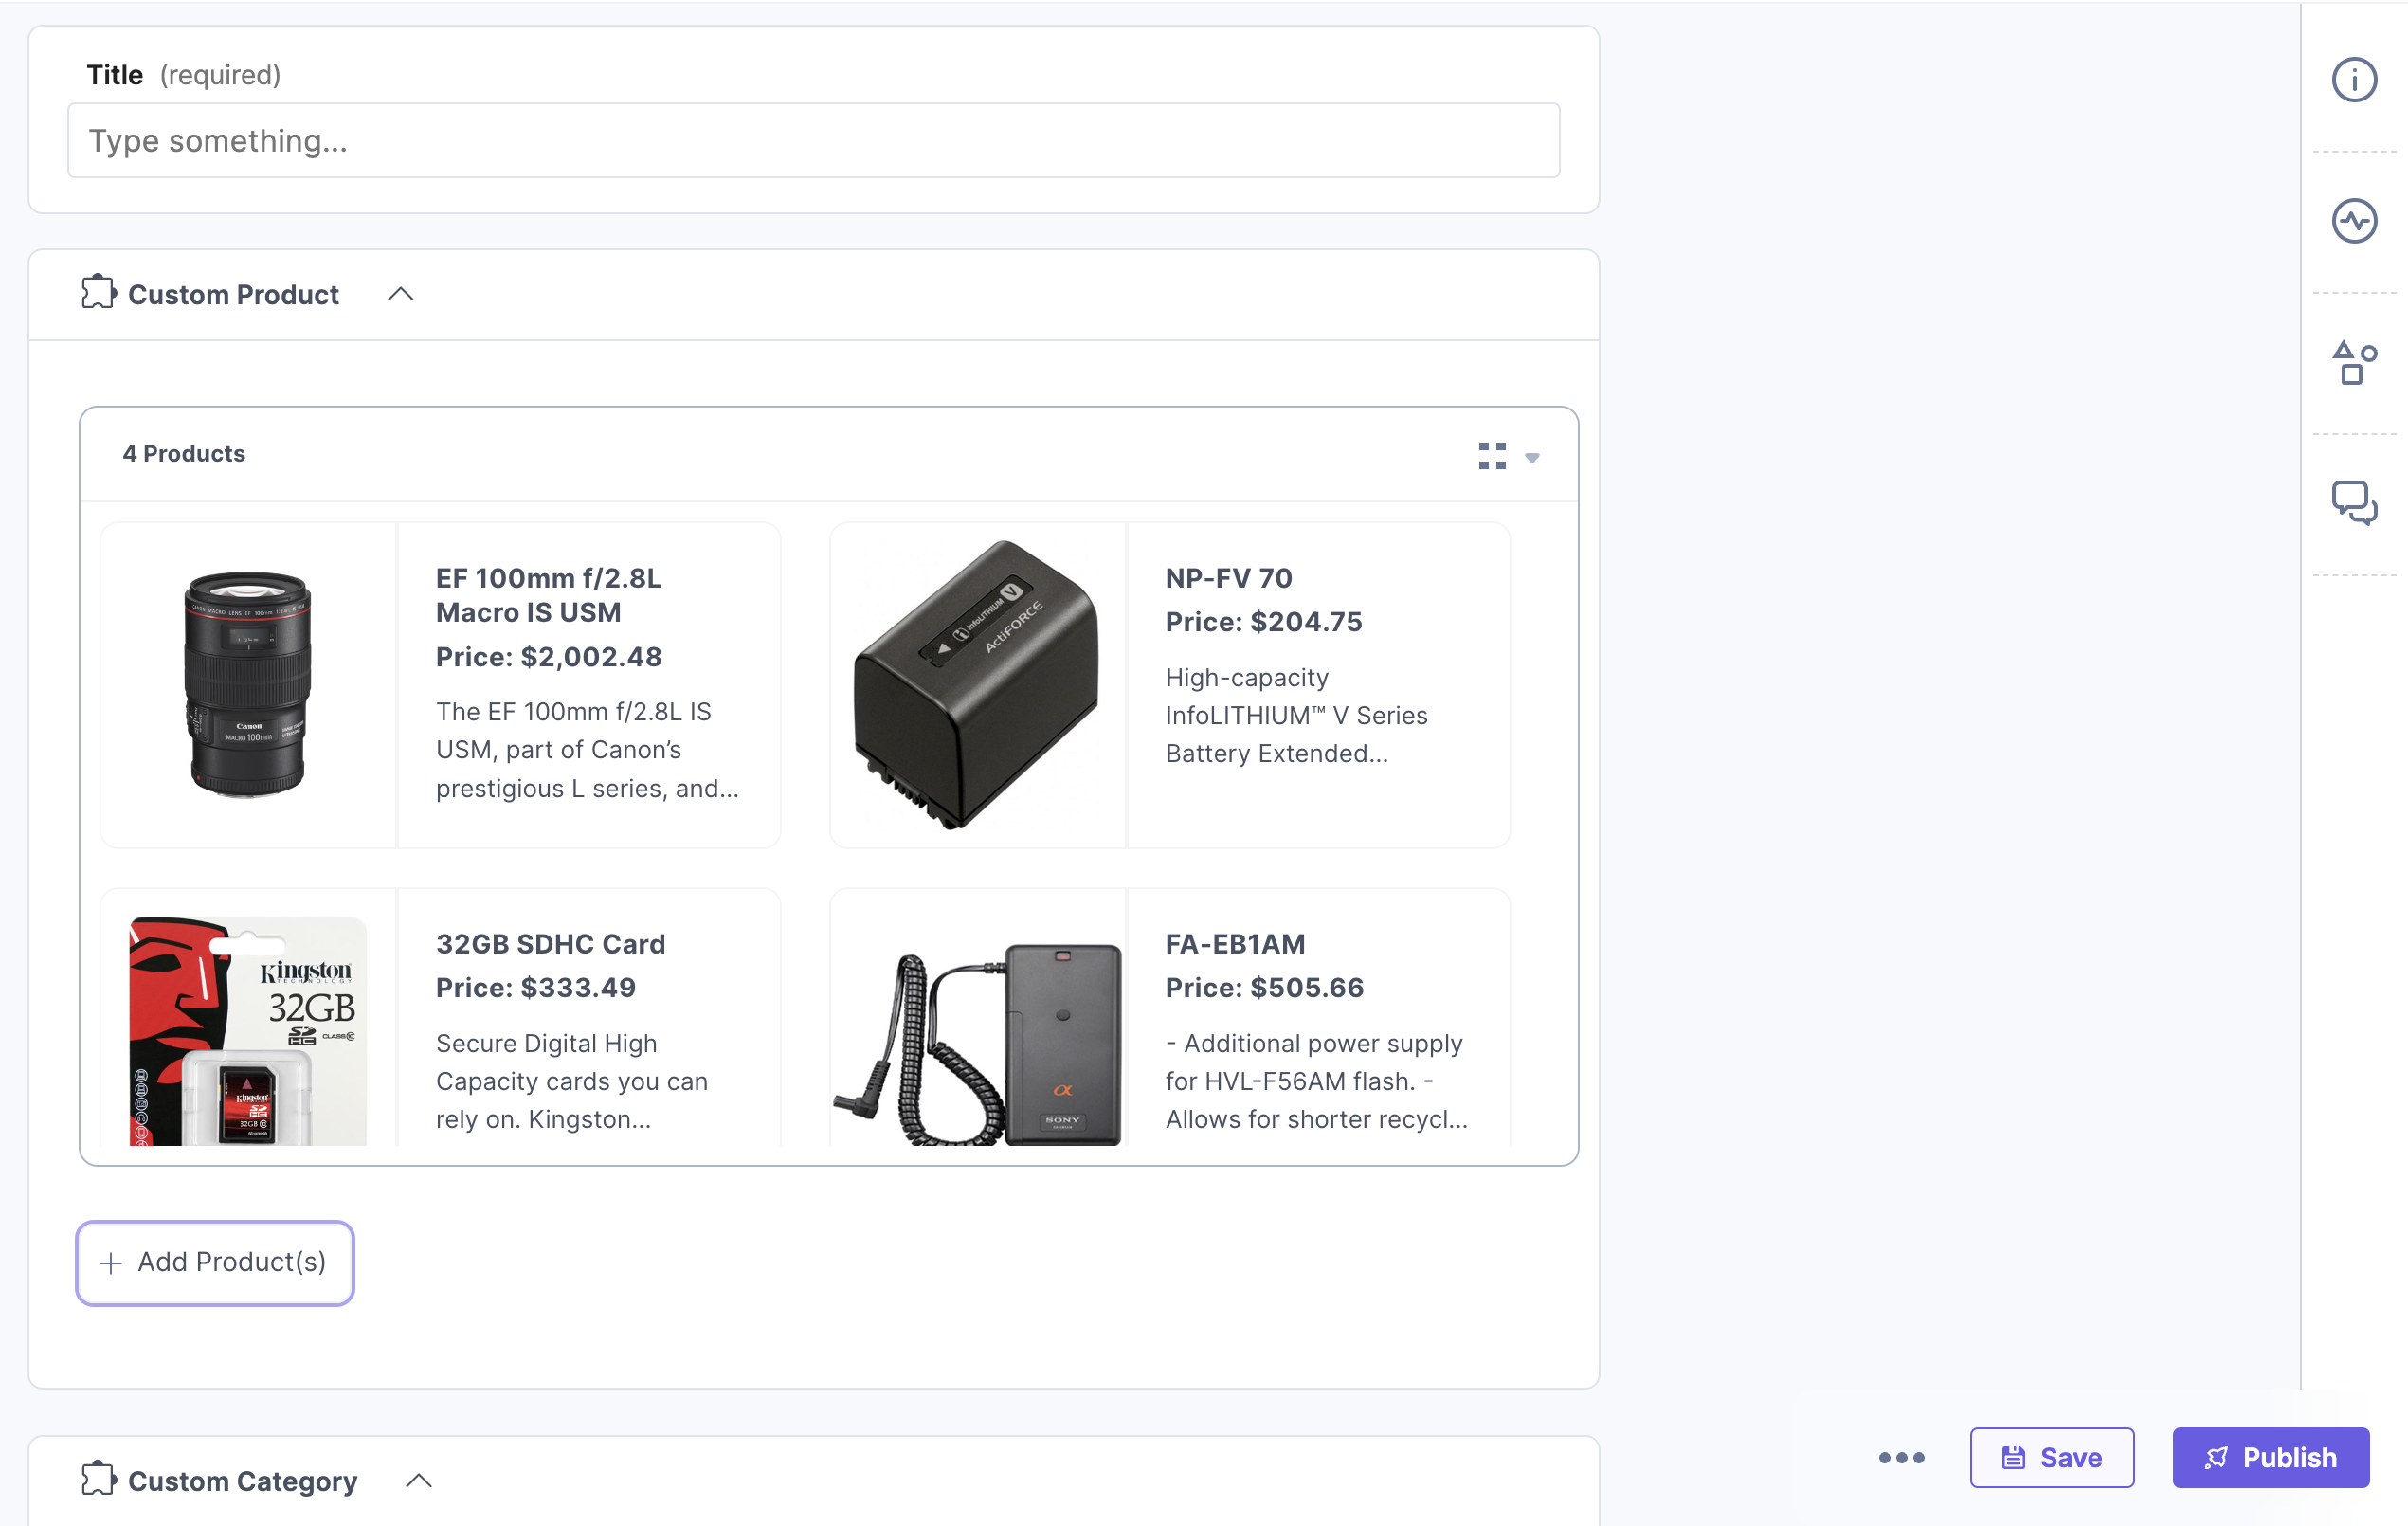
- To use the Ecommerce app, create an entry for this content type, and you will see this Ecommerce custom fields on your entry page as shown below:
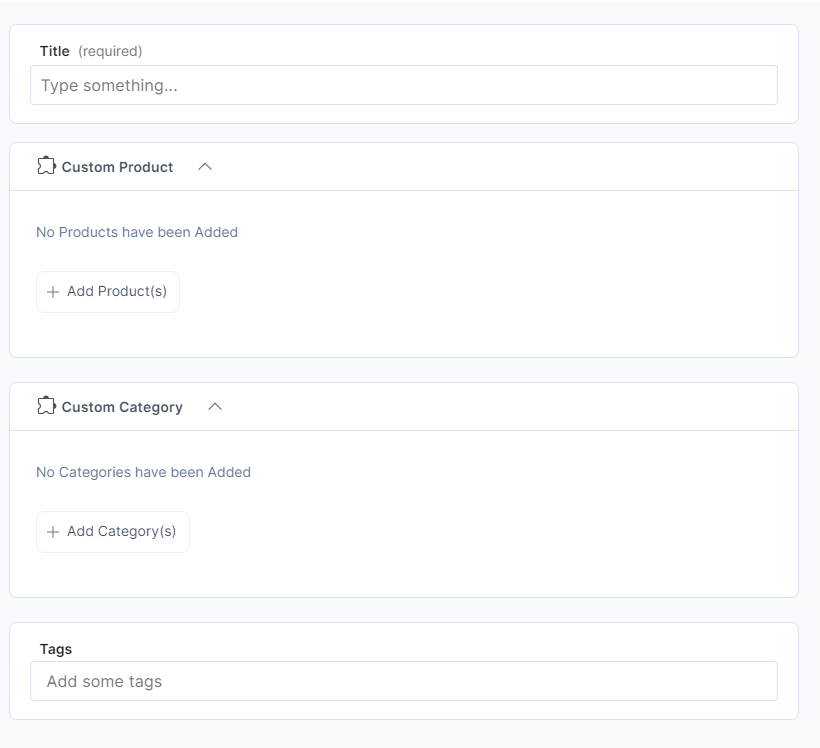
- Click the + Add Product(s) button and select the products you want to add from the third-party ecommerce website.
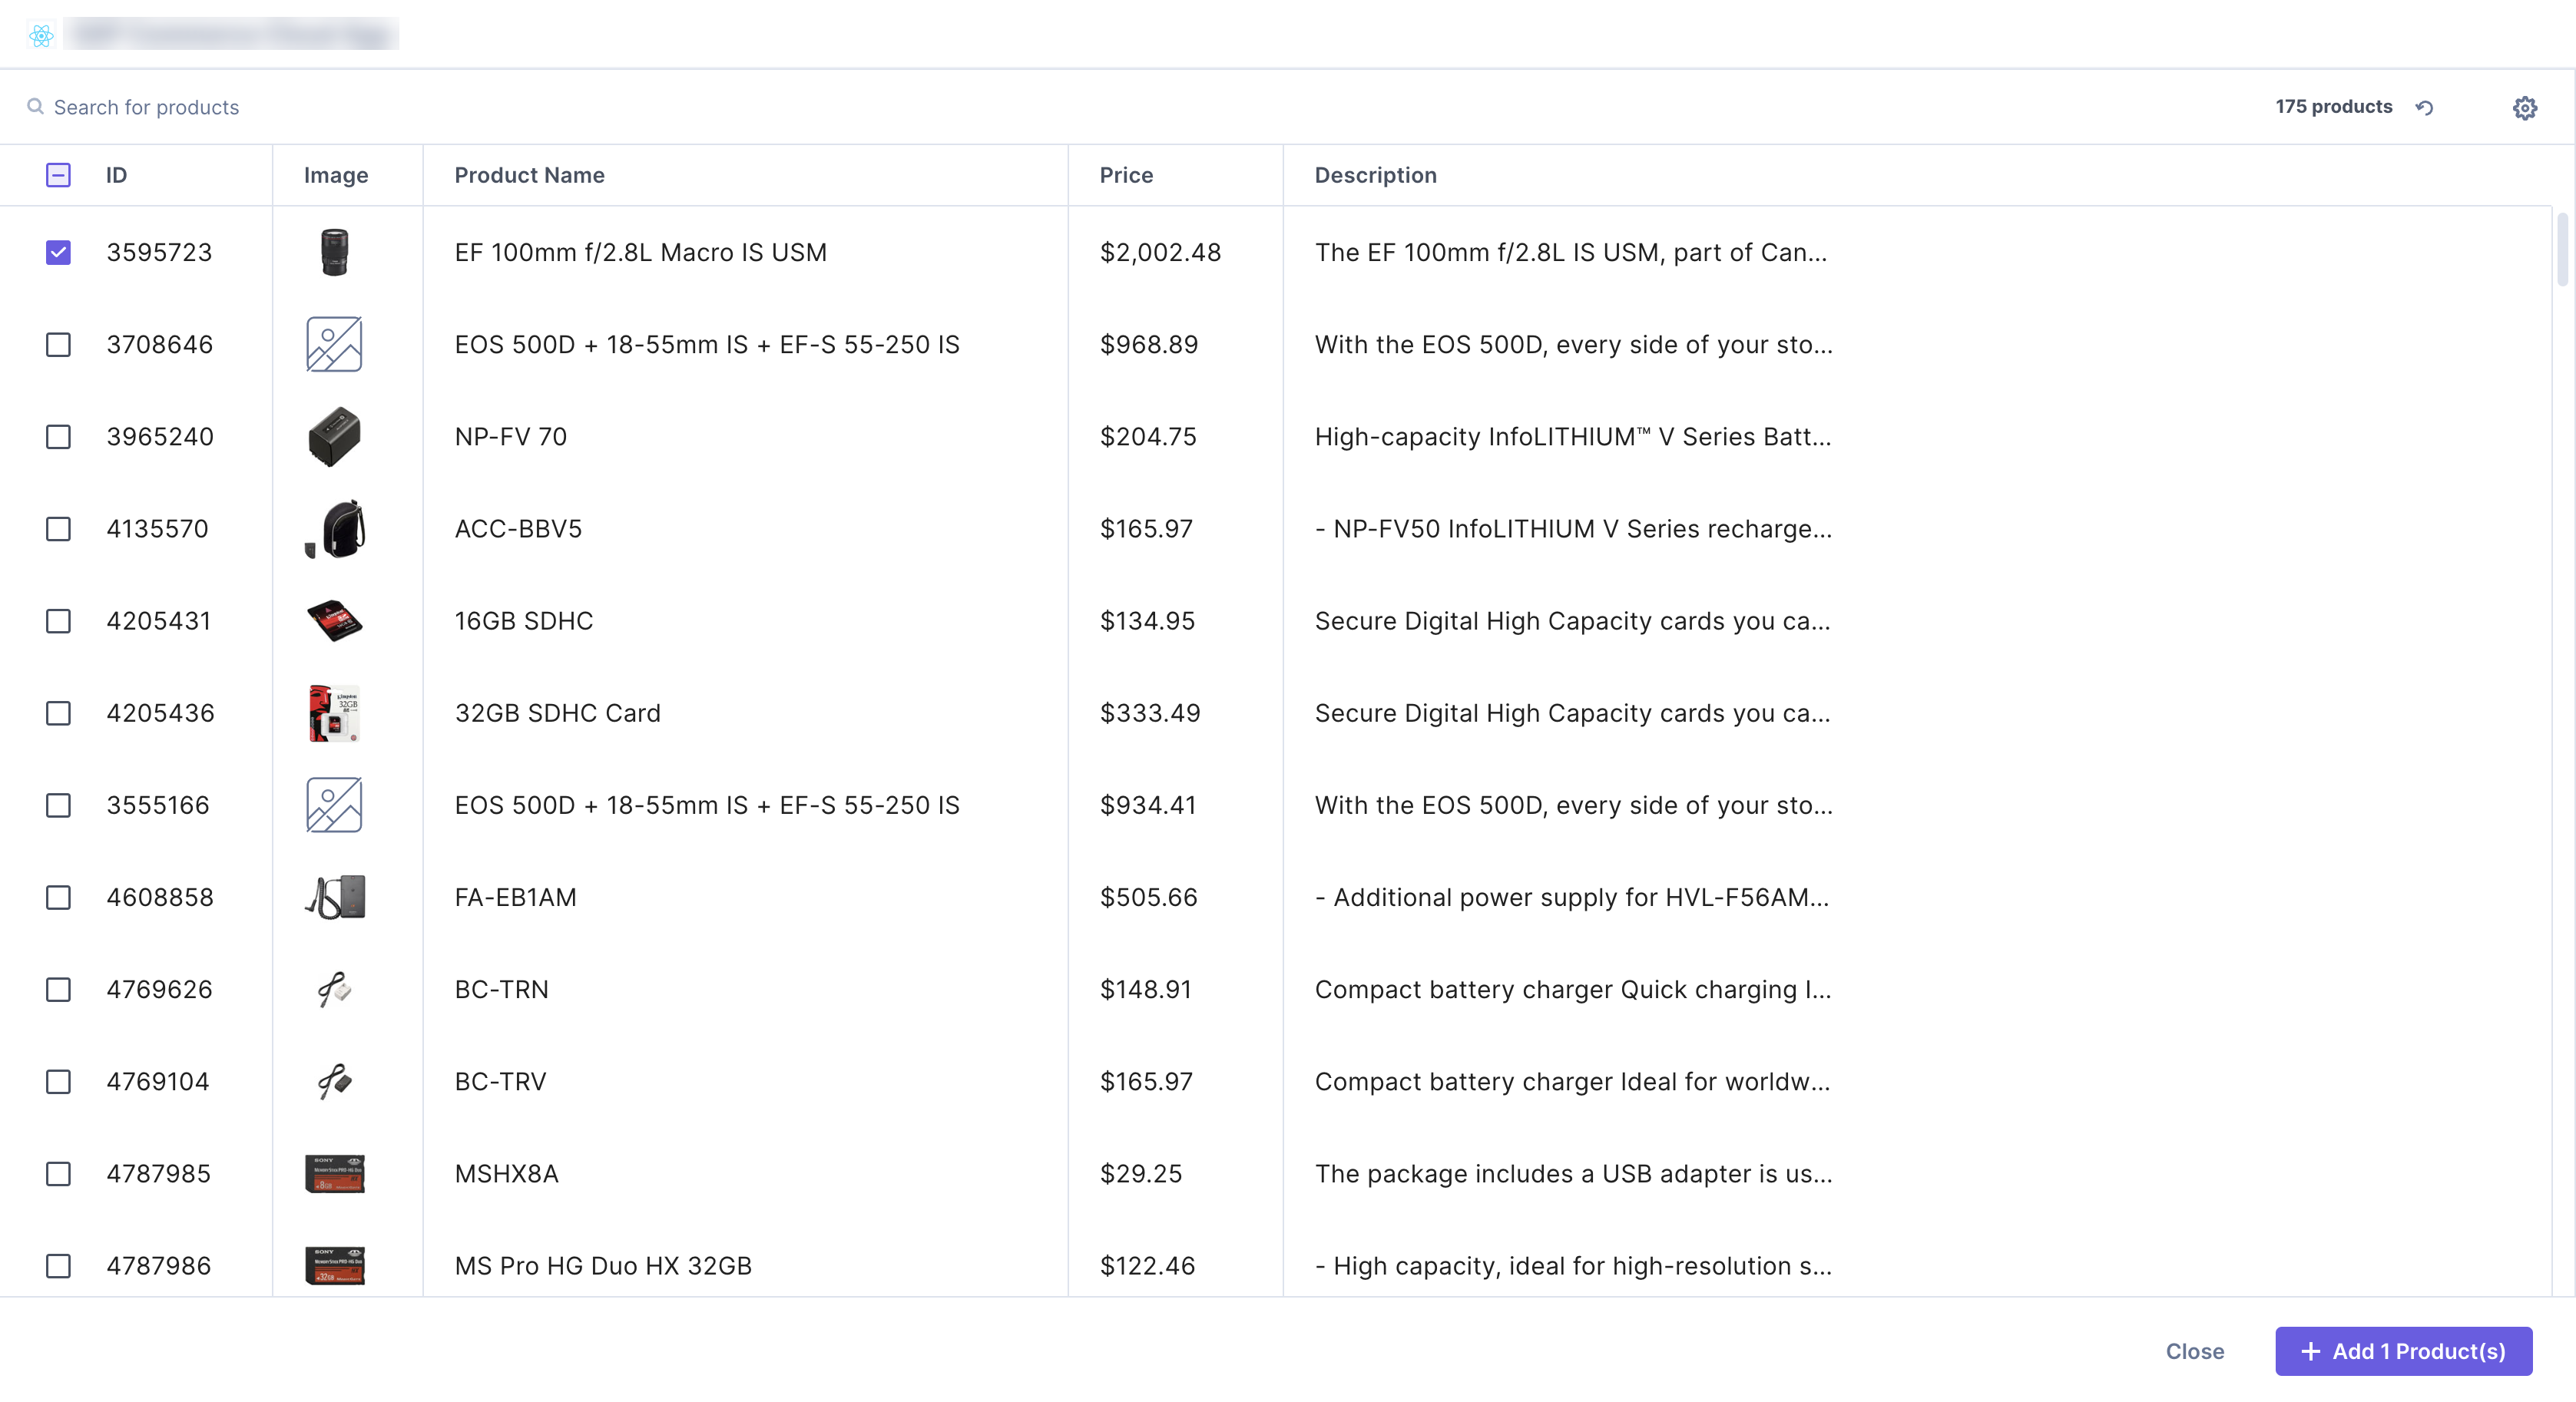
- You will see the products fetched within your entry. You can drag and drop the products to arrange them in required order in both Thumbnail and List views.
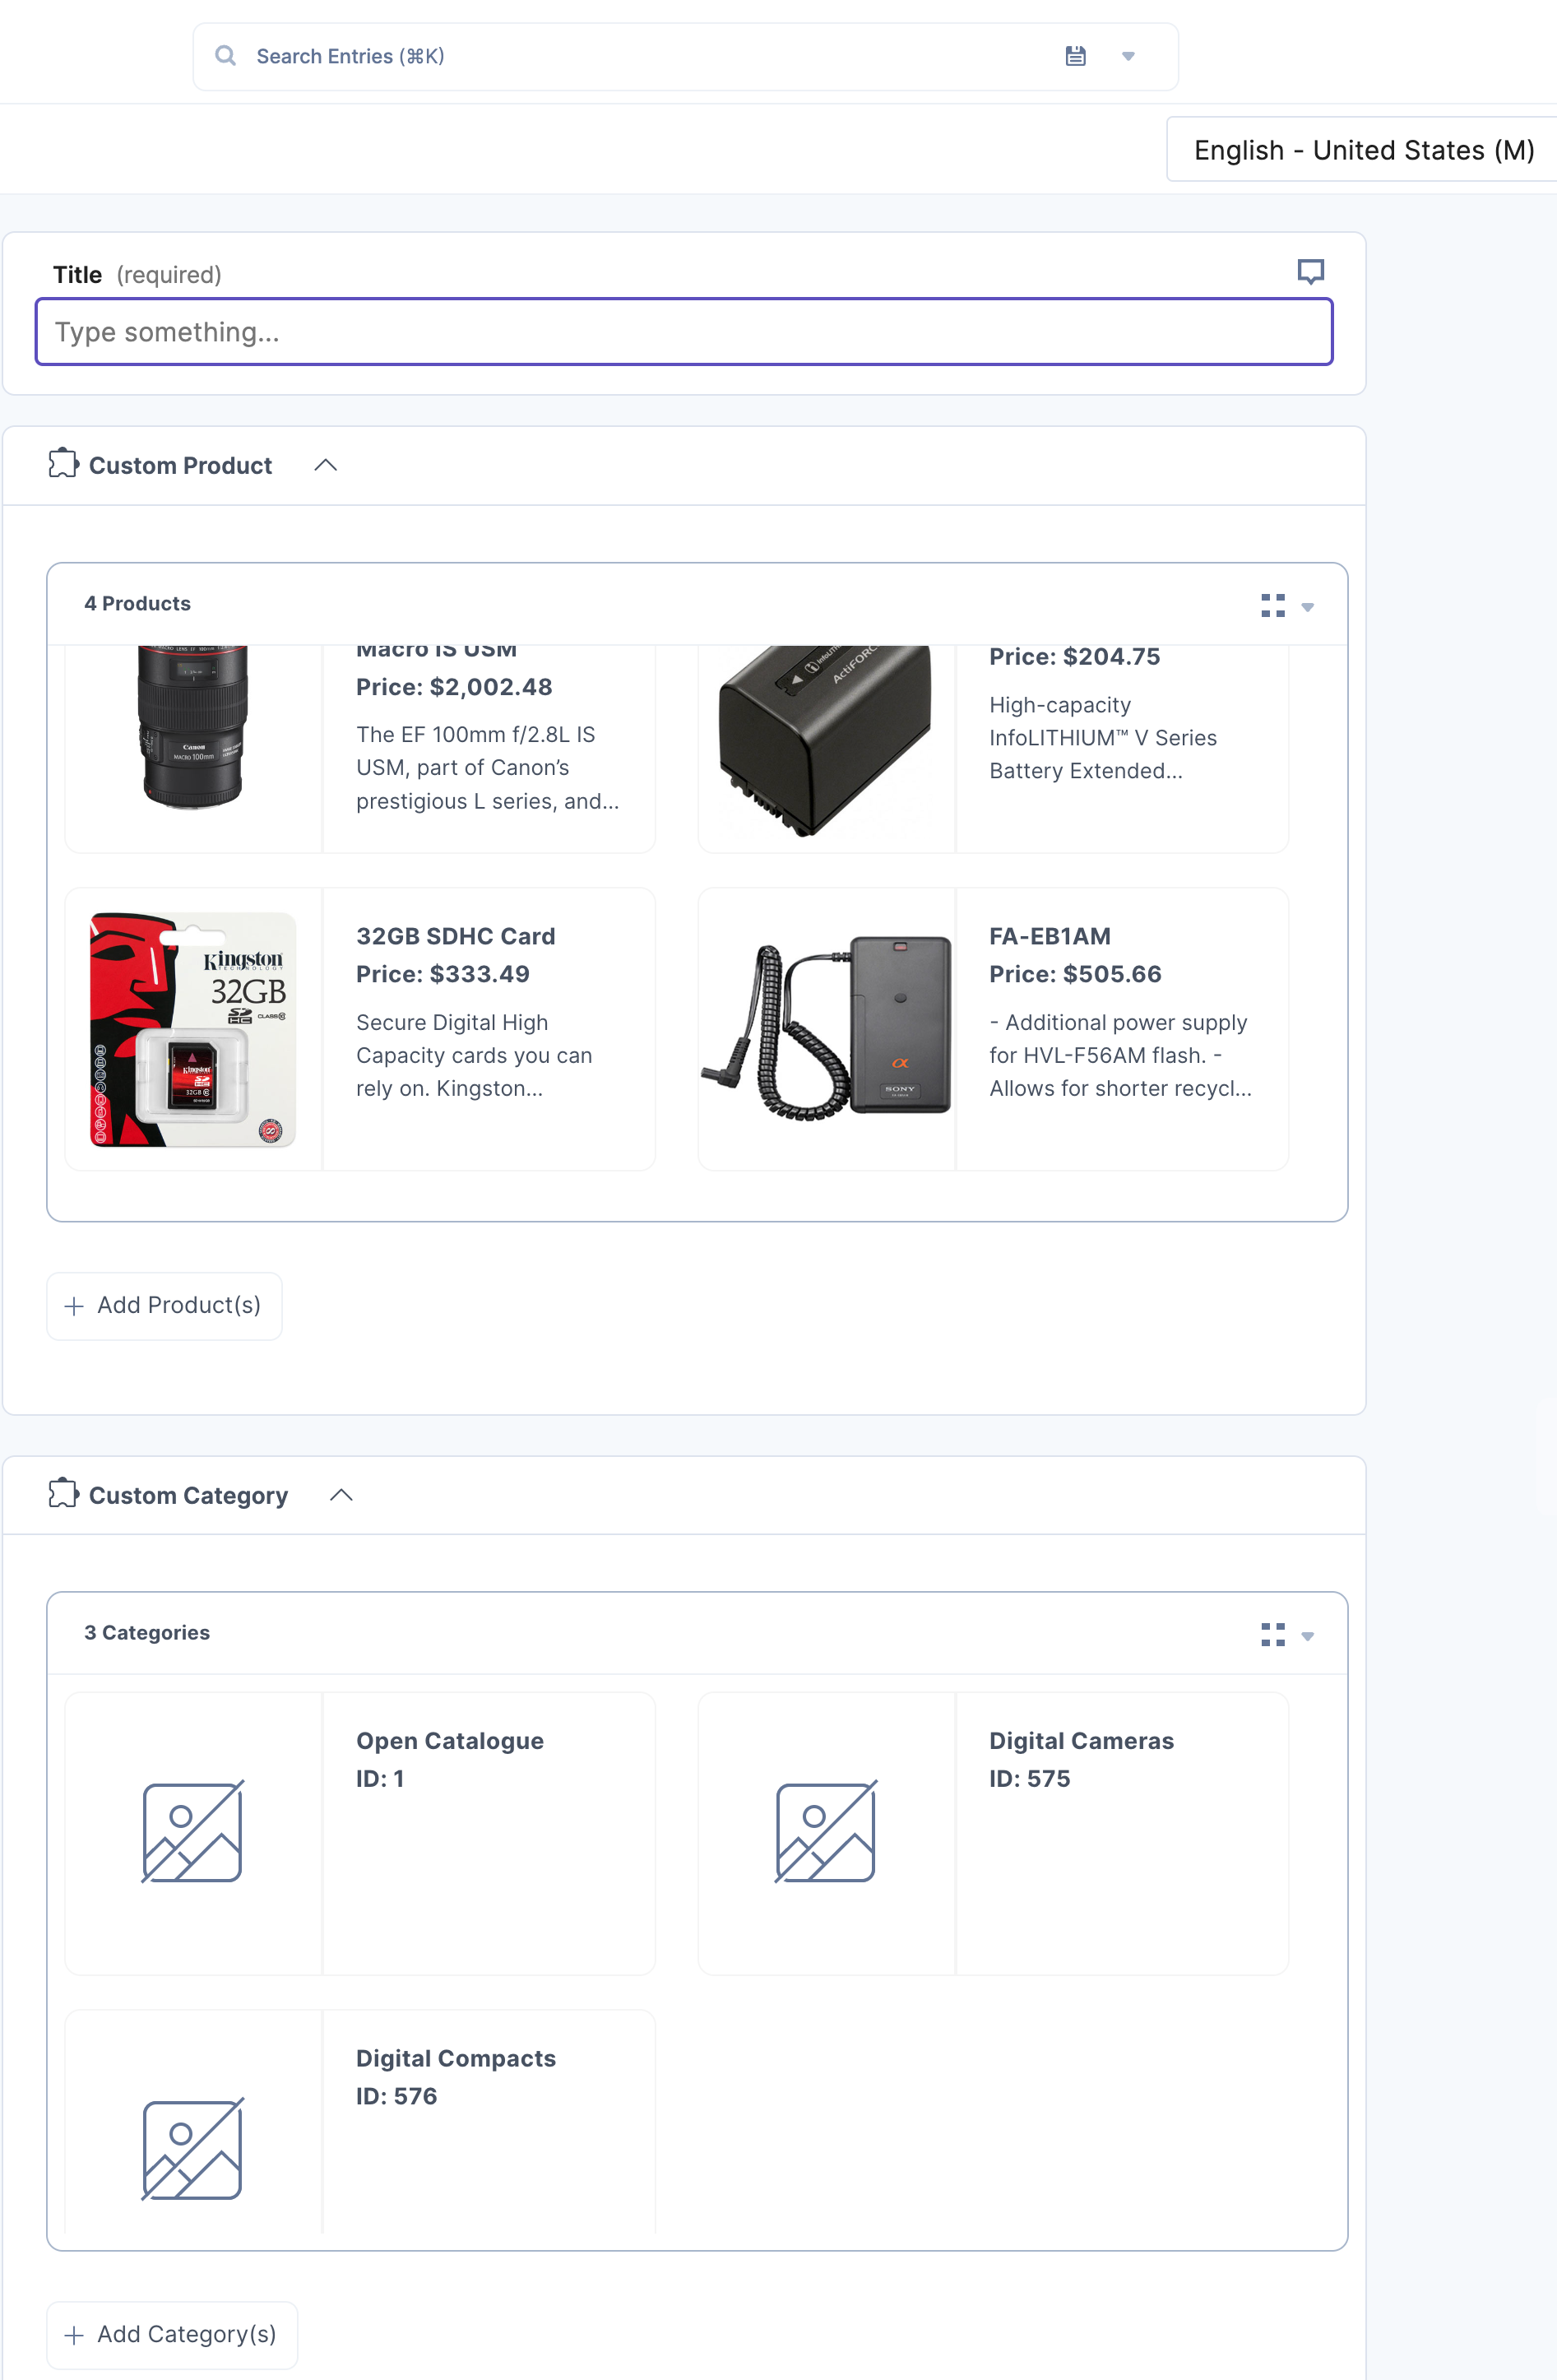
- Click the Save button.
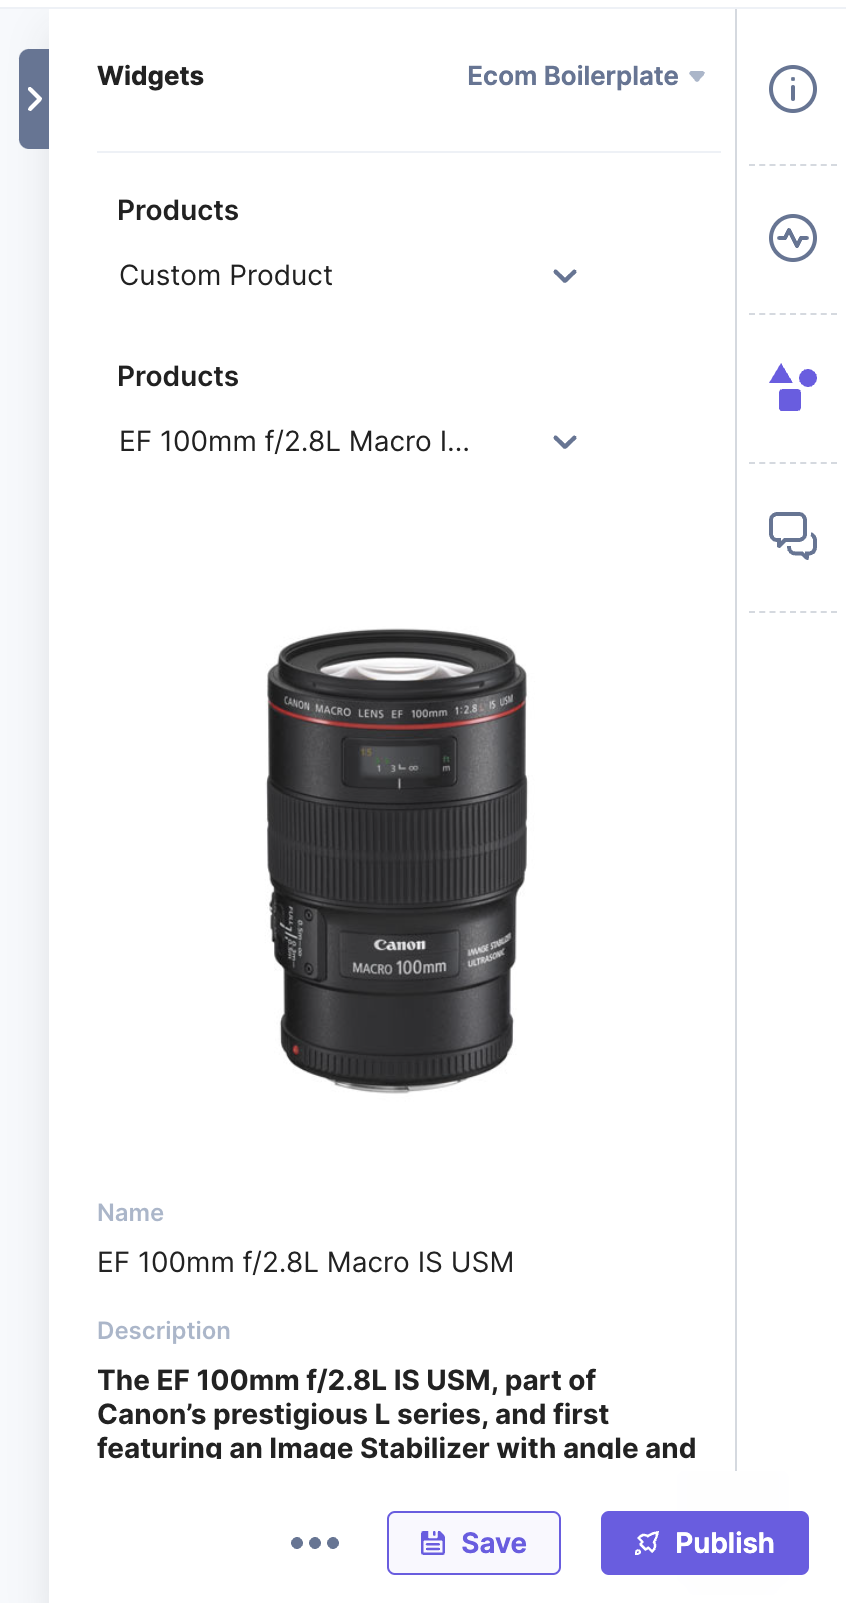
- You can view more product details in Sidebar Widget.
- In the Sidebar Widget, enter the product name in the dropdown field to search and view the product details.
More articles in "Quickstart"
