

HTML-based Rich Text Editor
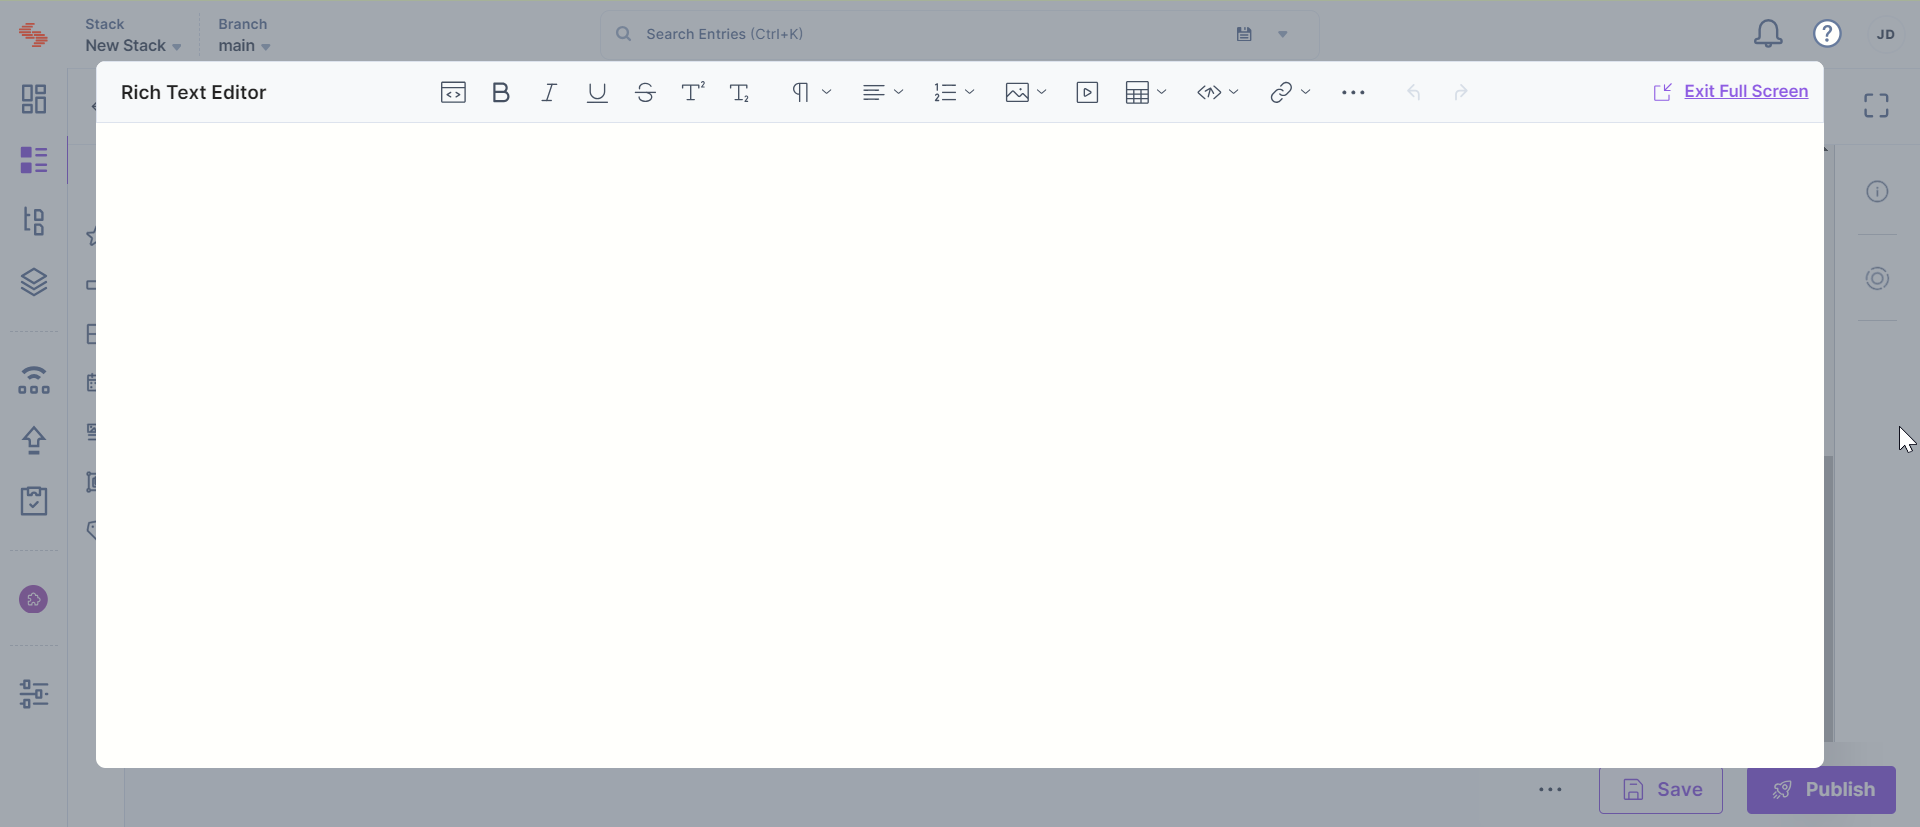
The HTML-based Rich Text Editor (RTE) field enables users to input different types of content such as text, image, videos, and so on. When you add a HTML-based RTE field in a content type, it displays a text area with editing and formatting options in the entry page. This field allows you to edit and format content entered in the field without using HTML tags (however, you can use HTML tags in the HTML mode, if needed).
Note: We now have a JSON Rich Text Editor that stores content in structured JSON blocks and returns clean data in the response body. You can also migrate content from your HTML-based RTE to the new JSON RTE using our CLI. Read more about our JSON Rich Text Editor and migration guide.
Customized HTML-based Rich Text Editor
Apart from choosing between the Basic and Advanced editors, developers can also choose the Custom editor, while adding the HTML-based RTE field to content types.
The Custom editor allows you to choose from the various formatting options, and control what will be available in the HTML-based RTE toolbar for content managers.
Note: Only the stack owner, admins, and users assigned “Developer” roles have the right to customize the RTE field.
To customize the HTML-based RTE field, log in to your Contentstack account, and perform the following steps:
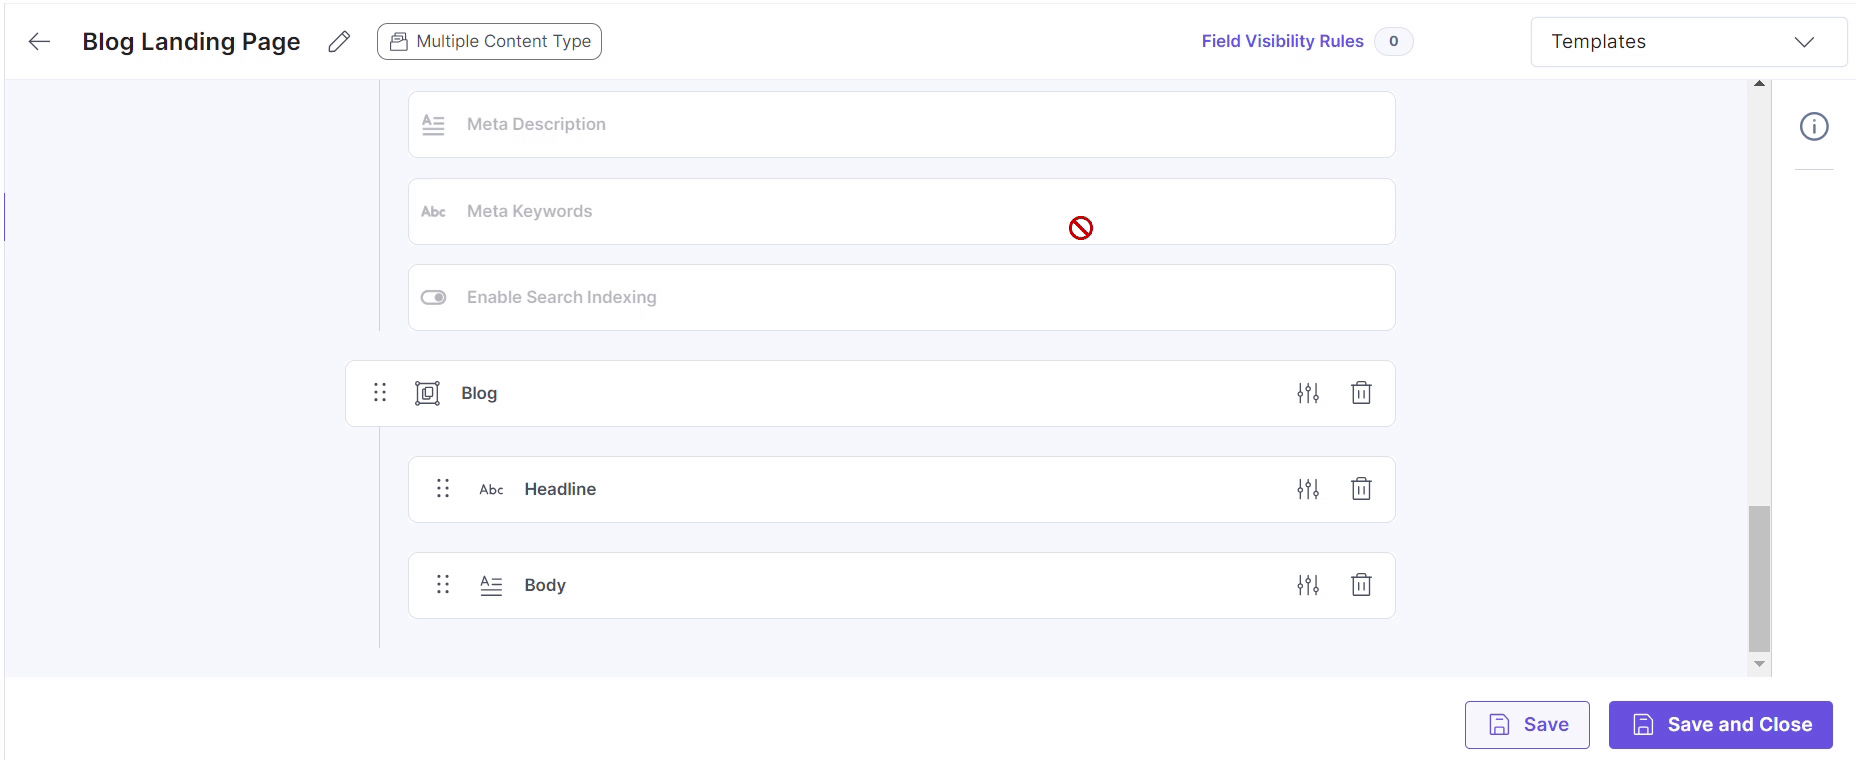
- In the Content Type Builder page, add the Rich Text Editor (RTE) field to it.
- In the Editor Properties section of the RTE field, under the Editor Type, select Custom, and choose the formatting options you want to include in the RTE field.
- To select all the formatting options, check the Select All box.
- After adding and configuring the fields, click either Save or Save and Close button to save your content type.
Now, when the content managers edit or create an entry of this content type, they will see the HTML-based RTE with the formatting/inserting options that you selected in the above step.
Additional Resource: You can read more about Field Visibility Rules in our documentation where we have covered it extensively.
Working with Copy-Paste in HTML-based Rich Text Editor
Copy-paste behavior in the HTML-based Rich Text Editor depends on the source of the content (for example, Google Docs, Microsoft Word, or web pages). These sources often include inline styles and hidden formatting that may be preserved in the editor.
As a result:
- Inline styles may be retained and affect formatting consistency.
- Some formatting may not align with your frontend styles.
- Content may render differently on the frontend compared to the editor.
Recommended Approach: Paste as Plain Text
For more consistent results, paste content as plain text to remove unwanted formatting.
- Mac: Command + Shift + V
- Windows: Ctrl + Shift + V
After pasting:
- Reapply formatting using the HTML RTE toolbar.
- Preview the content to ensure it matches your design requirements.
Spacing behavior in HTML-based RTE
The HTML-based Rich Text Editor (RTE) preserves spacing more consistently when you press the spacebar.
Note: When you add multiple spaces intentionally, the editor stores them as in the backend preventing the spacing from collapsing during rendering.
This ensures that:
- Your intended spacing is retained across the editor and frontend.
- Content layout remains consistent across different views.
- Formatting issues caused by collapsed spaces are reduced.
You may notice in the output in the following cases:
- Empty blocks: If a heading, paragraph, list item, quote, or table cell has no visible content, the editor inserts a non-breaking space so the element remains visible and does not collapse in the browser.
- User-entered spacing: Extra spaces at the beginning or end of a line, or multiple spaces within a line, are preserved to maintain the intended formatting.
- Existing non-breaking spaces: Any non-breaking spaces already present in the content (for example, from pasted text) are retained in the output.
Note: In code blocks or similar contexts where spacing must remain exact, this spacing behavior is not applied.
List Spacing and Formatting
When pasting bulleted or numbered lists:
- Inline styles from the source may override default spacing.
- List items may appear compressed or inconsistently spaced on the frontend.
To resolve this:
- Paste content as plain text and recreate the list.
- Remove and reapply list formatting within the editor.
- Validate the output on the frontend application.
Troubleshooting Formatting Issues
If pasted content does not render as expected:
- Paste the content as plain text.
- Remove unwanted formatting using the “Remove Formatting” option.
- Reapply required styles using the toolbar.
- Recreate complex elements such as nested lists or tables.
- Adjust frontend styles (for example, margin or padding) if needed.
Note: Due to differences in how external tools generate HTML, achieving consistent formatting across all sources is not always possible. Results may vary depending on the content source and structure. For more structured and consistent content handling, consider using the JSON Rich Text Editor.
Embed Entries or Assets within HTML-based Rich Text Editor
Contentstack allows you to embed entries and assets within the HTML-based Rich Text Editor field. Embedded entries and assets are automatically updated within the Rich Text Editor field whenever the source entry or asset is updated.
The HTML-based RTE field lets you embed entries inline within the flow of text, as a separate content block, or as a dynamic hyperlink.
Here are some real-world scenarios where we use embedded entries:
- Embed entry inline: To pass in some value from a linked entry that might be dynamic, such as a working title or a link that opens a modal popup
- Embed entry as block: To add descriptive image carousels, survey forms, or product listings
- Embed entry as hyperlink: To add a hyperlink in the RTE that changes dynamically whenever any updates are made
In the case of assets, they can be embedded in the HTML-based Rich Text Editor in two ways, either as a displayable component or as a downloadable file.
Here are some real-world scenarios where we use embedded assets:
- Displayable embedded images: Such assets are dynamically updated in the frontend whenever you make any changes to the source item in the asset manager
- Downloadable Images or Files: Such items are usually PDFs or other reference file formats that come with a handy download link
Note: The option to embed entries and assets within rich text content is available only for Advanced and Custom Rich Text Editor fields. The Basic type of Rich Text Editor does not have this option.
Enable the Embed Items Option within the HTML-based RTE
To enable the option to embed entries and assets inside the HTML-based Rich Text Editor field, log in to your Contentstack account and perform the following steps:
- In the Content Type Builder page, add the Rich Text Editor (RTE) field to the content type.
- In the Properties window of the RTE field, go to the Advanced section, and select the Advanced radio button under Editor Type.
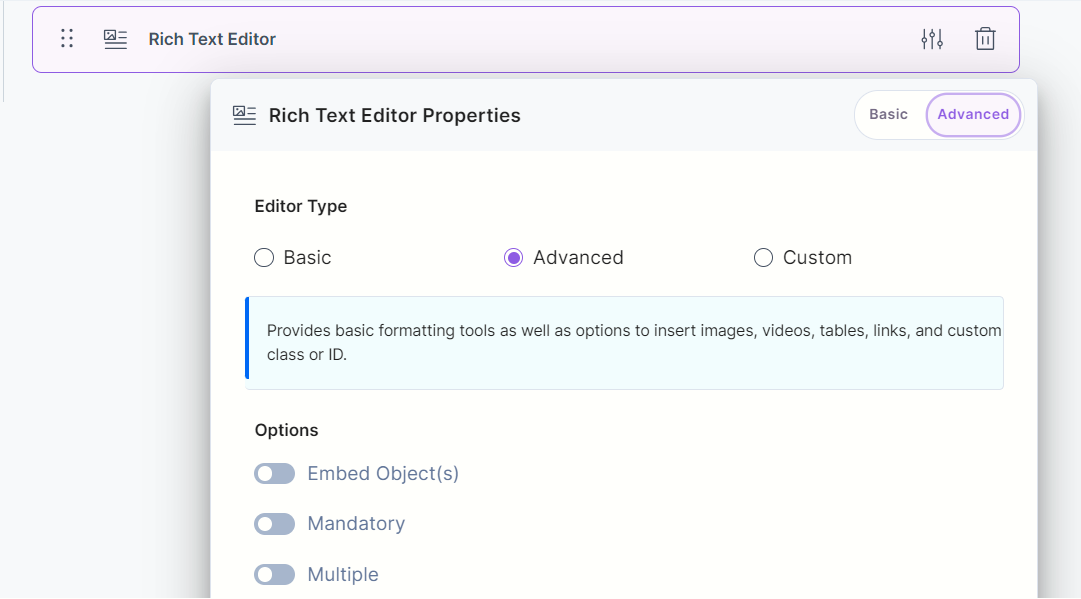
- Under Options, checkmark the Embed Object(s) option.
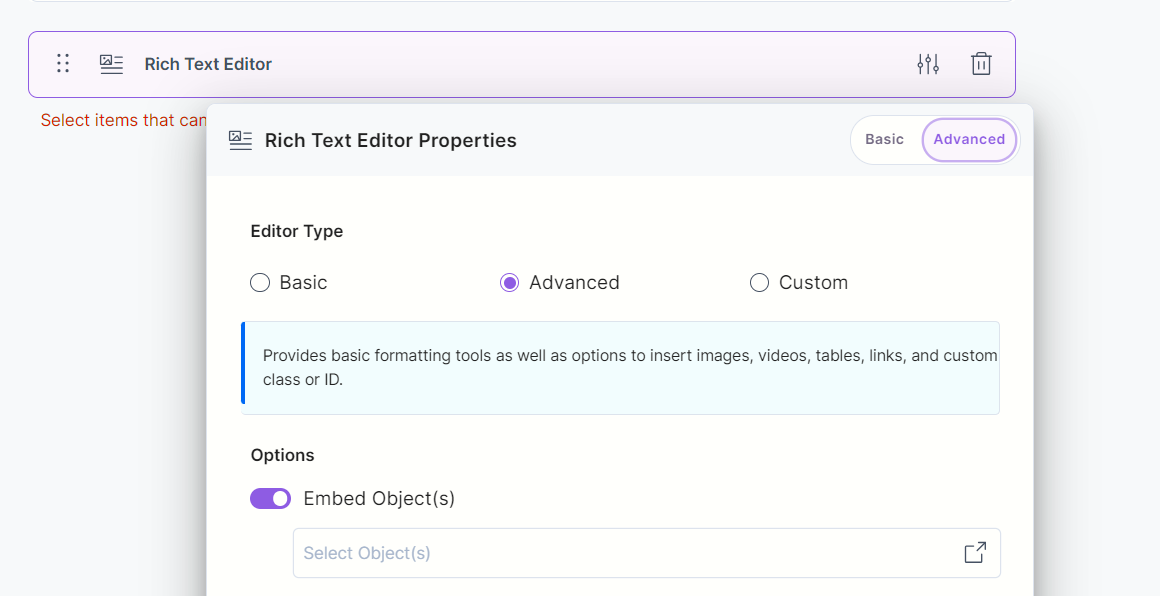
- Click the dropdown and from the resulting modal, checkmark the Embed Asset(s) option. Further, from the Content type section, select the content types of which you want to embed entries within the RTE field.
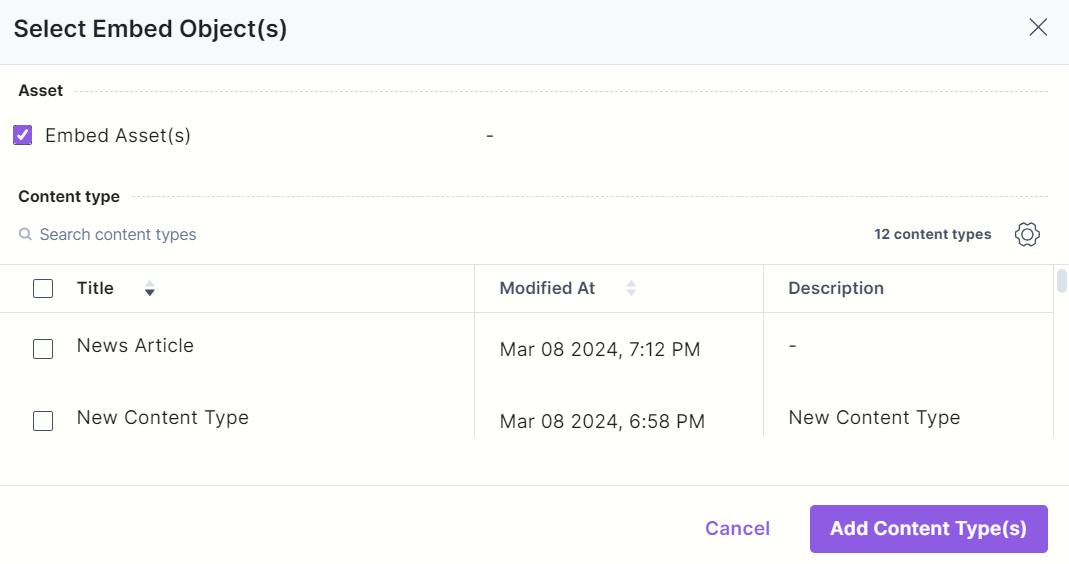
- Click Add Content Type(s).
- Click either Save or Save and Close button to save your content type.
Now when the Content Managers try to edit or create an entry within the selected content types, they will be able to see the Embed icon in the RTE. After embedding the asset in your HTML-based RTE, hover over the image and click the edit button to view, edit or delete the asset.
You can also embed items within your RTE using the Custom Editor type.
To do this, log in to your Contentstack account, add a Rich Text Editor (RTE) field to your content type, and perform the following steps:
- In the Properties window of the RTE field, go to the Advanced section and select Custom under Editor Type.
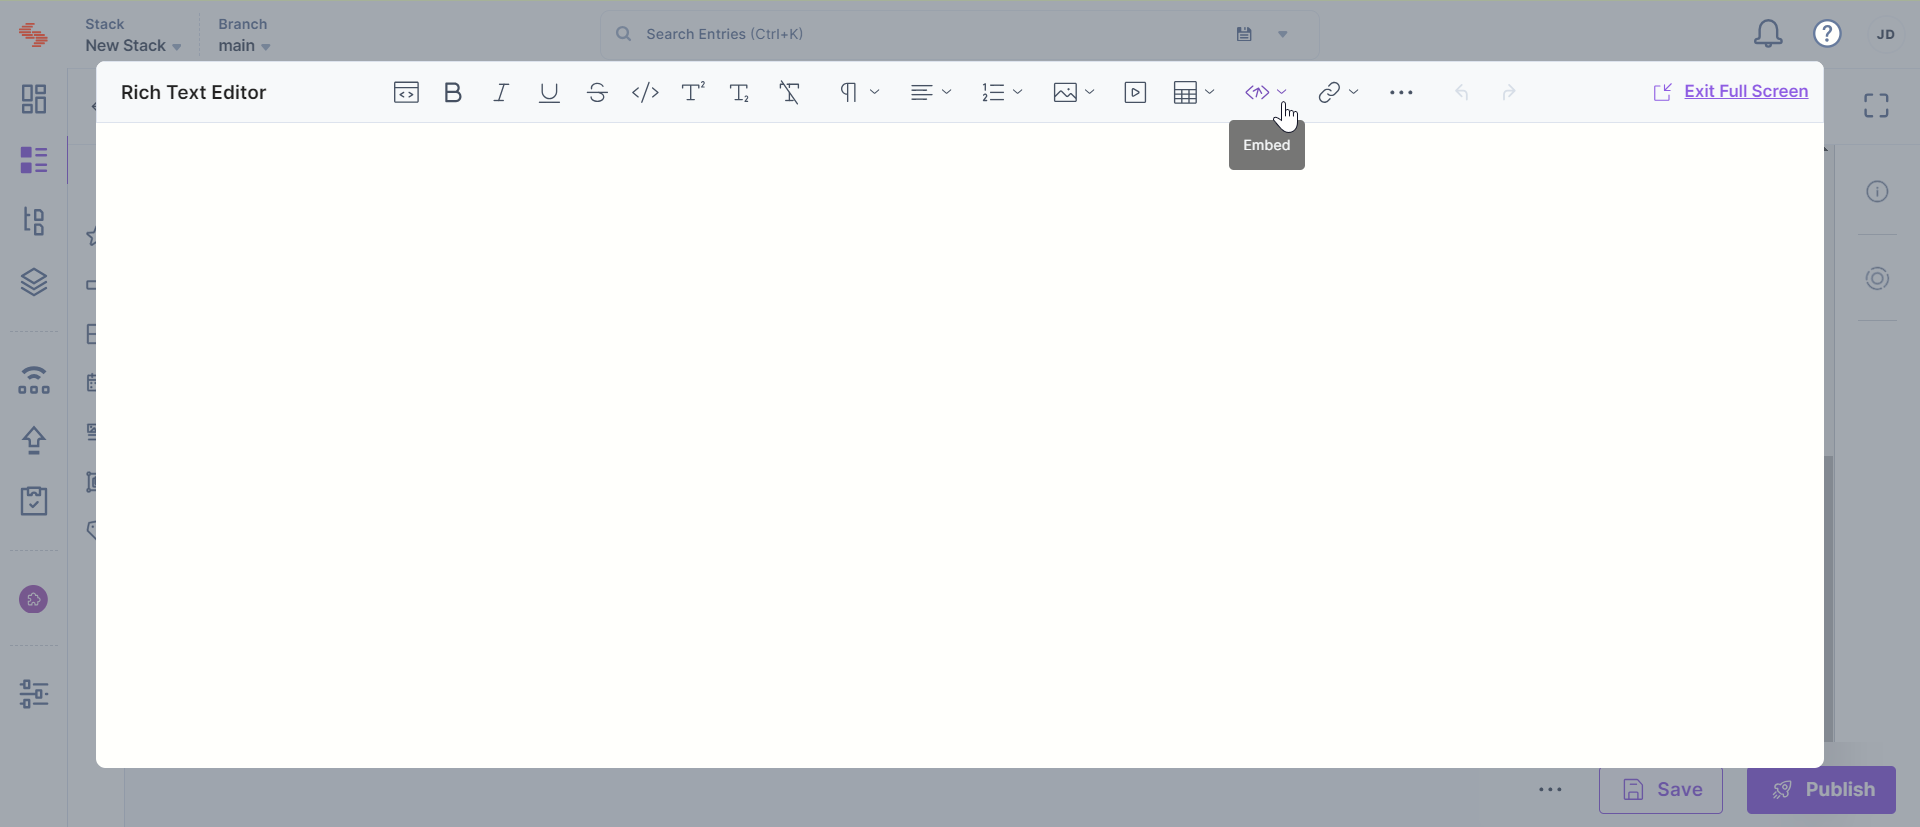
- Under Insert Object, select the “Embed” icon as displayed in the image below:
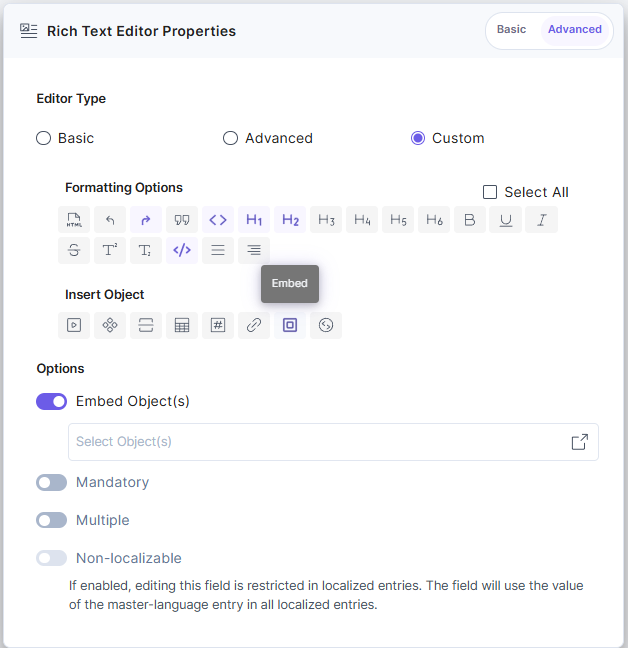
- Click the dropdown and from the resulting modal, checkmark the Embed Asset(s) option. Further, from the Content type section, select the content types of which you want to embed entries within the RTE field.
- Click Add Content Type(s).
- Click either Save or Save and Close button to save your content type.
Note: You can only embed entries within the Advanced and Custom type HTML-based Rich Text Editor. This option is not available for the Basic RTE.
Embed Entries as Block or Inline within the HTML-based RTE
To embed entries in your HTML-based Rich Text Editor, log in to your Contentstack account and perform the following steps:
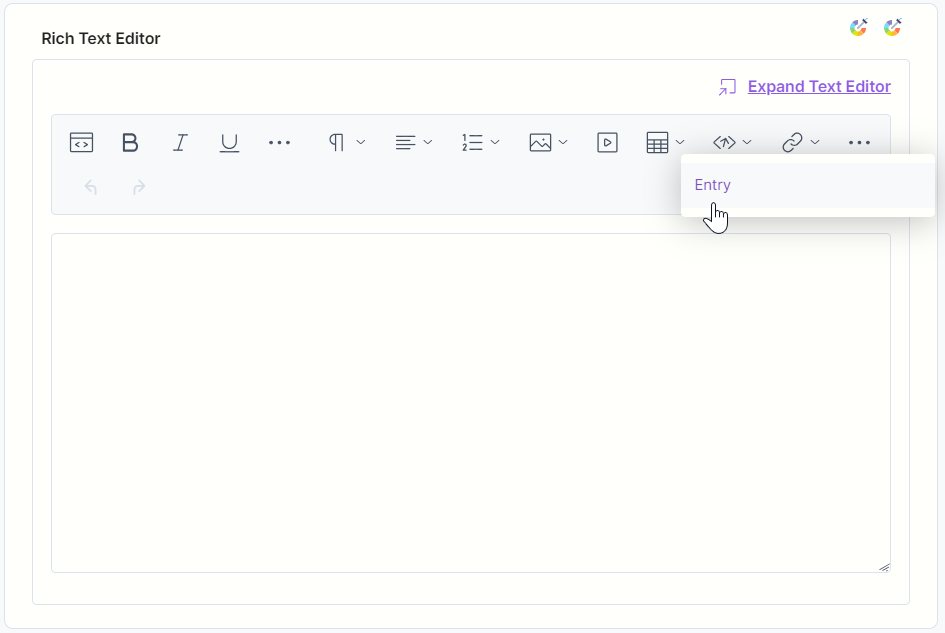
- Create an entry with the Content Type where you have enabled the Embed feature.
- In the RTE field, click the “Embed” icon and click Entry as displayed below:
- In the modal that opens up, select the content type of which you want to embed an entry from the dropdown.

- From the list of entries that appears, select the entry that you want to embed within the RTE.
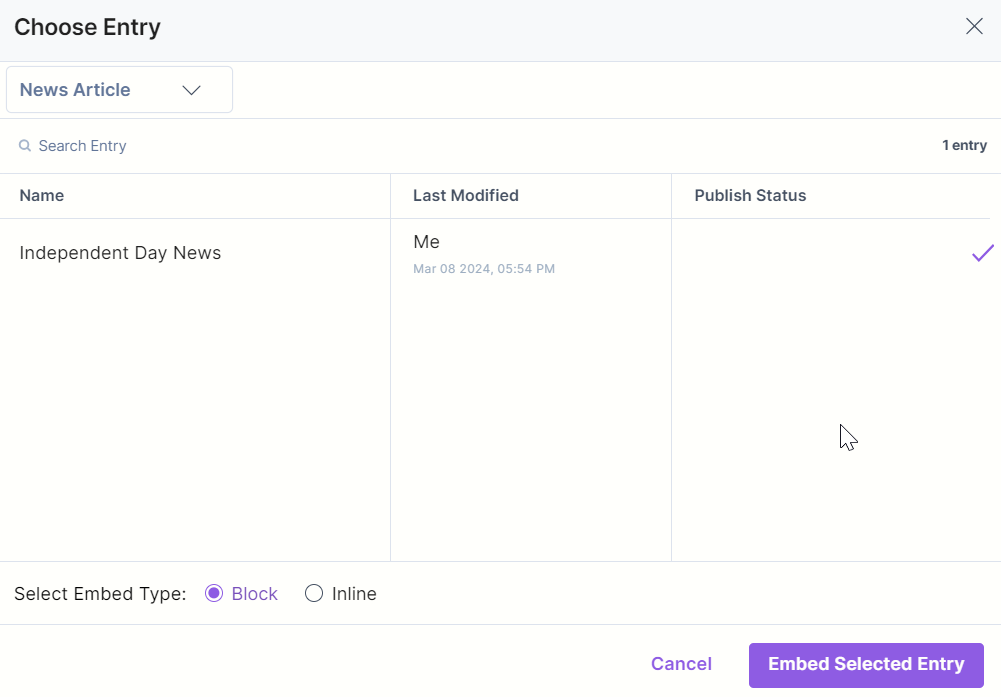
- Under Select Embed Type, you can select one of the following options:
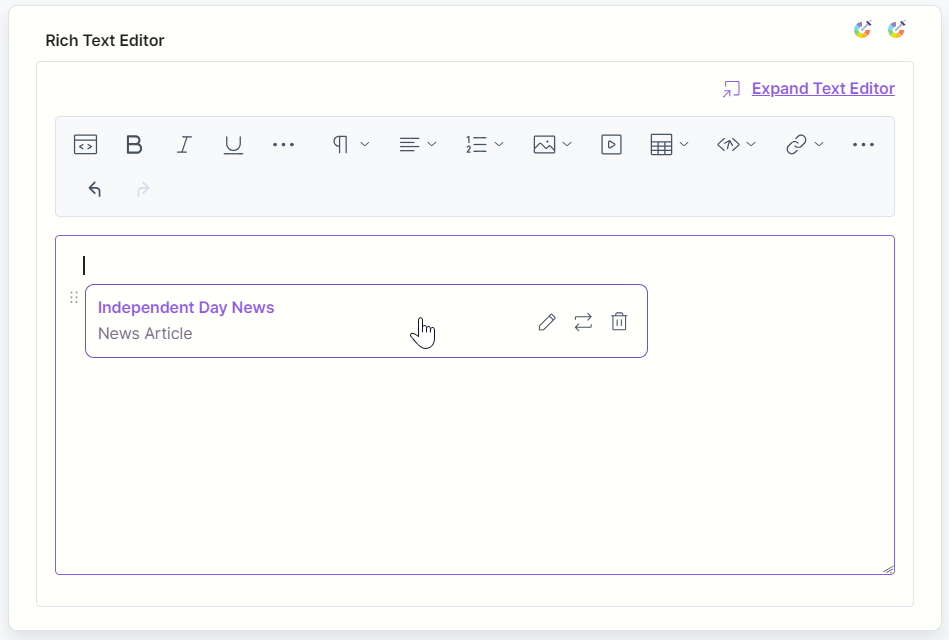
- Embed as Block: On selecting this option, the embedded entry will appear as a block. You will be able to enter text above or below such a block.
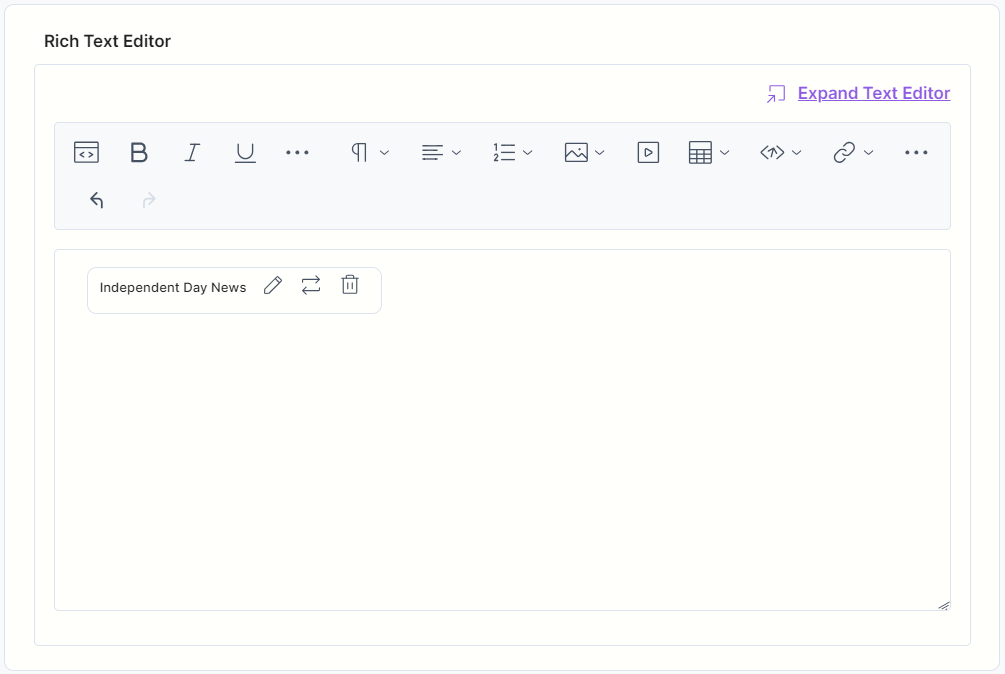
- Embed as Inline (a part of text): On selecting this option, the embedded entry will appear inline as part of the text. You will be able to enter your text before or after the embedded entry in the same paragraph.
- Embed as Block: On selecting this option, the embedded entry will appear as a block. You will be able to enter text above or below such a block.
Note: You can only embed a maximum of 100 objects (entries and assets combined) within the RTE at the same time.
Embed Entry as Hyperlink
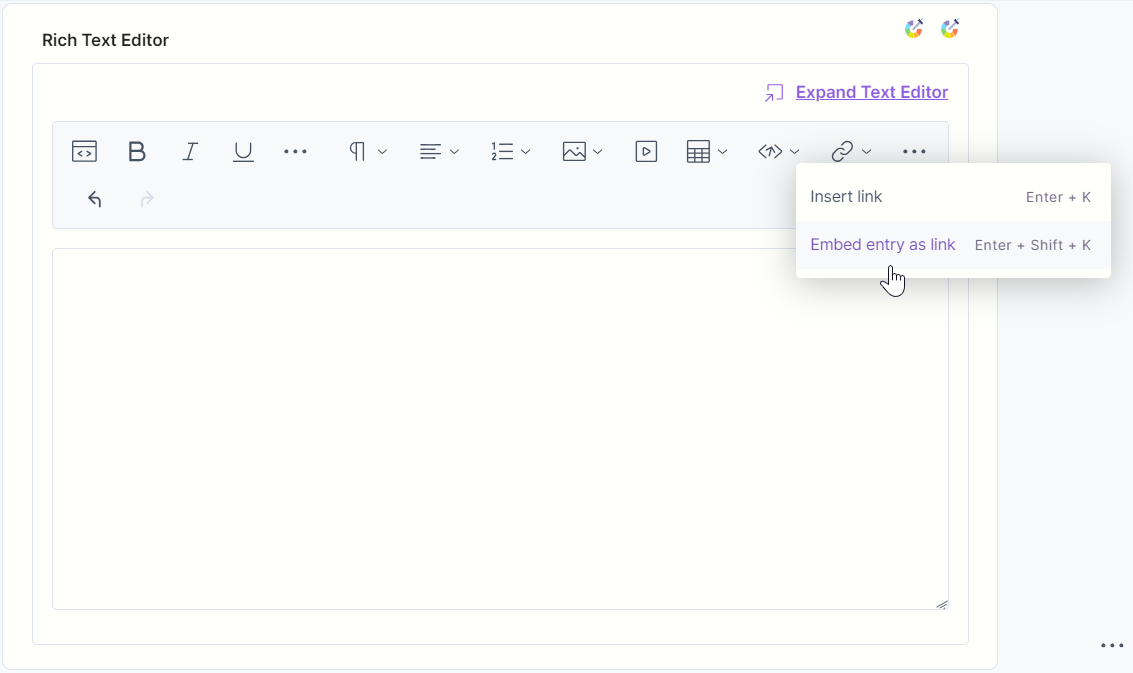
To embed an entry as a hyperlink inside the HTML-based RTE, you can perform the following steps:
- Go to the content type where you have enabled the Link option and open an entry.
- In the RTE field, click the “Link” icon and click Embed entry as link.
- In the modal that opens up, select the content type of which you want to embed an entry from the dropdown.
- From the list of entries that appears, select the entry that you want to embed within the RTE as a hyperlink.
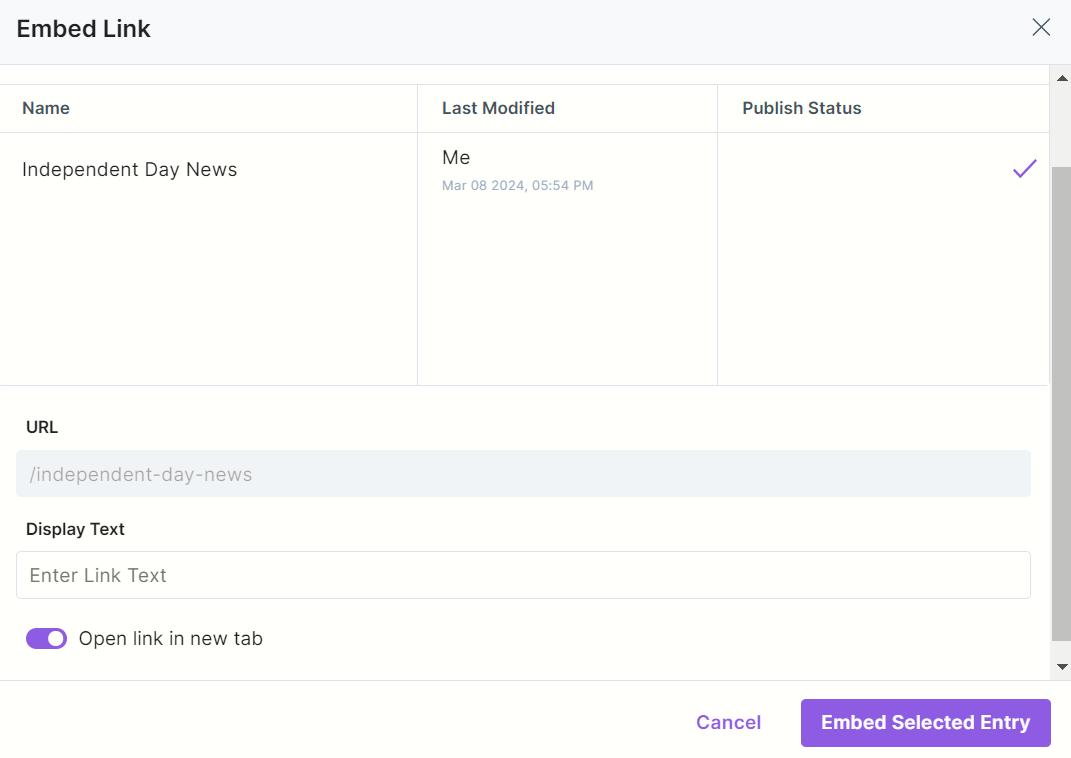
- Enter appropriate anchor text for the hyperlinked entry, check the Open link in new Tab option if required, and click Embed Selected Entry.
Note: If you've inserted the link of a child entry within a parent entry in the Master language and later decide to localize the parent entry, you'll need to update the embedded link manually in the localized version as well.
For instance, if you've linked the "Blog" entry in English within the "Home" entry in English, and subsequently localize the "Home" entry into Arabic, you'll need to manually update the URL for the embedded "Blog" entry to the Arabic version.
Embed Assets in the HTML-based RTE
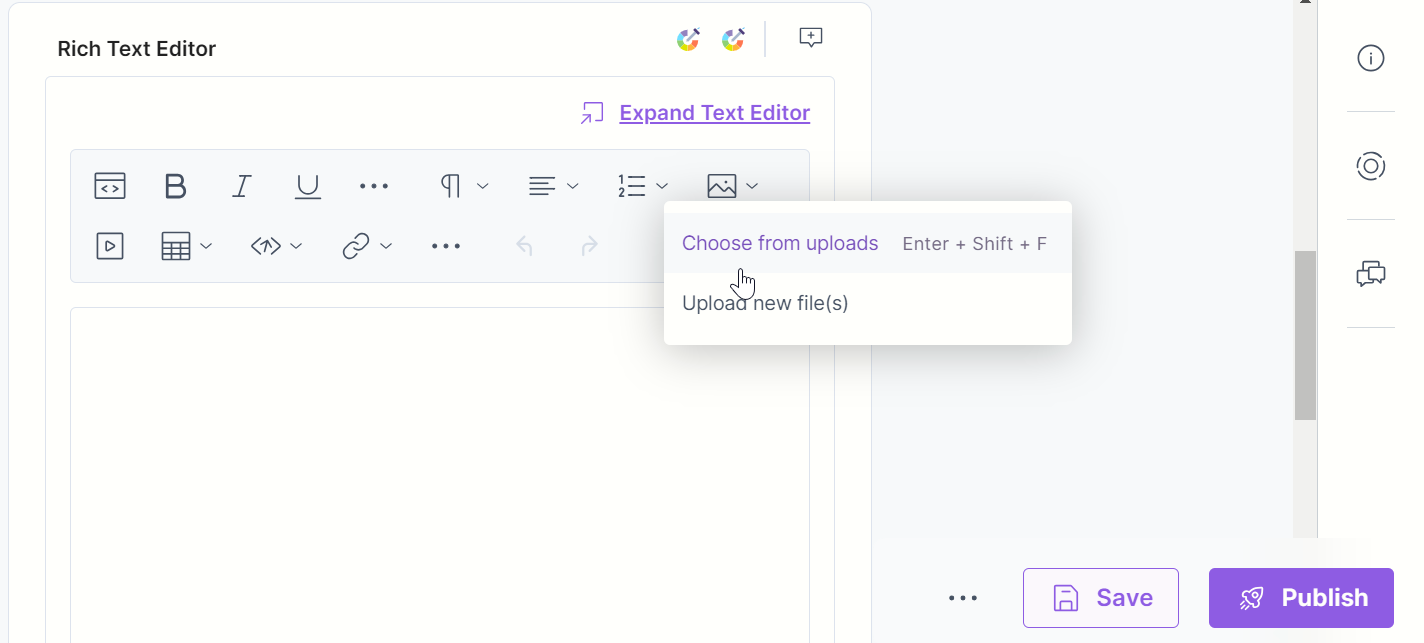
To embed assets in your HTML-based Rich Text Editor field, log in to your Contentstack account and perform the following steps:
- Go to the content type where you have enabled the Embed feature and open an entry.
- In the RTE field, click the “Image” icon and click one of the options as displayed below:
- In the modal that opens up, you can search for a specific asset or select from the displayed list as shown below:
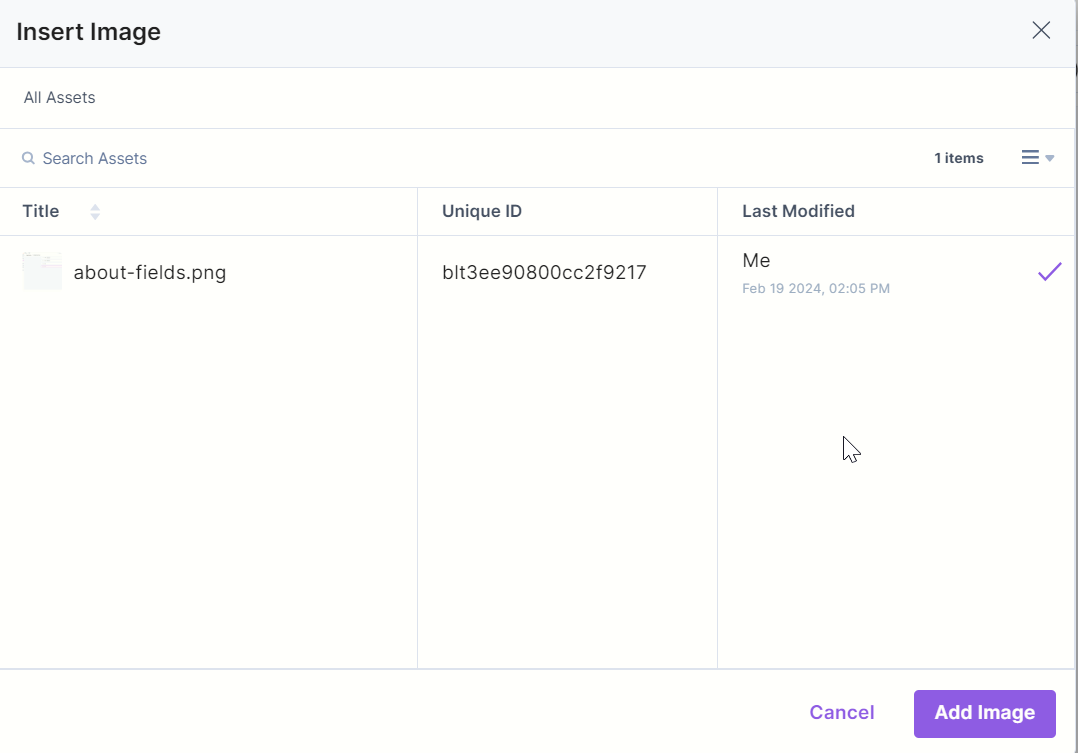
- Click the Add Image button to add the asset within the RTE.
Note: You can only embed a maximum of 100 objects (entries and assets combined) within the RTE at the same time.
Limitations of Embedded Entries and Assets
- At any given time, a combined total of 100 entries and assets can be embedded inside a single RTE field.
- By default, a maximum of 10 content types can be selected for a Single RTE as a reference. This count also includes embedded assets. This means, if you have 1 asset embedded in the RTE, you can add 9 more referenced content types. This however can be increased by configuring your plan.
- Any references within the embedded entry will not be resolved.
Embedded Entries and Assets within HTML-based RTE FAQs
- What is it?
Ability to embed inline, block, and hyperlinked entries/assets within the flow of text in the rich text editor. It is useful when developing content inside the rich text editor that references other entries. If the referred image or asset changes, the content inside the RTE will change when the user re-publishes, e.g., dynamic linking. - How can I use the “Embedded entries or assets within RTE” feature for my stack?
This feature is available only if it is part of your plan. To avail of this feature, you can get in touch with our Support team. - Can I embed entries or assets inside any Rich Text Editor?
No, the “Embedded entries or assets within RTE” feature is only available for Rich Text Editors of type “Advanced” and “Custom.” Basic RTEs do not support this feature. Learn how to enable embedded entries and assets within the RTE. - Do we count embedded entries or assets placed within the RTE as fields of the content type schema?
No, we do not count embedded entries or assets while determining the total field count for content type. We only take into account the parent RTE field. - How can I fetch embedded entries/assets (placed inside the “Rich Text Editor” (RTE) field) and display them on my frontend application?
You need to use the “Utils SDK” of our SDKs to render embedded entries and assets using the Contentstack SDKs. - When exactly do I embed an entry as inline?
When you need to render content that can be dynamically updated from time to time while being placed within the text flow, you can embed an entry inline. Use the inline style when rendering a webpage link that opens up a modal or displaying only the title of another entry within the text flow. - When exactly do I embed an entry as a separate block?
When you need to render the entire contents of another entry within the RTE, you can embed the concerned entry as a separate block. Use the block style when displaying an interactive form that collects user data or displaying an image gallery for your ecommerce website. - Does an embedded entry or asset on my website get modified if I make changes to the original file?
Yes. When you make changes to the source file (entry or asset), the changes are dynamically reflected on your website. When you request the updated item, the API returns the latest version of the embedded object. - What is the difference between an embedded asset and an asset added to the RTE through the asset manager?
Assets added through Contentstack’s asset manager are static. They do not dynamically reflect any changes made to the asset across all the related RTEs.
Conversely, assets embedded within the RTE are similar to the Reference field. Once you update them from the asset manager, they automatically get updated throughout all the RTEs that refer to them. - What is the difference between an embedded entry hyperlink and a normal entry hyperlink within the RTE?
A hyperlink of an entry remains static, while a dynamic embedded hyperlink of an entry changes whenever you make any changes to the source entry’s webpage link. You can avoid the manual effort required to change the link across every content type. - If I update and publish an asset from the asset manager, will the live entry that refers to the updated asset also get updated automatically with the latest asset version?
Yes, when you publish the updated asset, the older published version gets purged from the cache. When a new request hits the server for the asset, the latest version shows up on your website in real-time.Note: This real-time update of frontend items works the same for embedded entries.
- Can I publish an embedded entry along with its references?
Yes, you can publish an embedded entry along with its references. However, Contentstack only resolves referenced entries that lie up to one level deep when publishing embedded entries and their references. - Do embedded entries follow the fallback logic?
Yes, embedded entries follow the fallback logic. For example, when an embedded entry (hyperlink, inline, or block) is not published in a specific language, you can fetch content from its fallback language (only if it is published) in the same Content Delivery API request. - Does this have GraphQL support?
We only supporting this feature via REST API. GraphQL support for embedded entries will be available via our new JSON-based Rich Text Editor. You can refer to the following API requests to learn how to fetch embedded entries or assets:
Social Embeds
Social embedding refers to the process of incorporating social media posts into your webpage. This process enhances your website's content by offering you interactive and easily shareable social media content.
With the Social Embeds feature, you can embed your social media links within the HTML RTE.
To embed a link within your HTML RTE, log in to your Contentstack Account and follow the steps below:
- Go to your stack and open an entry where you want to embed your social content.
- Within the HTML RTE field, click the Social Embeds icon.
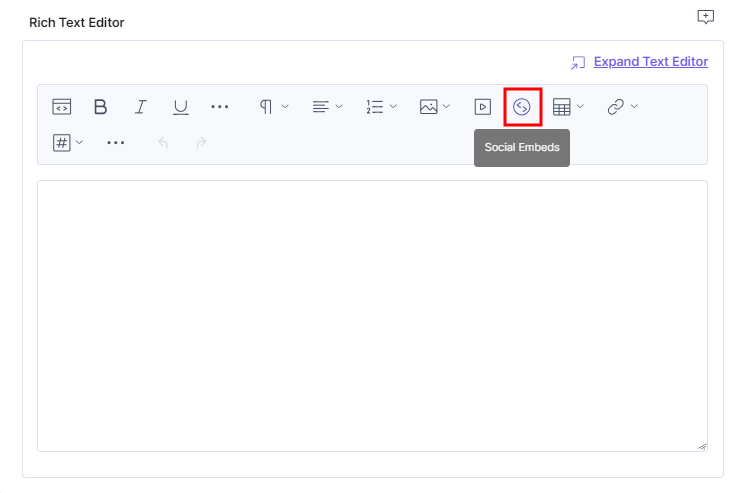
- In the Social Embeds modal that appears, paste the URL or embed code from social media and click the Add button to embed your social content within the editor.
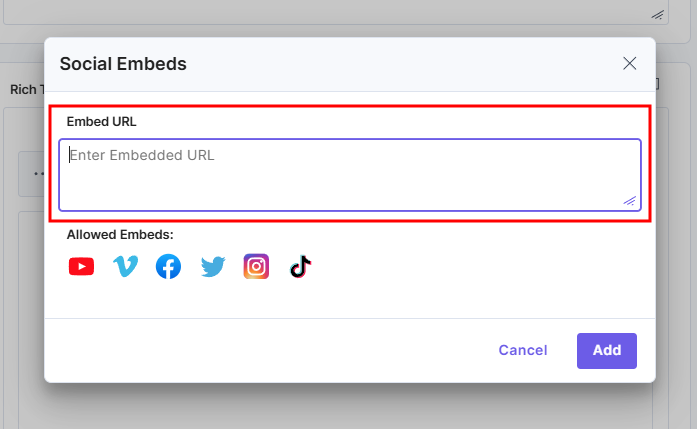
Note: You can use any shareable link from the list of allowed embeds that you see below the Social Embeds modal.
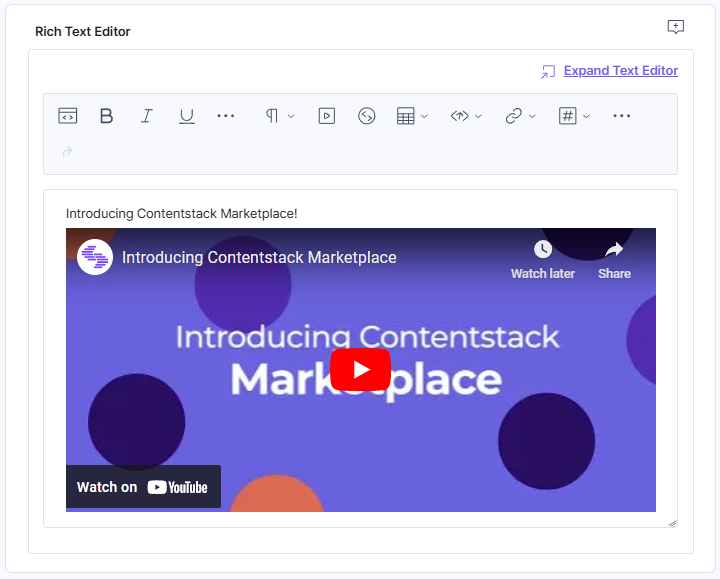
Your embedded content should look as follows:
Note: Contentstack supports embedding content from YouTube, Vimeo, Facebook, Twitter, Instagram, and TikTok only.
Indentation and Outdentation in HTML-based RTE
Indentation allows you to visually offset blocks of content in the HTML-based Rich Text Editor (RTE) to improve readability and content structure. You can indent or outdent supported content using toolbar icons or keyboard shortcuts.
Indentation is supported for the following elements:
- Paragraphs
- Headings
- Inline-formatted content within paragraphs (e.g., links, inline code, superscript, and subscript)
Note: Indentation is not supported for tables or entire lists. Lists follow standard nesting behavior.
You can indent or outdent content using the Indent and Outdent icons in the toolbar or use the keyboard shortcut Tab for Indent and Shift+Tab for Outdent.
Note:
- You can apply indentation at any point in a block.
- Each indent level increases the left margin by ~30px.
- You can apply indentation up to a maximum of 20 levels.
- The drag-and-drop (DND) handle moves with the indented block.
- When using keyboard shortcuts, indentation and outdentation work only when the cursor is at the beginning of a block.
- In tables, pressing Tab moves the cursor to the next cell.
Limitations for HTML-based RTE
- Malicious content will be removed from the <a>, <b>, <i>, <img>, <svg>, and <details> tags. For example, any JavaScript code within the href attribute of <a> tag will no longer be visible. You can recover this code from previous versions of the entry by referring to the Compare Entry Versions document.
- All event listeners such as onload, onerror, ontoggle, onwheel, onmouseover, oncopy, etc. attached to any tags will be removed to prevent XSS attacks.
Indentation is disabled if text alignment (left, center, right, justify) is applied.
- Alignment options are disabled for indented blocks.
- Tables and their contents cannot be indented.
- Converting indented blocks into lists removes the indentation and reverts the list to the root level.
- Indentation metadata is preserved when rendering content through SDKs.
HTML-based RTE Shortcut Keys
| Windows | Mac | |
|---|---|---|
| Bold | CTRL + B | ⌘ + B |
| Italic | CTRL + I | ⌘ + I |
| Underline | CTRL + U | ⌘ + U |
| Strikethrough | CTRL + SHIFT + X | ⌘ + SHIFT + X |
| Inline Code | CTRL + E | ⌘ + E |
| Superscript | CTRL + . | ⌘ + . |
| Subscript | CTRL + , | ⌘ + , |
| Remove Formatting | CTRL + \ | ⌘ + \ |
| Normal (Paragraph) | CTRL + ALT + 0 | ⌘ + OPTION + 0 |
| Heading 1 | CTRL + ALT + 1 | ⌘ + OPTION + 1 |
| Heading 2 | CTRL + ALT + 2 | ⌘ + OPTION + 2 |
| Heading 3 | CTRL + ALT + 3 | ⌘ + OPTION + 3 |
| Heading 4 | CTRL + ALT + 4 | ⌘ + OPTION + 4 |
| Heading 5 | CTRL + ALT + 5 | ⌘ + OPTION + 5 |
| Heading 6 | CTRL + ALT + 6 | ⌘ + OPTION + 6 |
| Block Quote | CTRL + ALT + 7 | ⌘ + OPTION + 7 |
| Code Snippet | CTRL + ALT + 8 | ⌘ + OPTION + 8 |
| Left | CTRL + ALT + L | ⌘ + CTRL + L |
| Center | CTRL + ALT + E | ⌘ + CTRL + E |
| Right | CTRL + ALT + R | ⌘ + CTRL + R |
| Justify | CTRL + ALT + J | ⌘ + CTRL + J |
| Indent | TAB | TAB |
| Outdent | SHIFT + TAB | SHIFT + TAB |
| Ordered List | CTRL + SHIFT + 7 | ⌘ + SHIFT + 7 |
| Unordered List | CTRL + SHIFT + 8 | ⌘ + SHIFT + 8 |
| Choose from Uploads | CTRL + SHIFT + F | ⌘ + SHIFT + F |
| Insert Table | CTRL + ALT + SHIFT + T | ⌘ + OPT + SHIFT + T |
| Link | CTRL + K | ⌘ + K |
| Add Properties | CTRL + SHIFT + P | ⌘ + SHIFT + P |
| Divider | CTRL + H | ⌘ + H |
| Undo | CTRL + Z | ⌘ + Z |
| Redo | CTRL + Y SHIFT + CTRL + Z | ⌘ + Y SHIFT + ⌘ + Z |
More articles in "Fields"
